Fulton Sweater Blazer

IMG_8262

I was immediately intrigued when Alina posted a sneak peak of the Fulton Sweater Blazer on Instagram a couple weeks ago. I’ve been admiring a J. Crew sweater blazer for at least two months now but wasn’t about to spend $150 on something I knew I could make (and might actually fit well)!

IMG-2437

IMG_8246

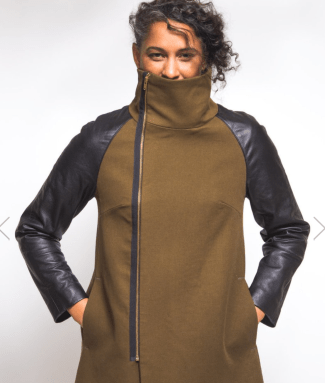
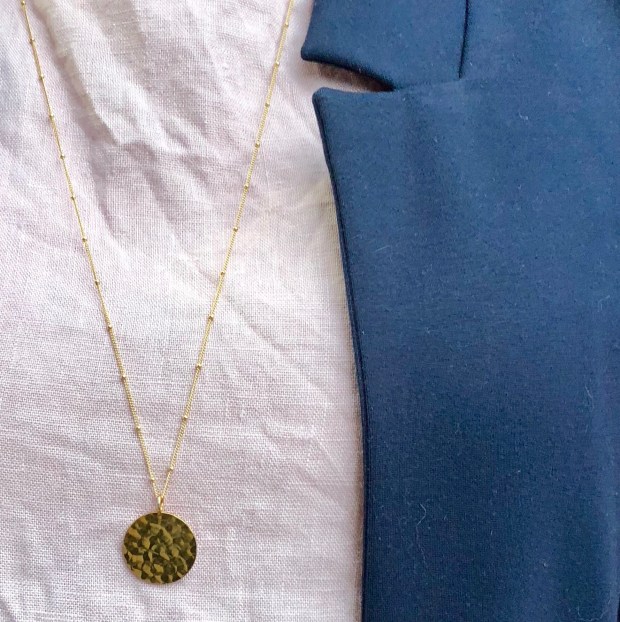
“The Fulton Sweater Blazer is an open-front knit jacket with a slimming relaxed fit. Polished, yet comfortable, this layering piece will instantly escalate casual outfits while adding a layer of warmth as you transition to and from seasons.” I think the hardest part of this pattern is choosing the correct fabric. The pattern calls for a stable knit with minimal vertical stretch. You want something somewhat weighty for warmth and drape but not too thick because the collar will be a challenge with a super thick fabric.

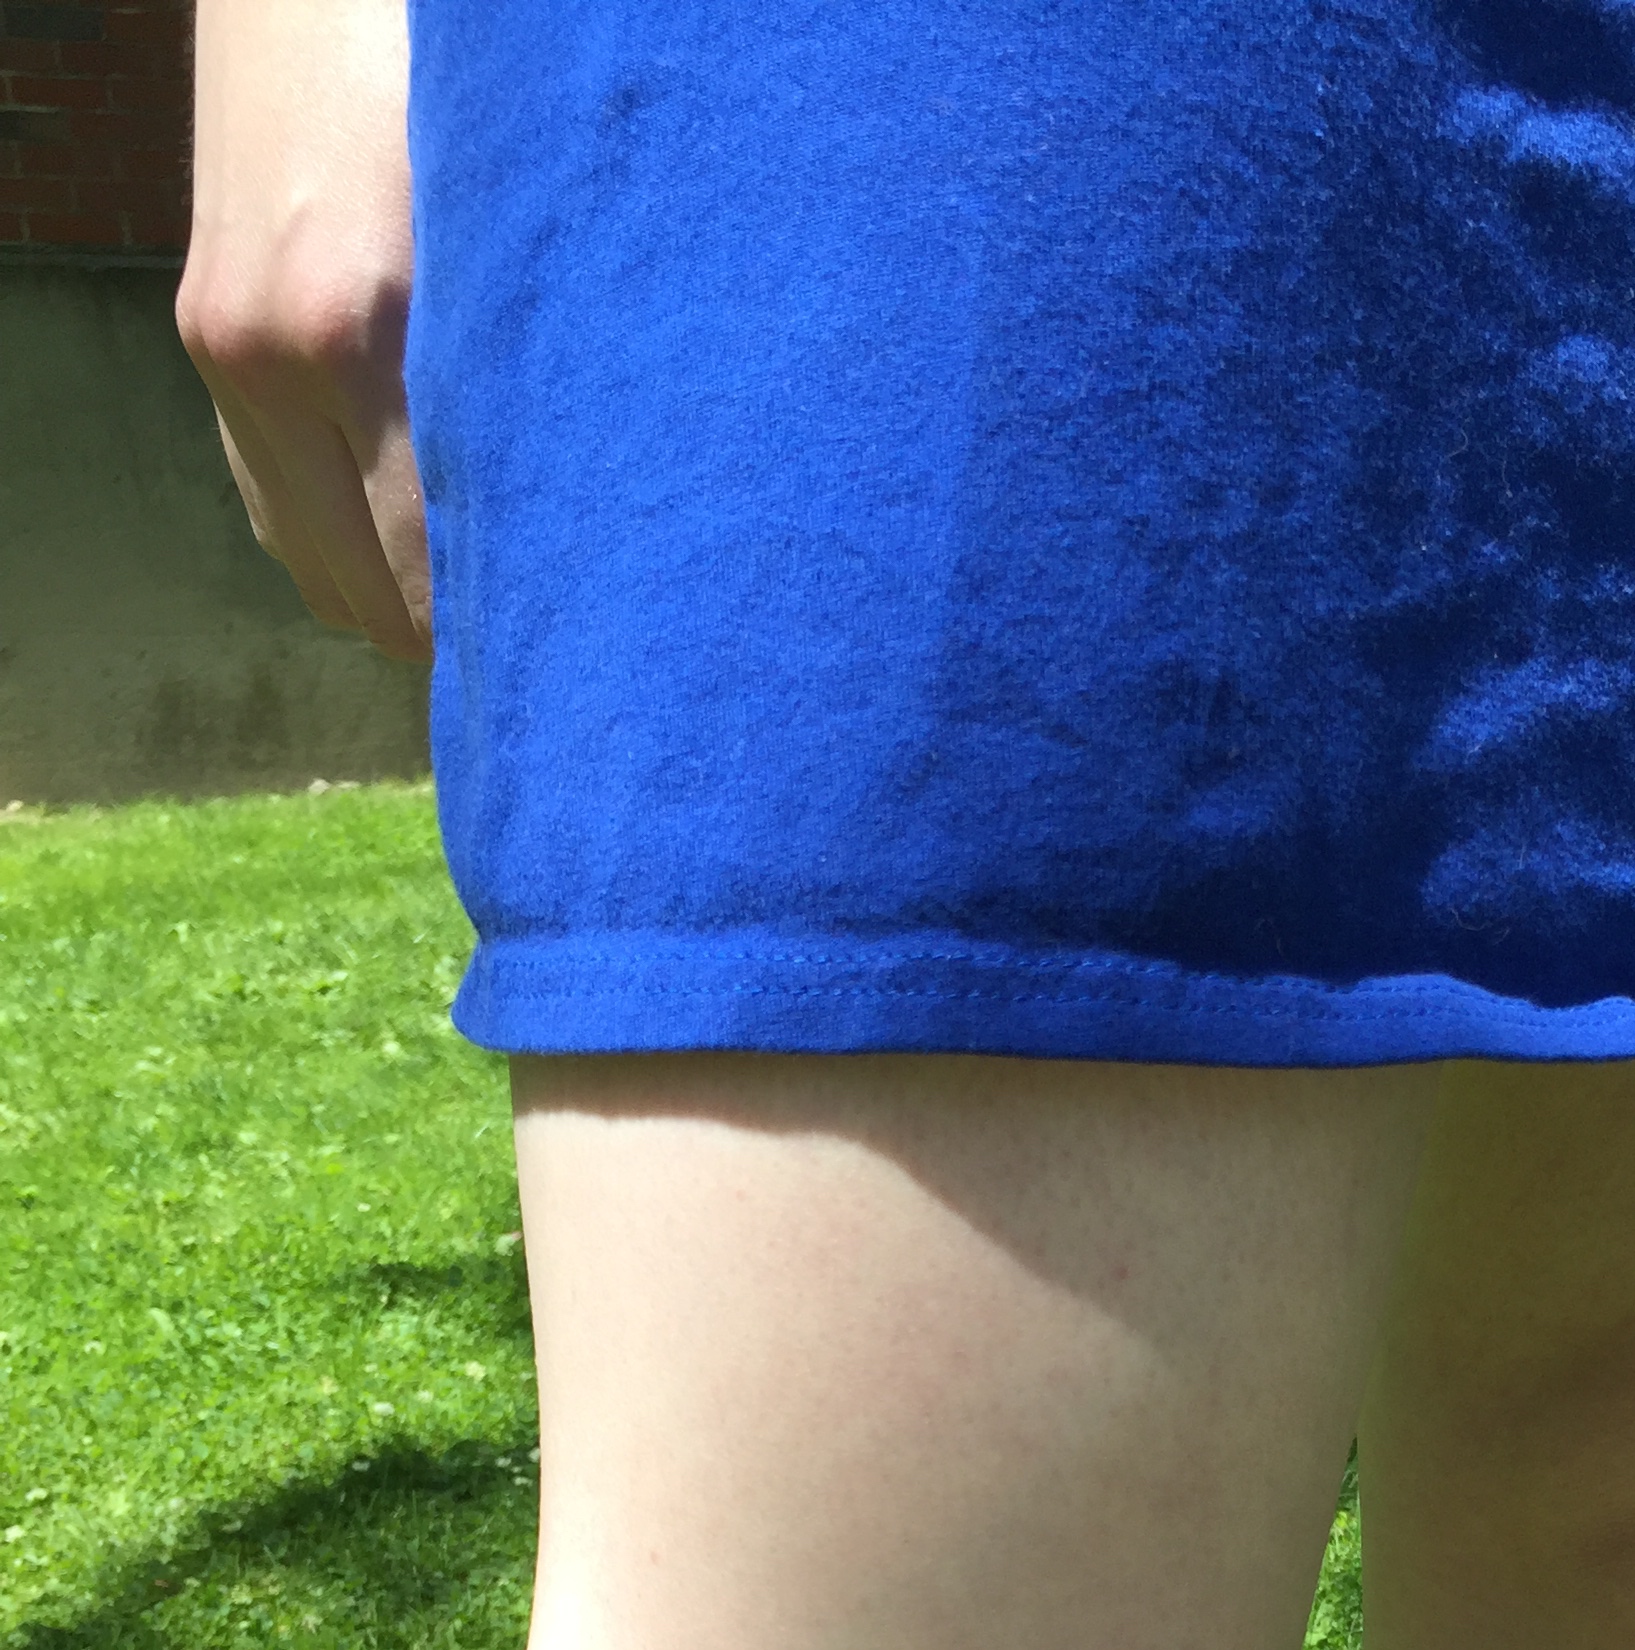
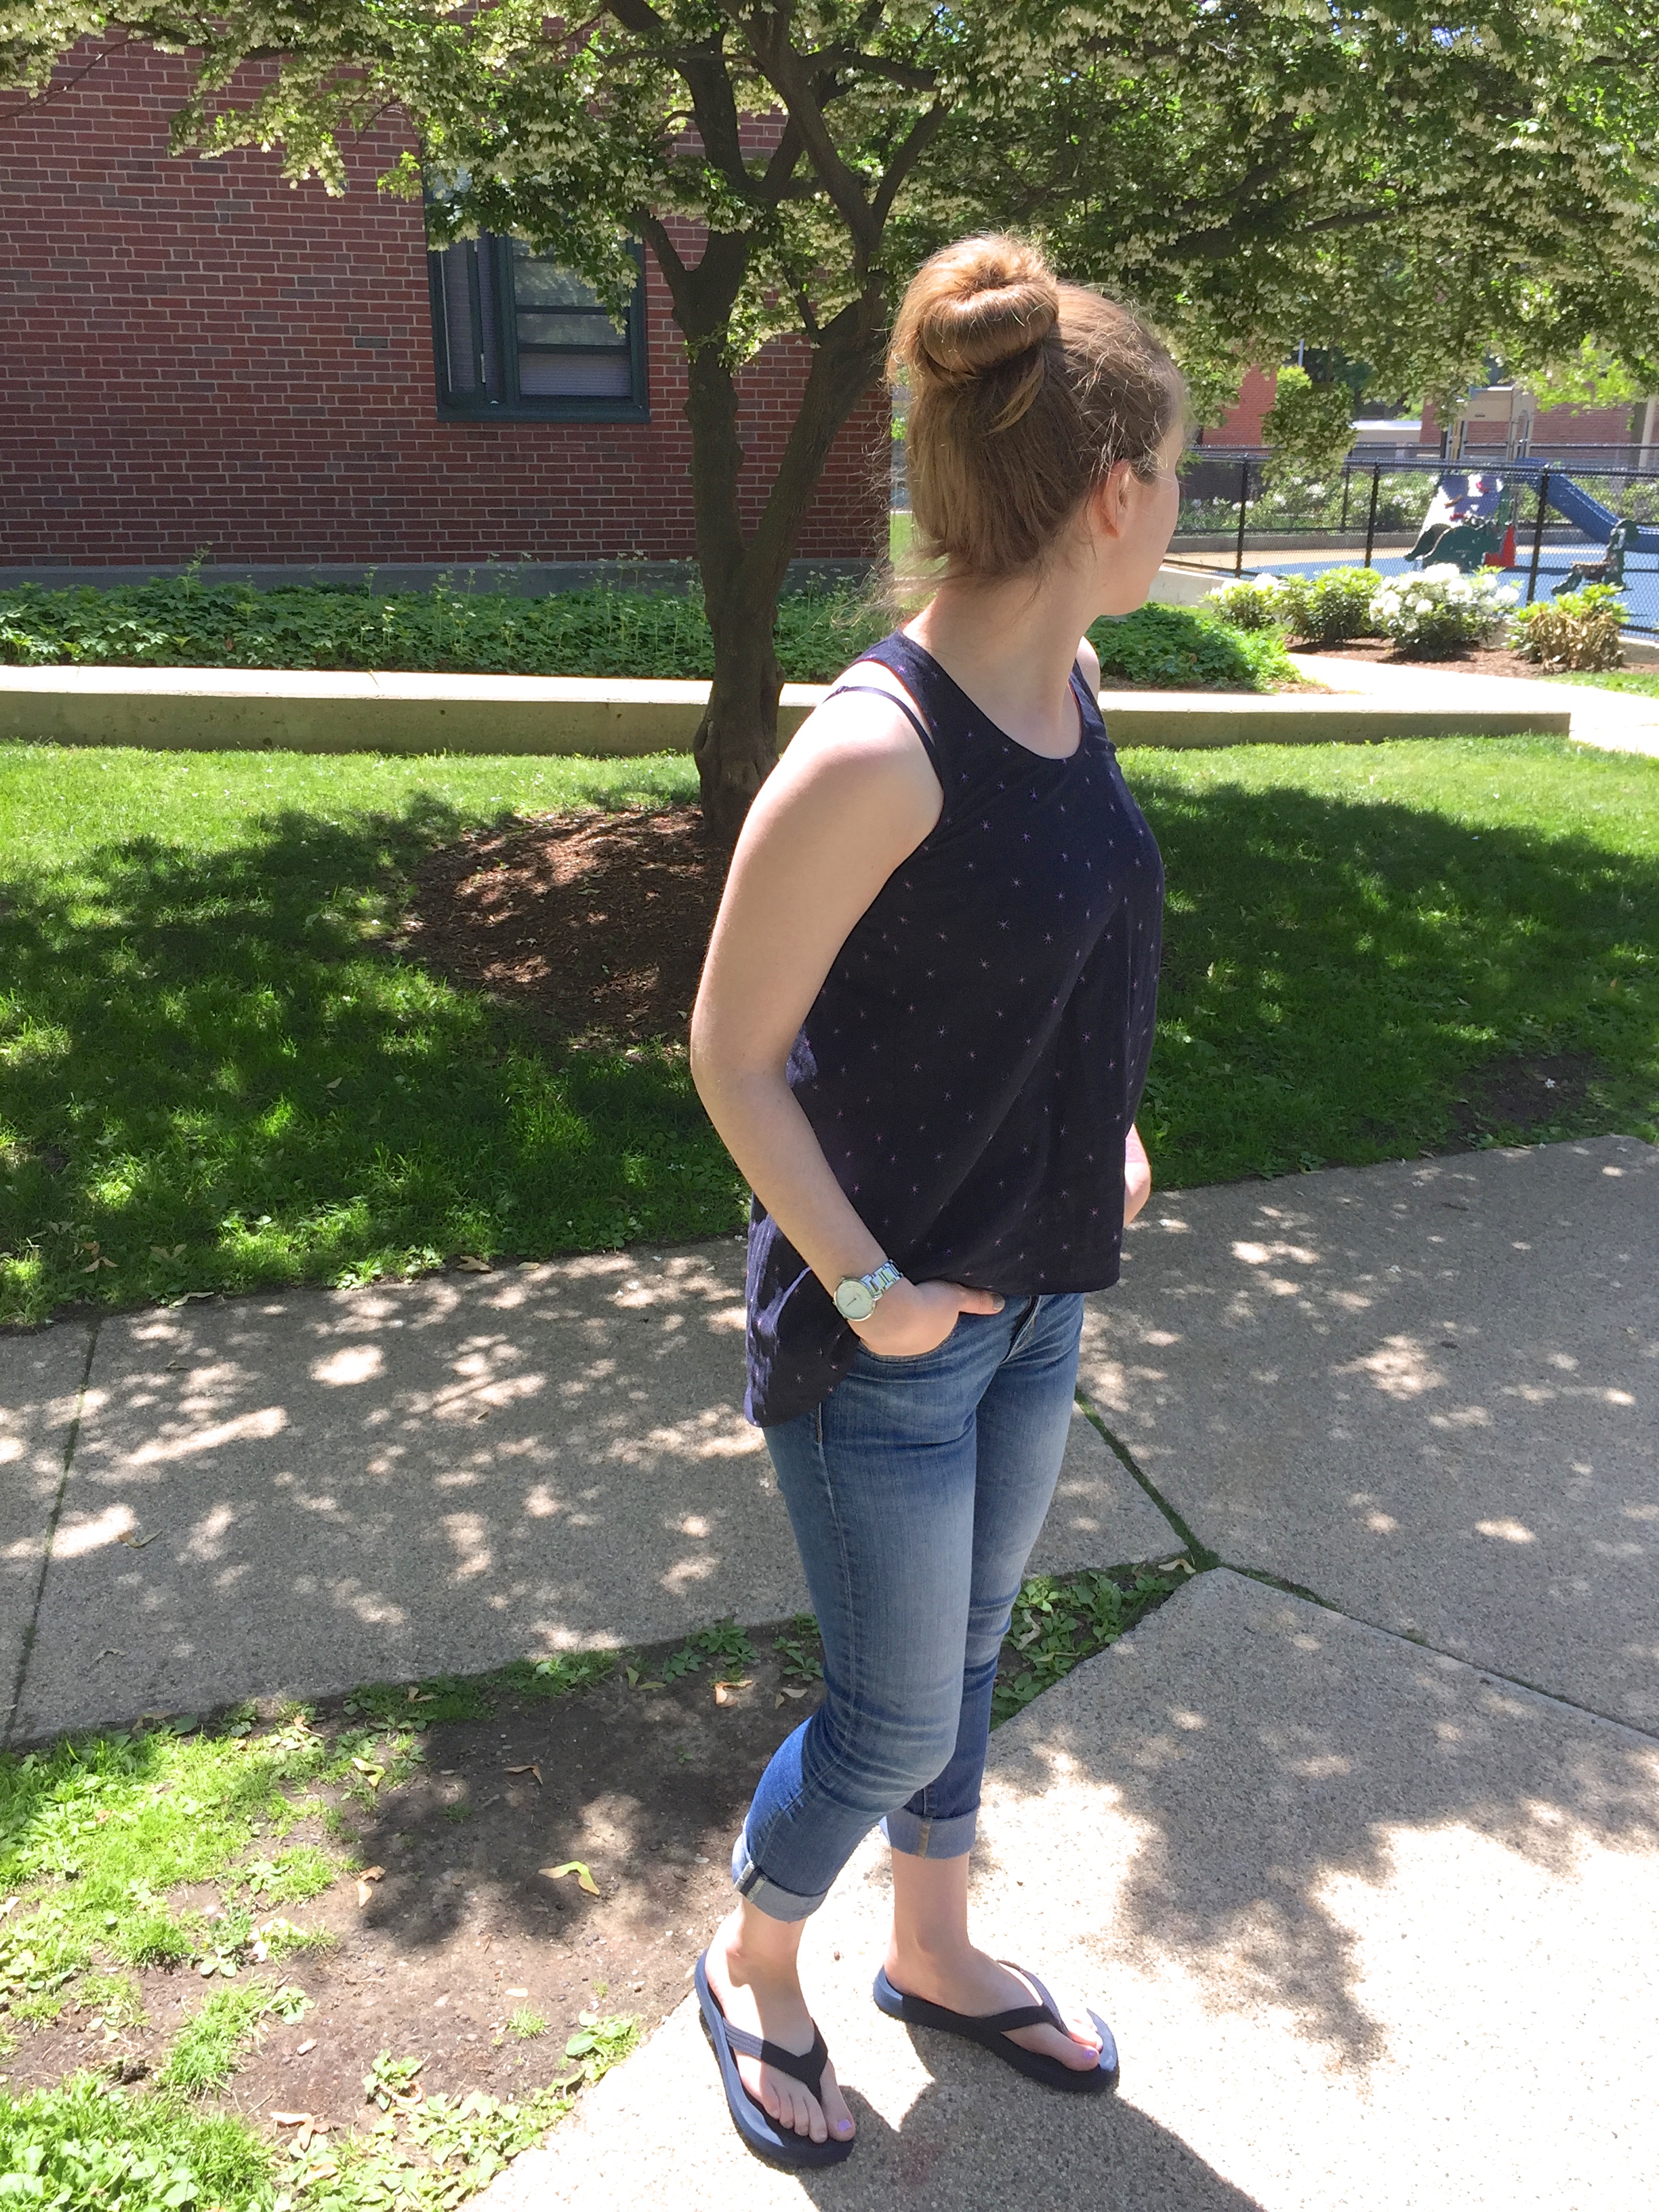
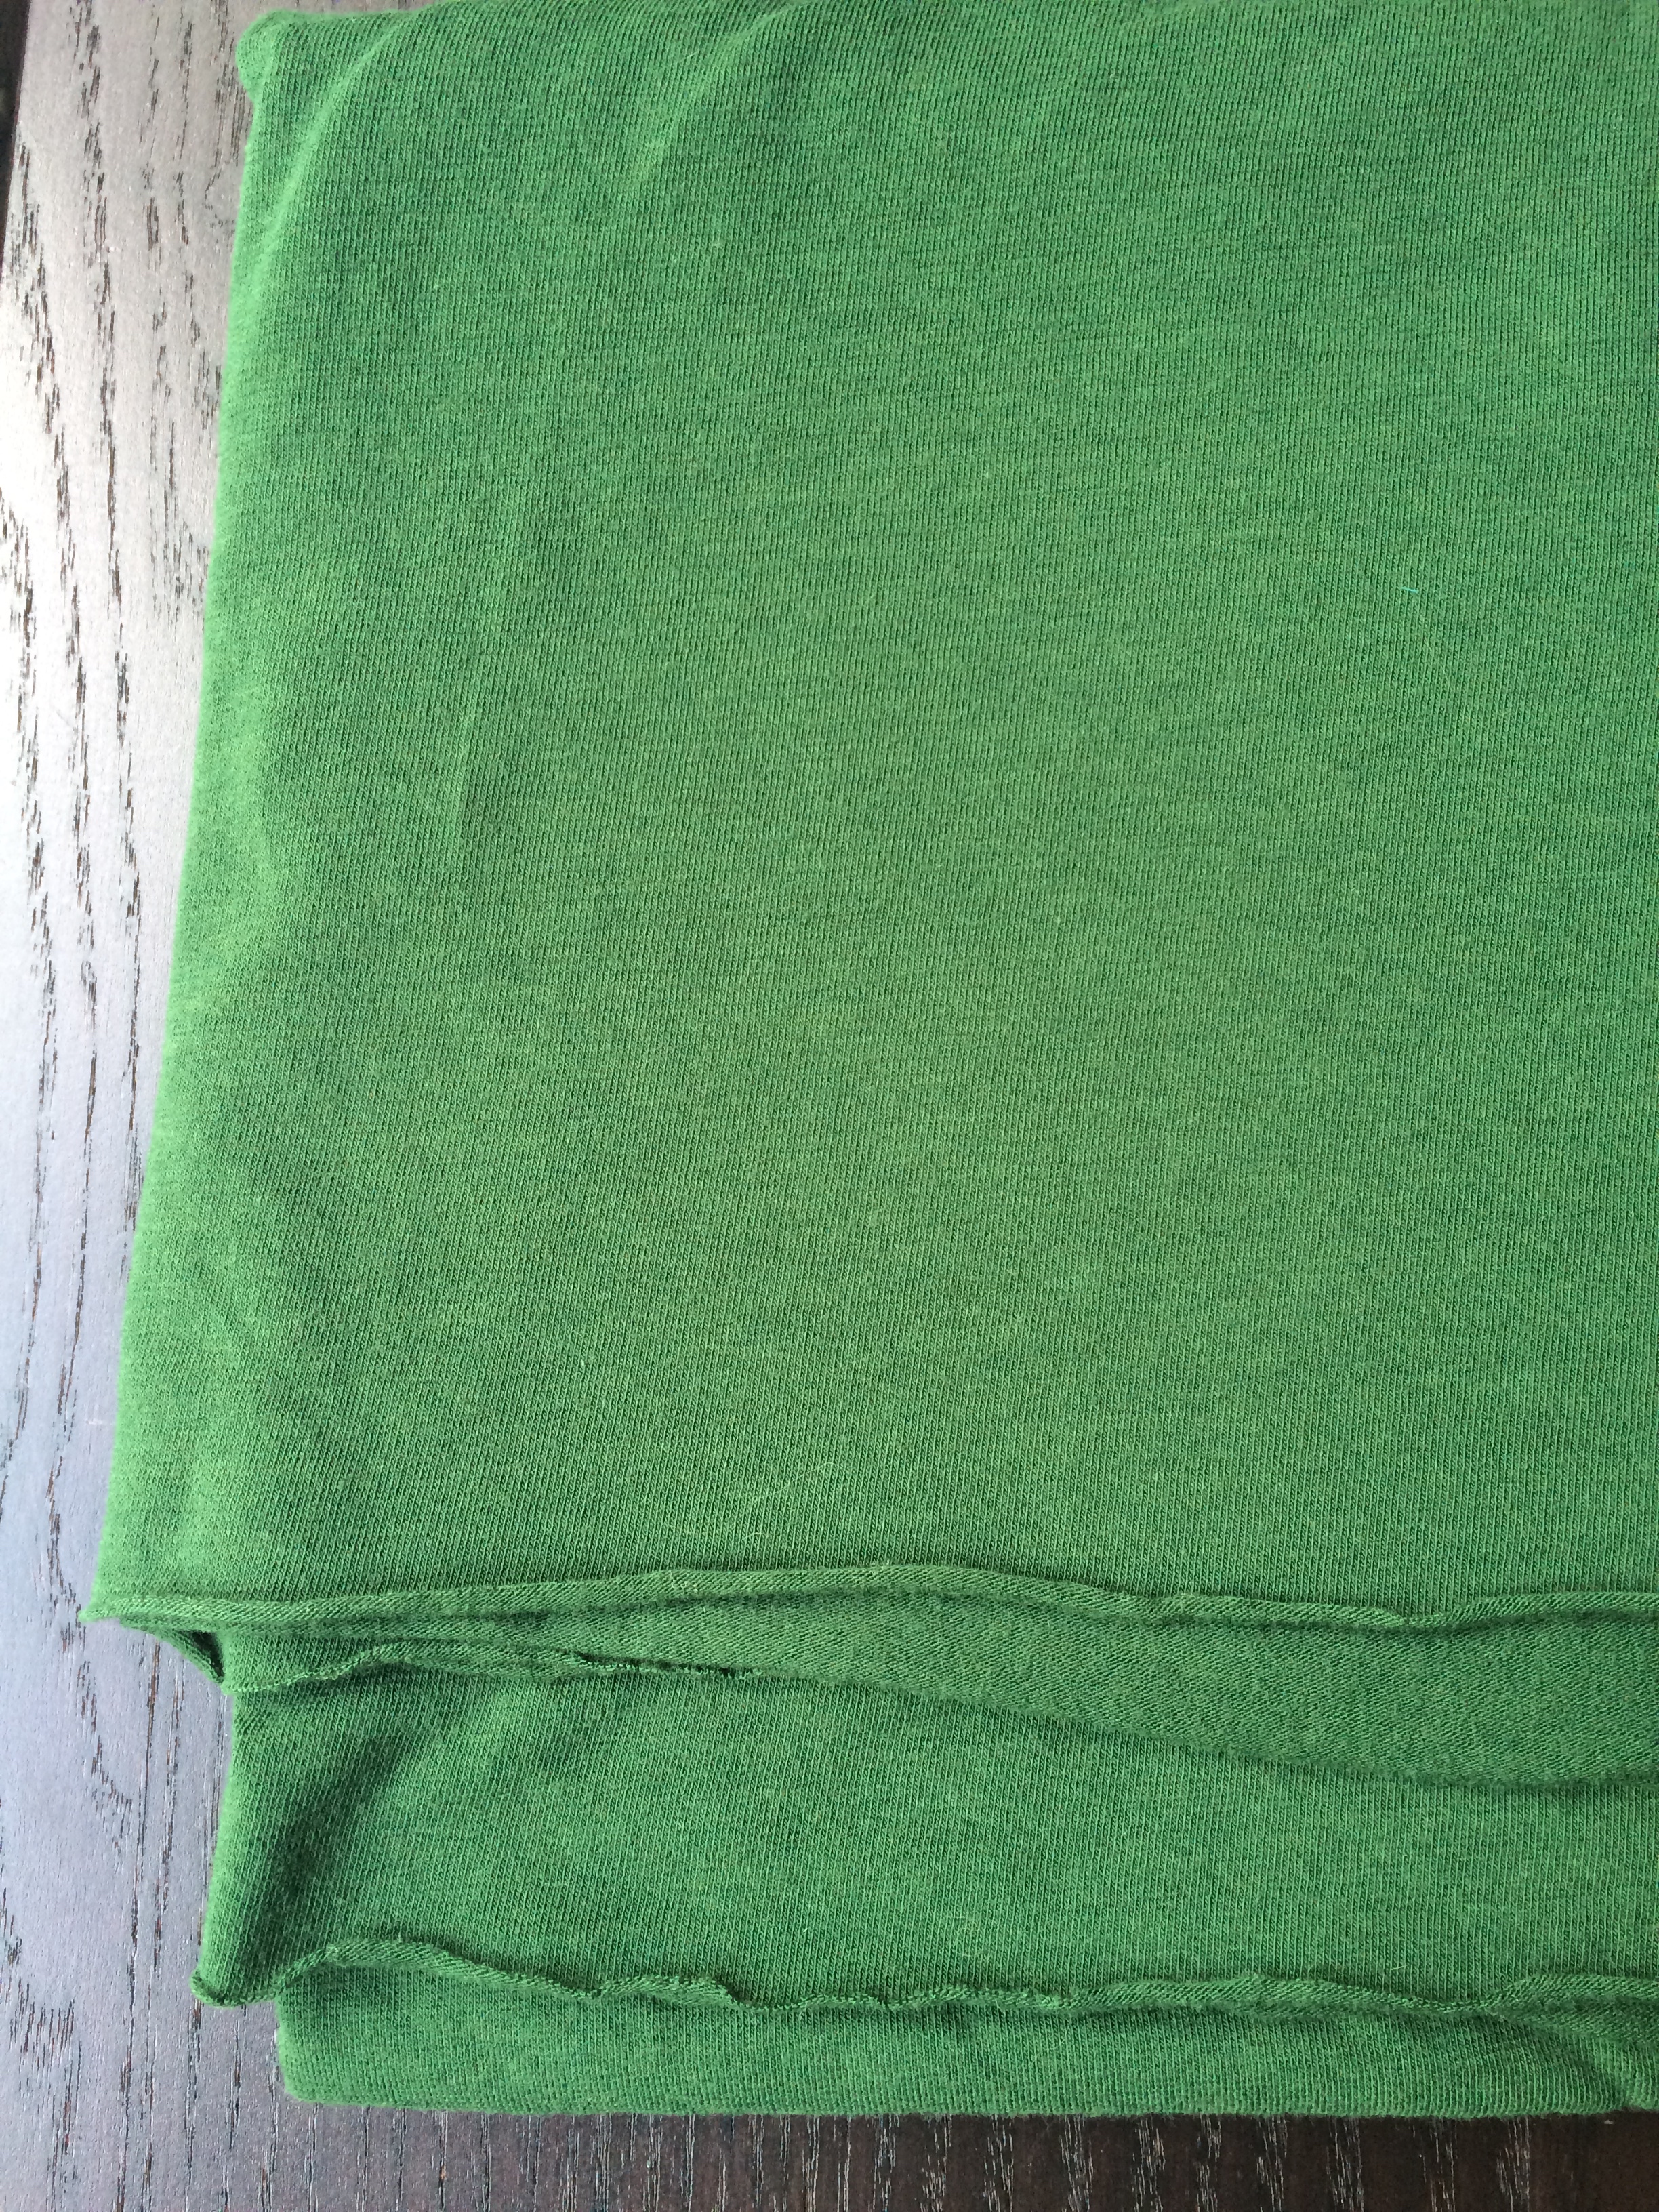
For my test I went with the Arietta Ponte de Roma from Robert Kaufman because I had it in my stash. It’s a fabric I’ve worked with a couple times and it sews nicely but it is heavy which is not ideal for this pattern. I’m happy with how this blazer turned out and I think it will gets lots of wear but I wouldn’t recommend using this fabric. I just got a wool blend double knit in the mail which isn’t too thick and feels much lighter-weight and I’m planning to use that for another version of this pattern.

IMG_8265

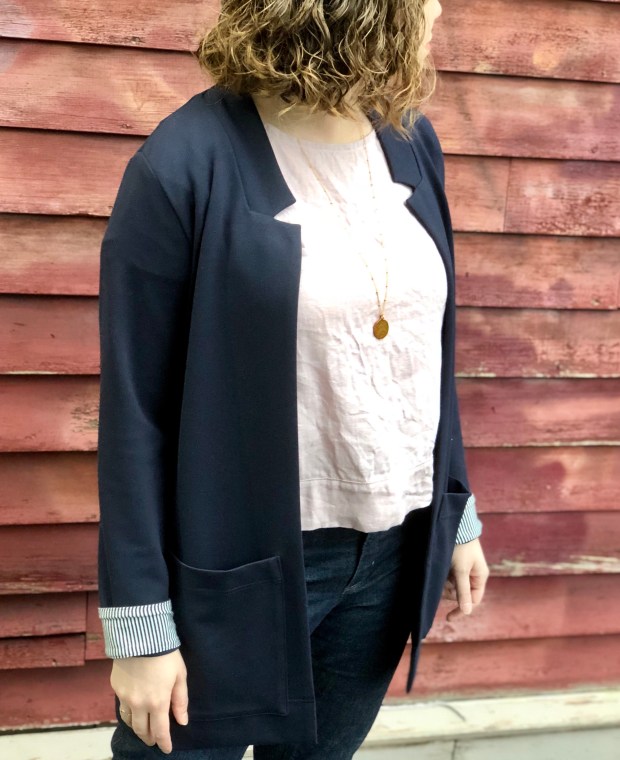
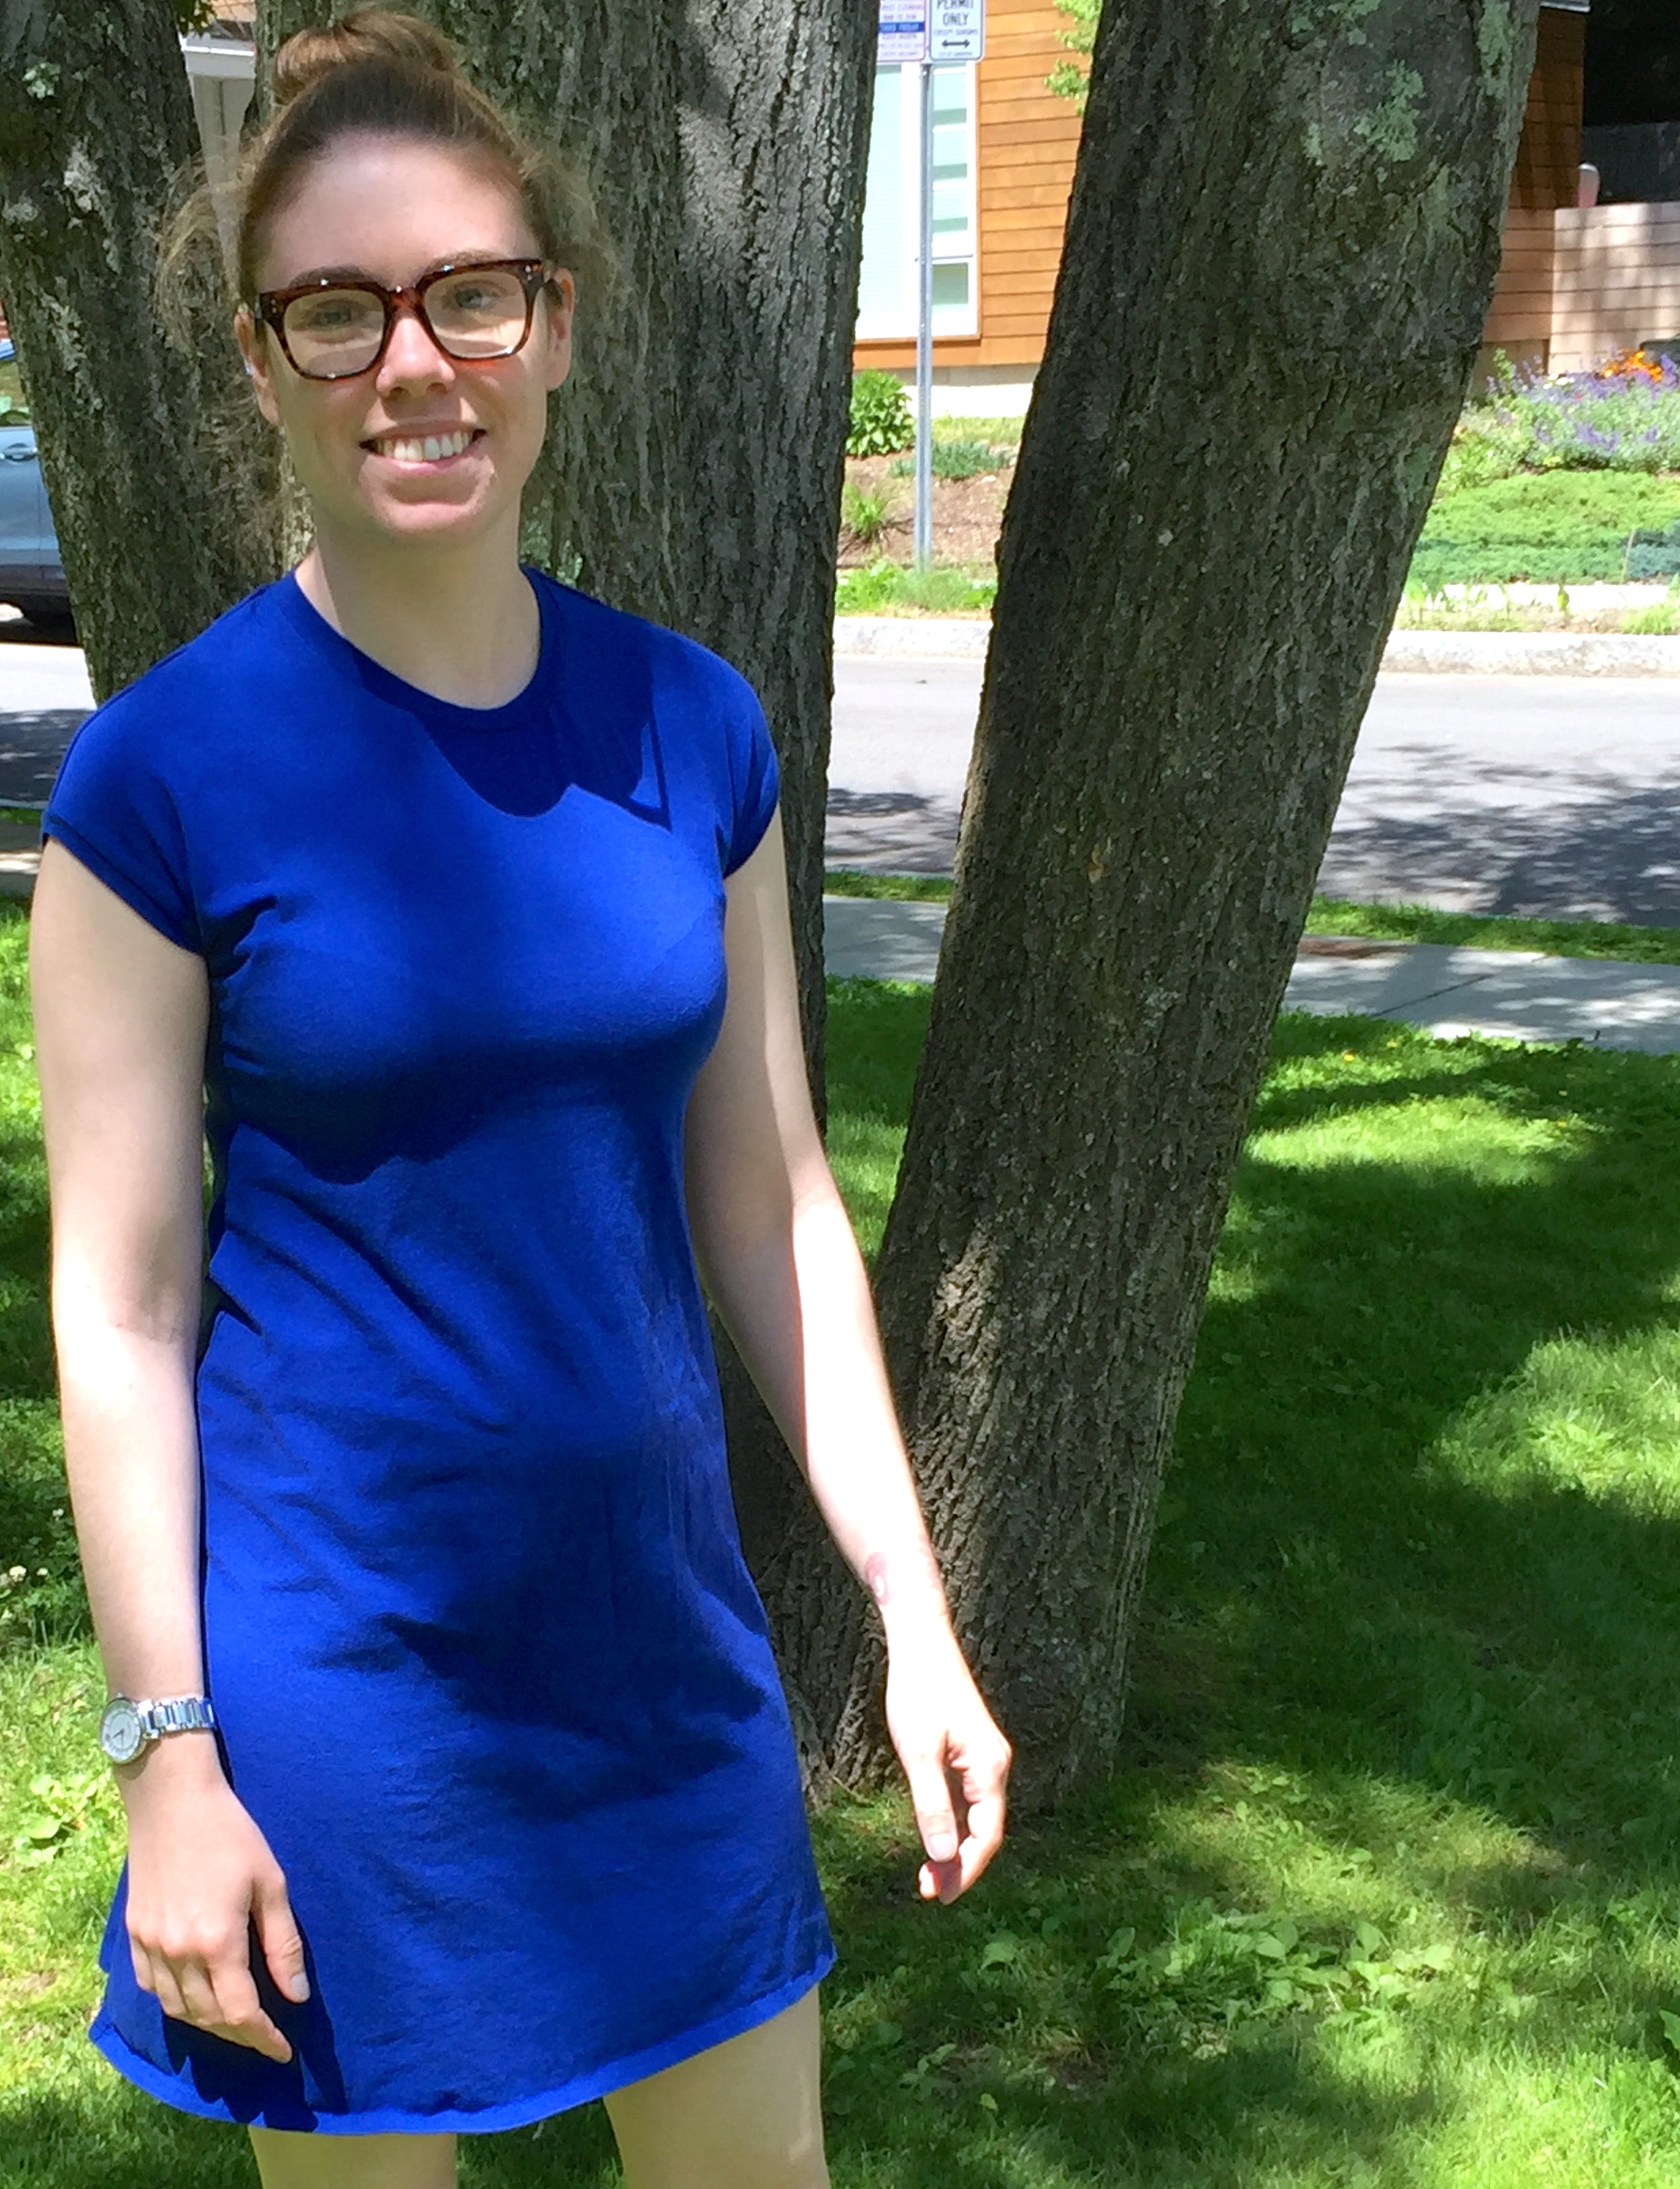
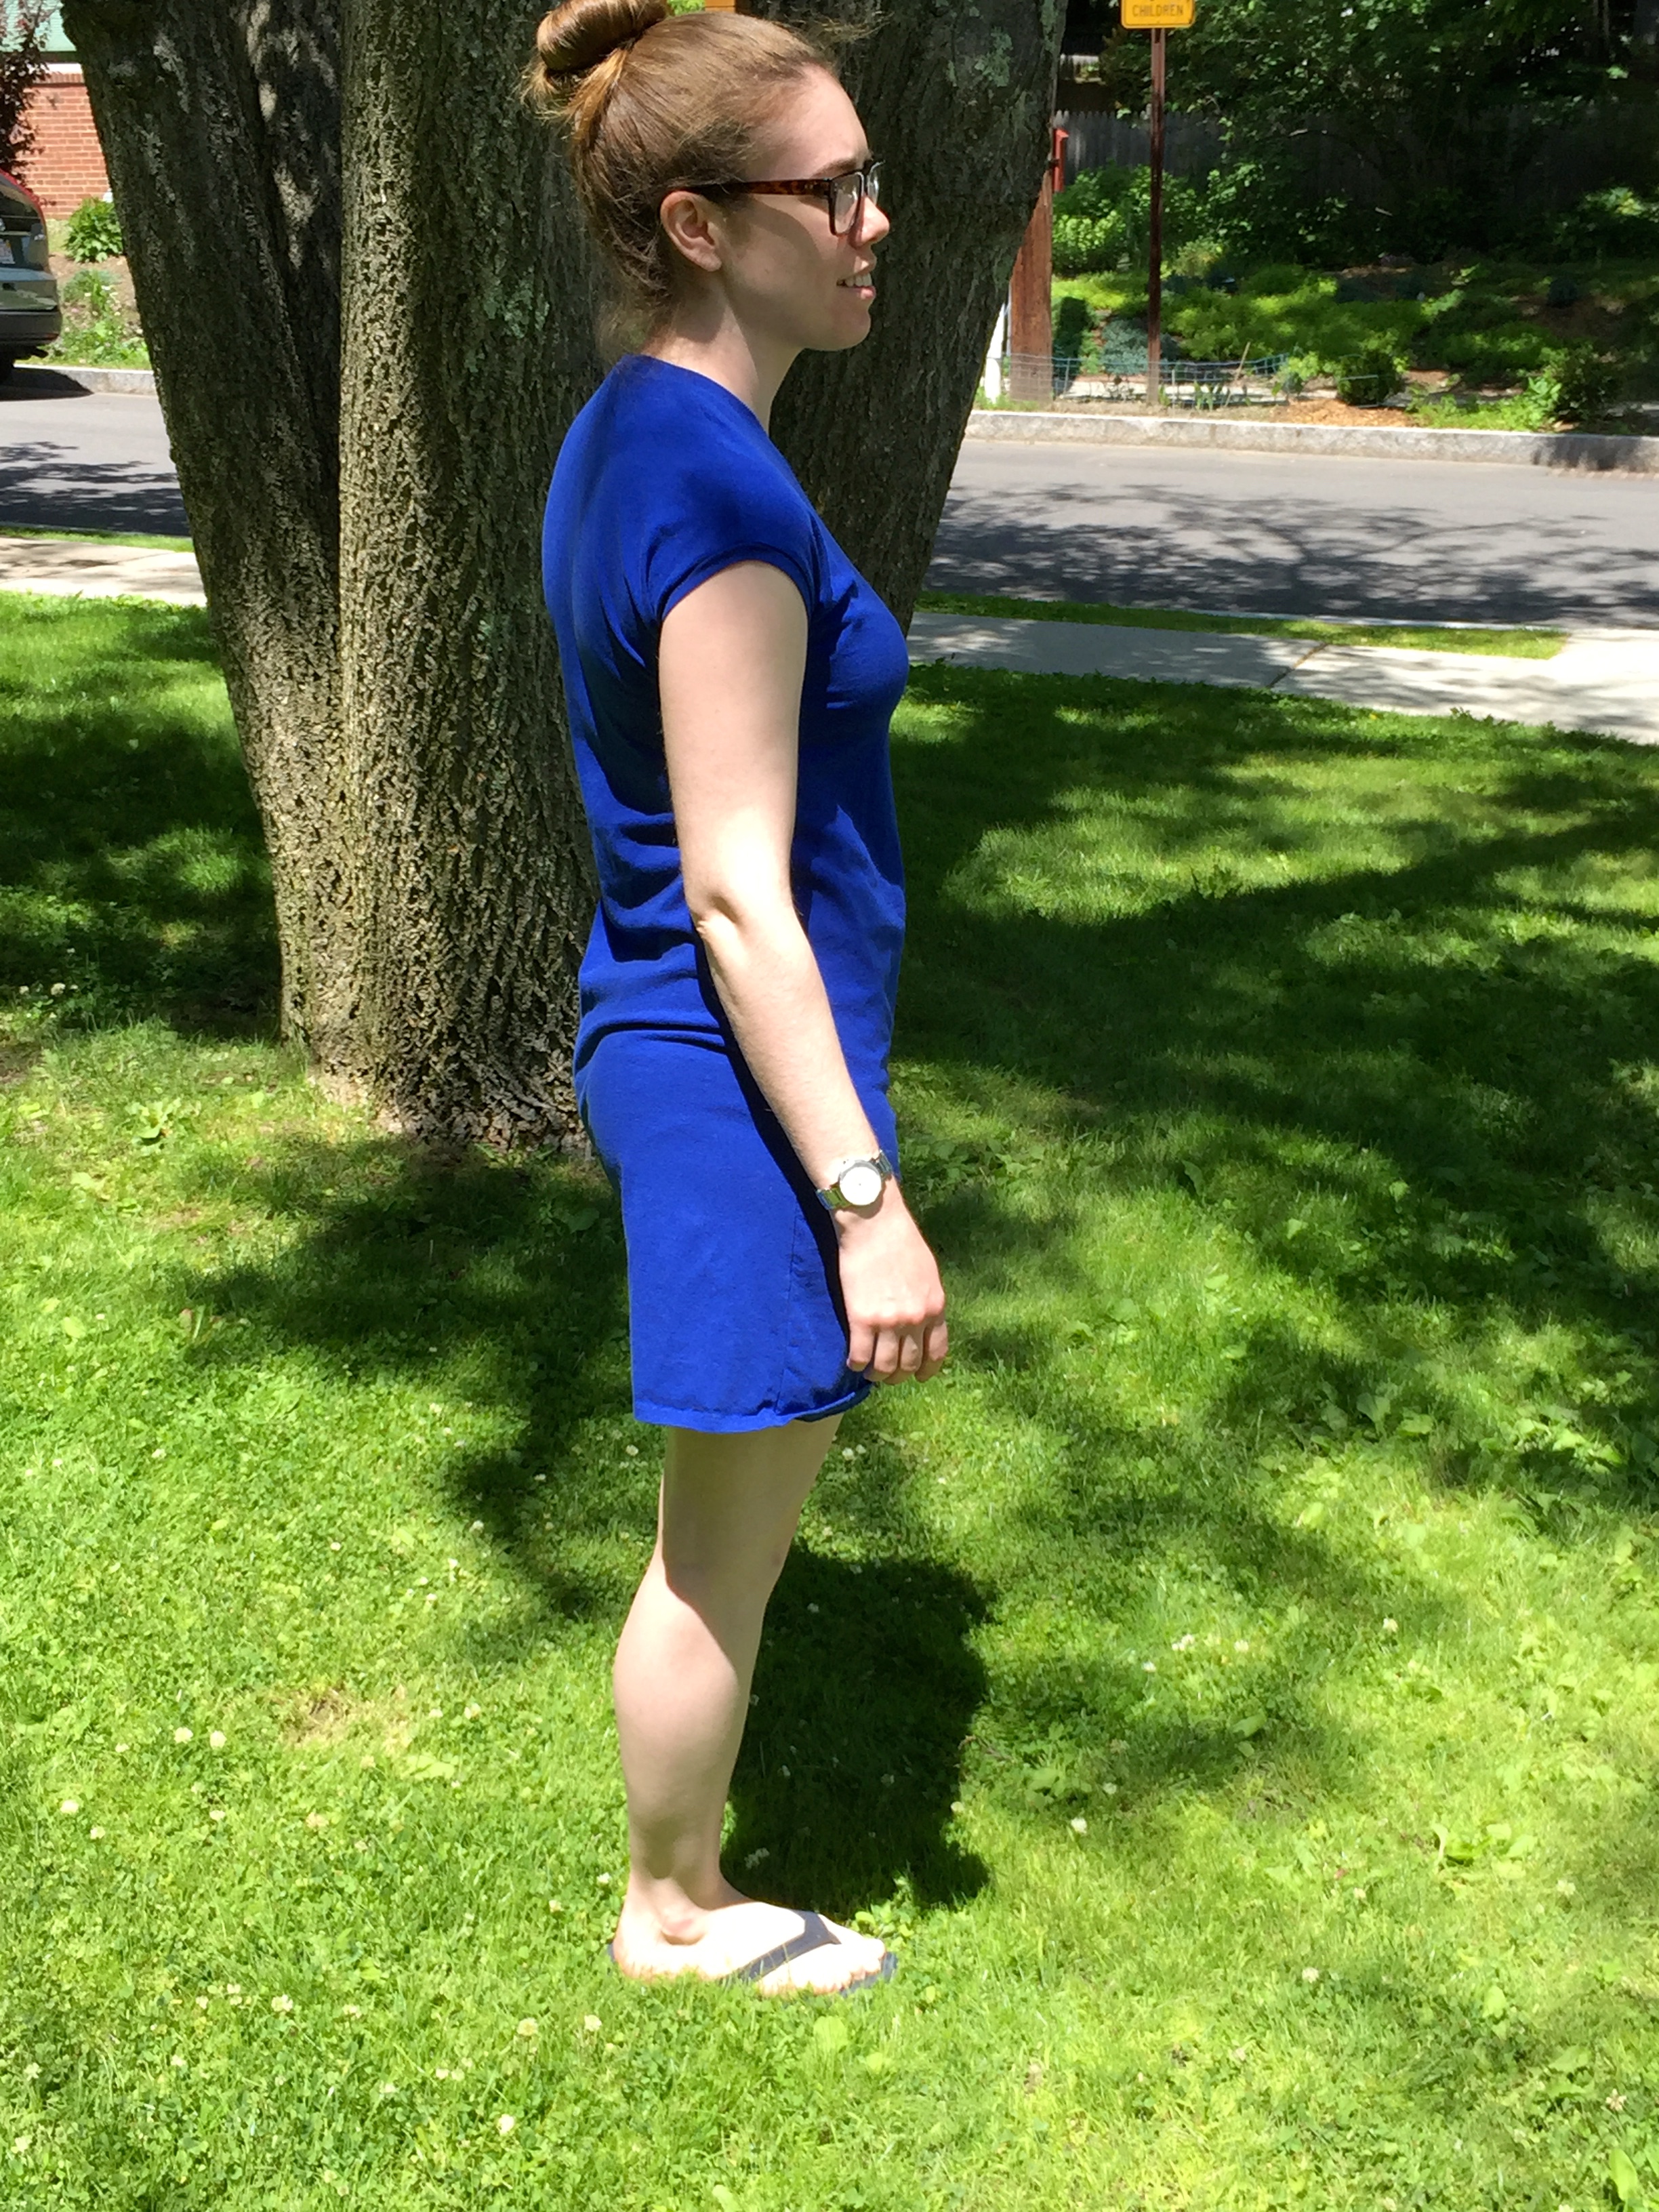
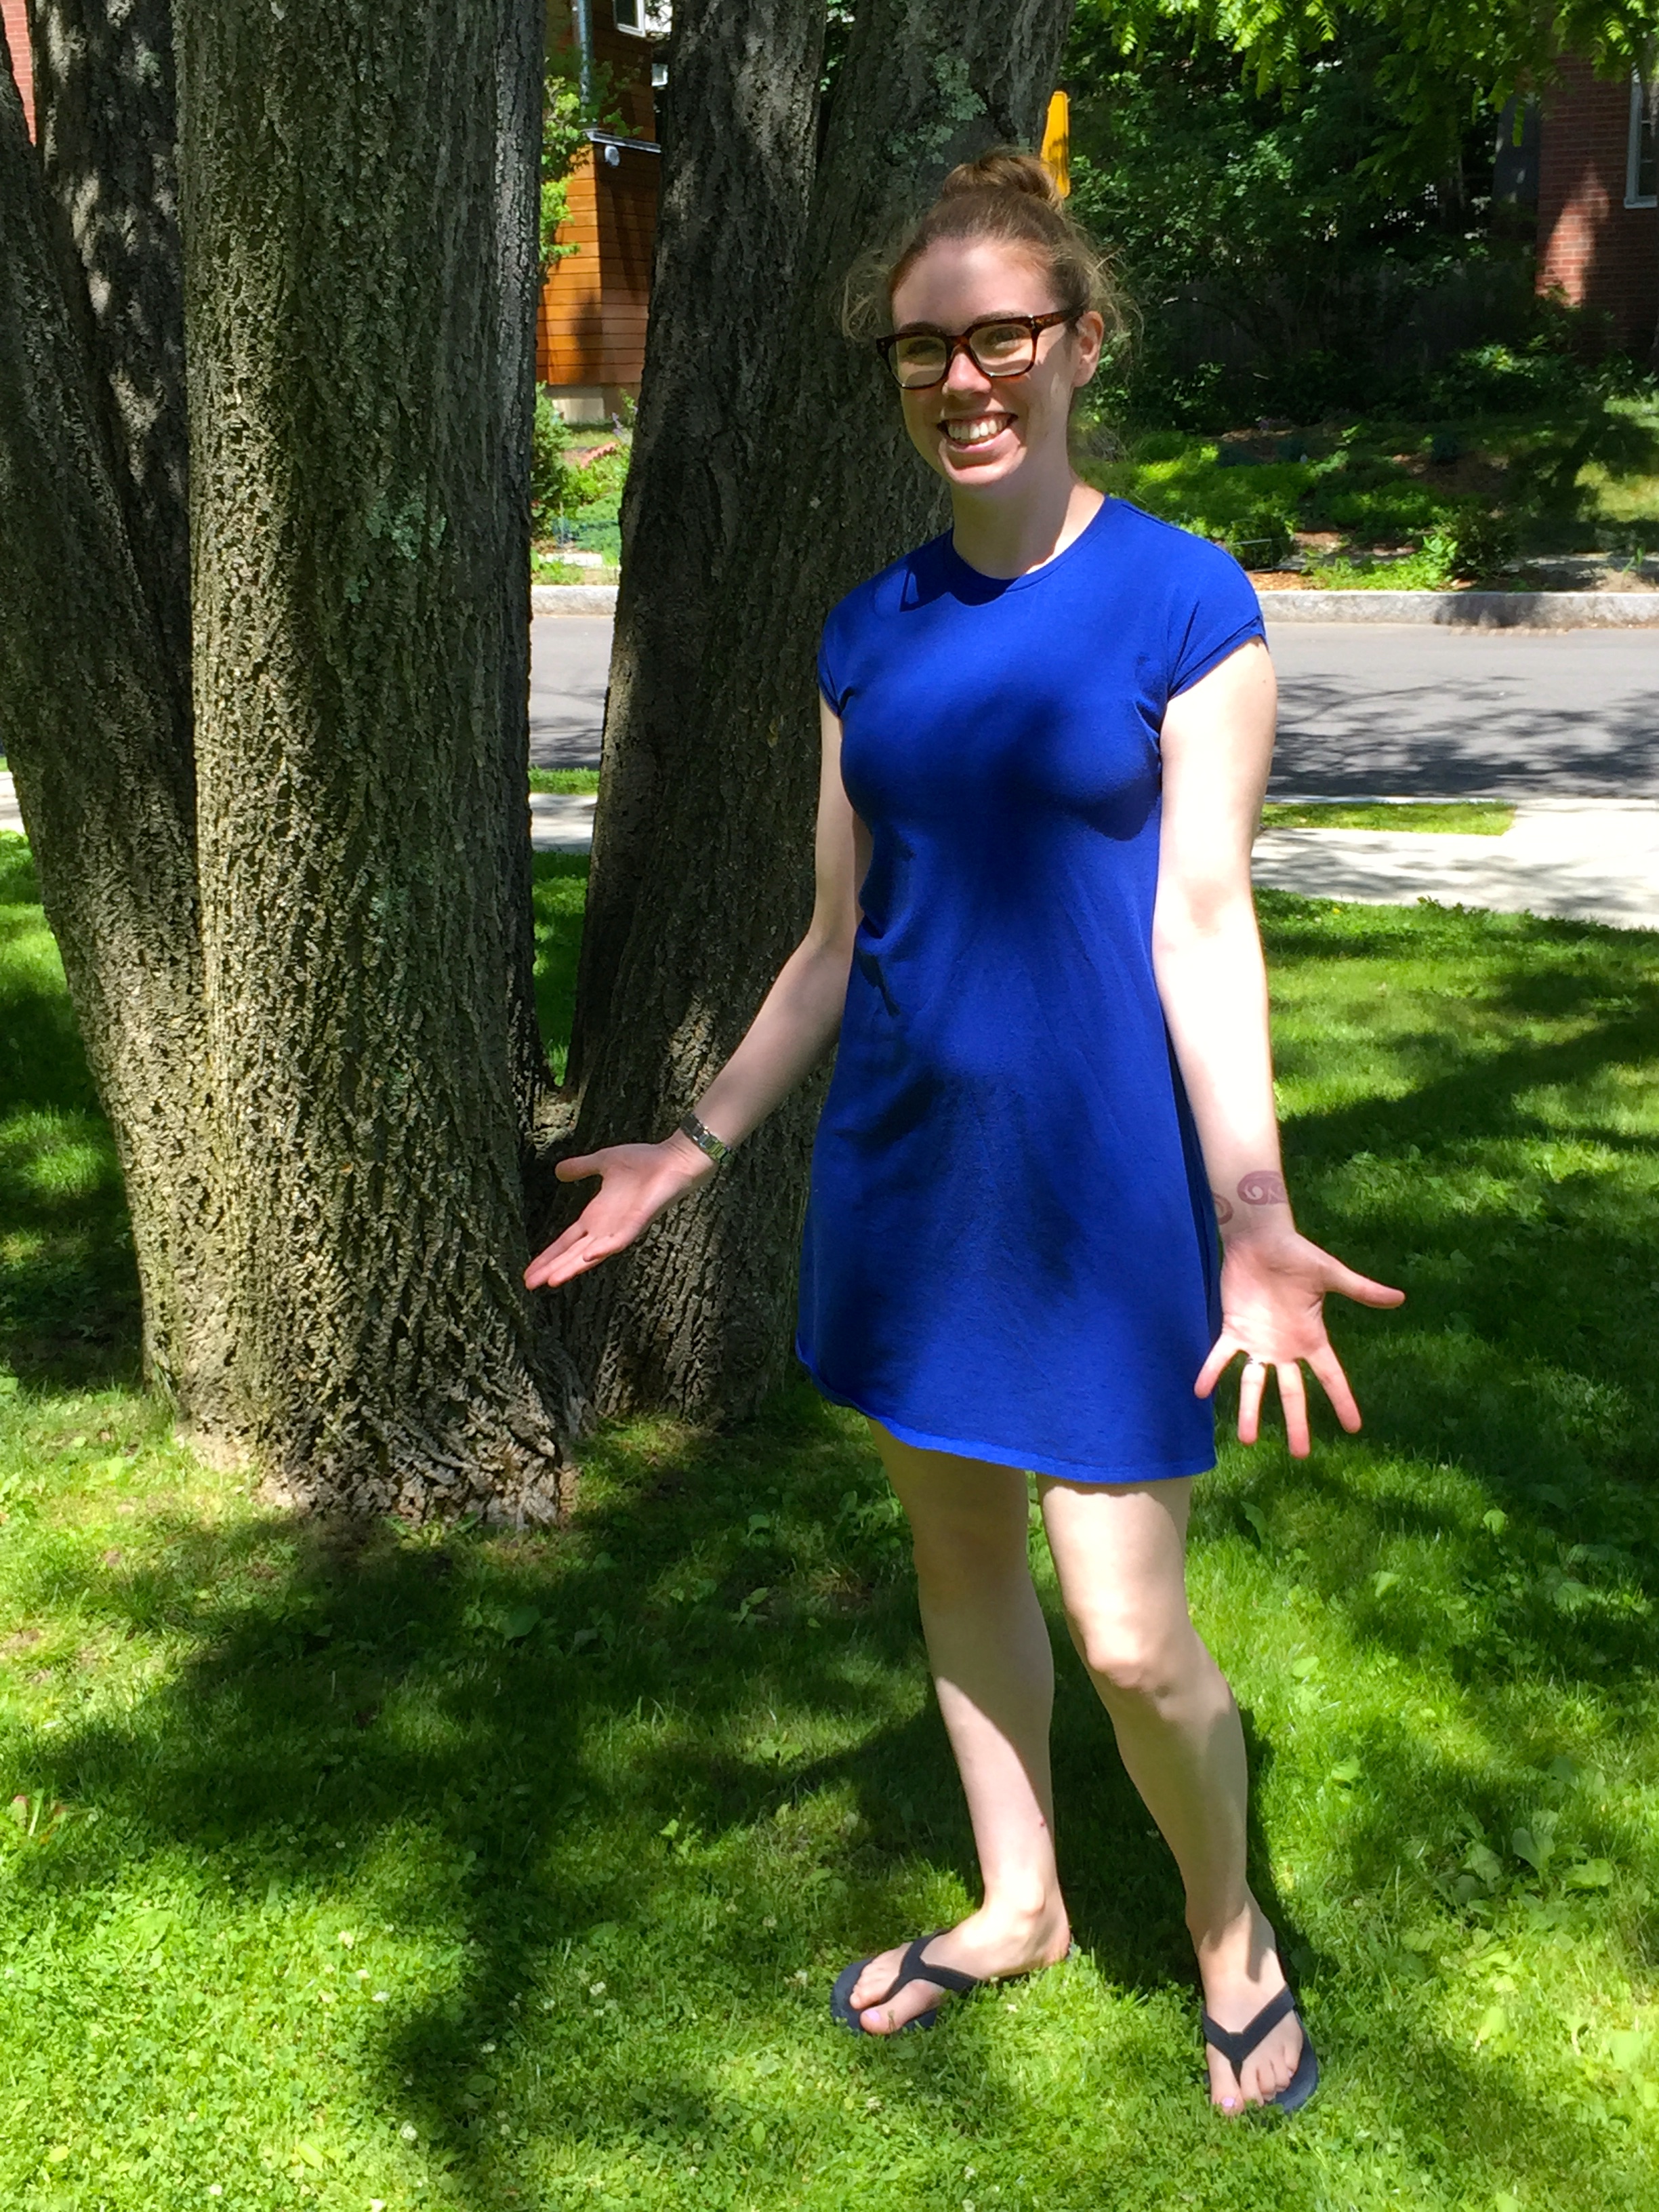
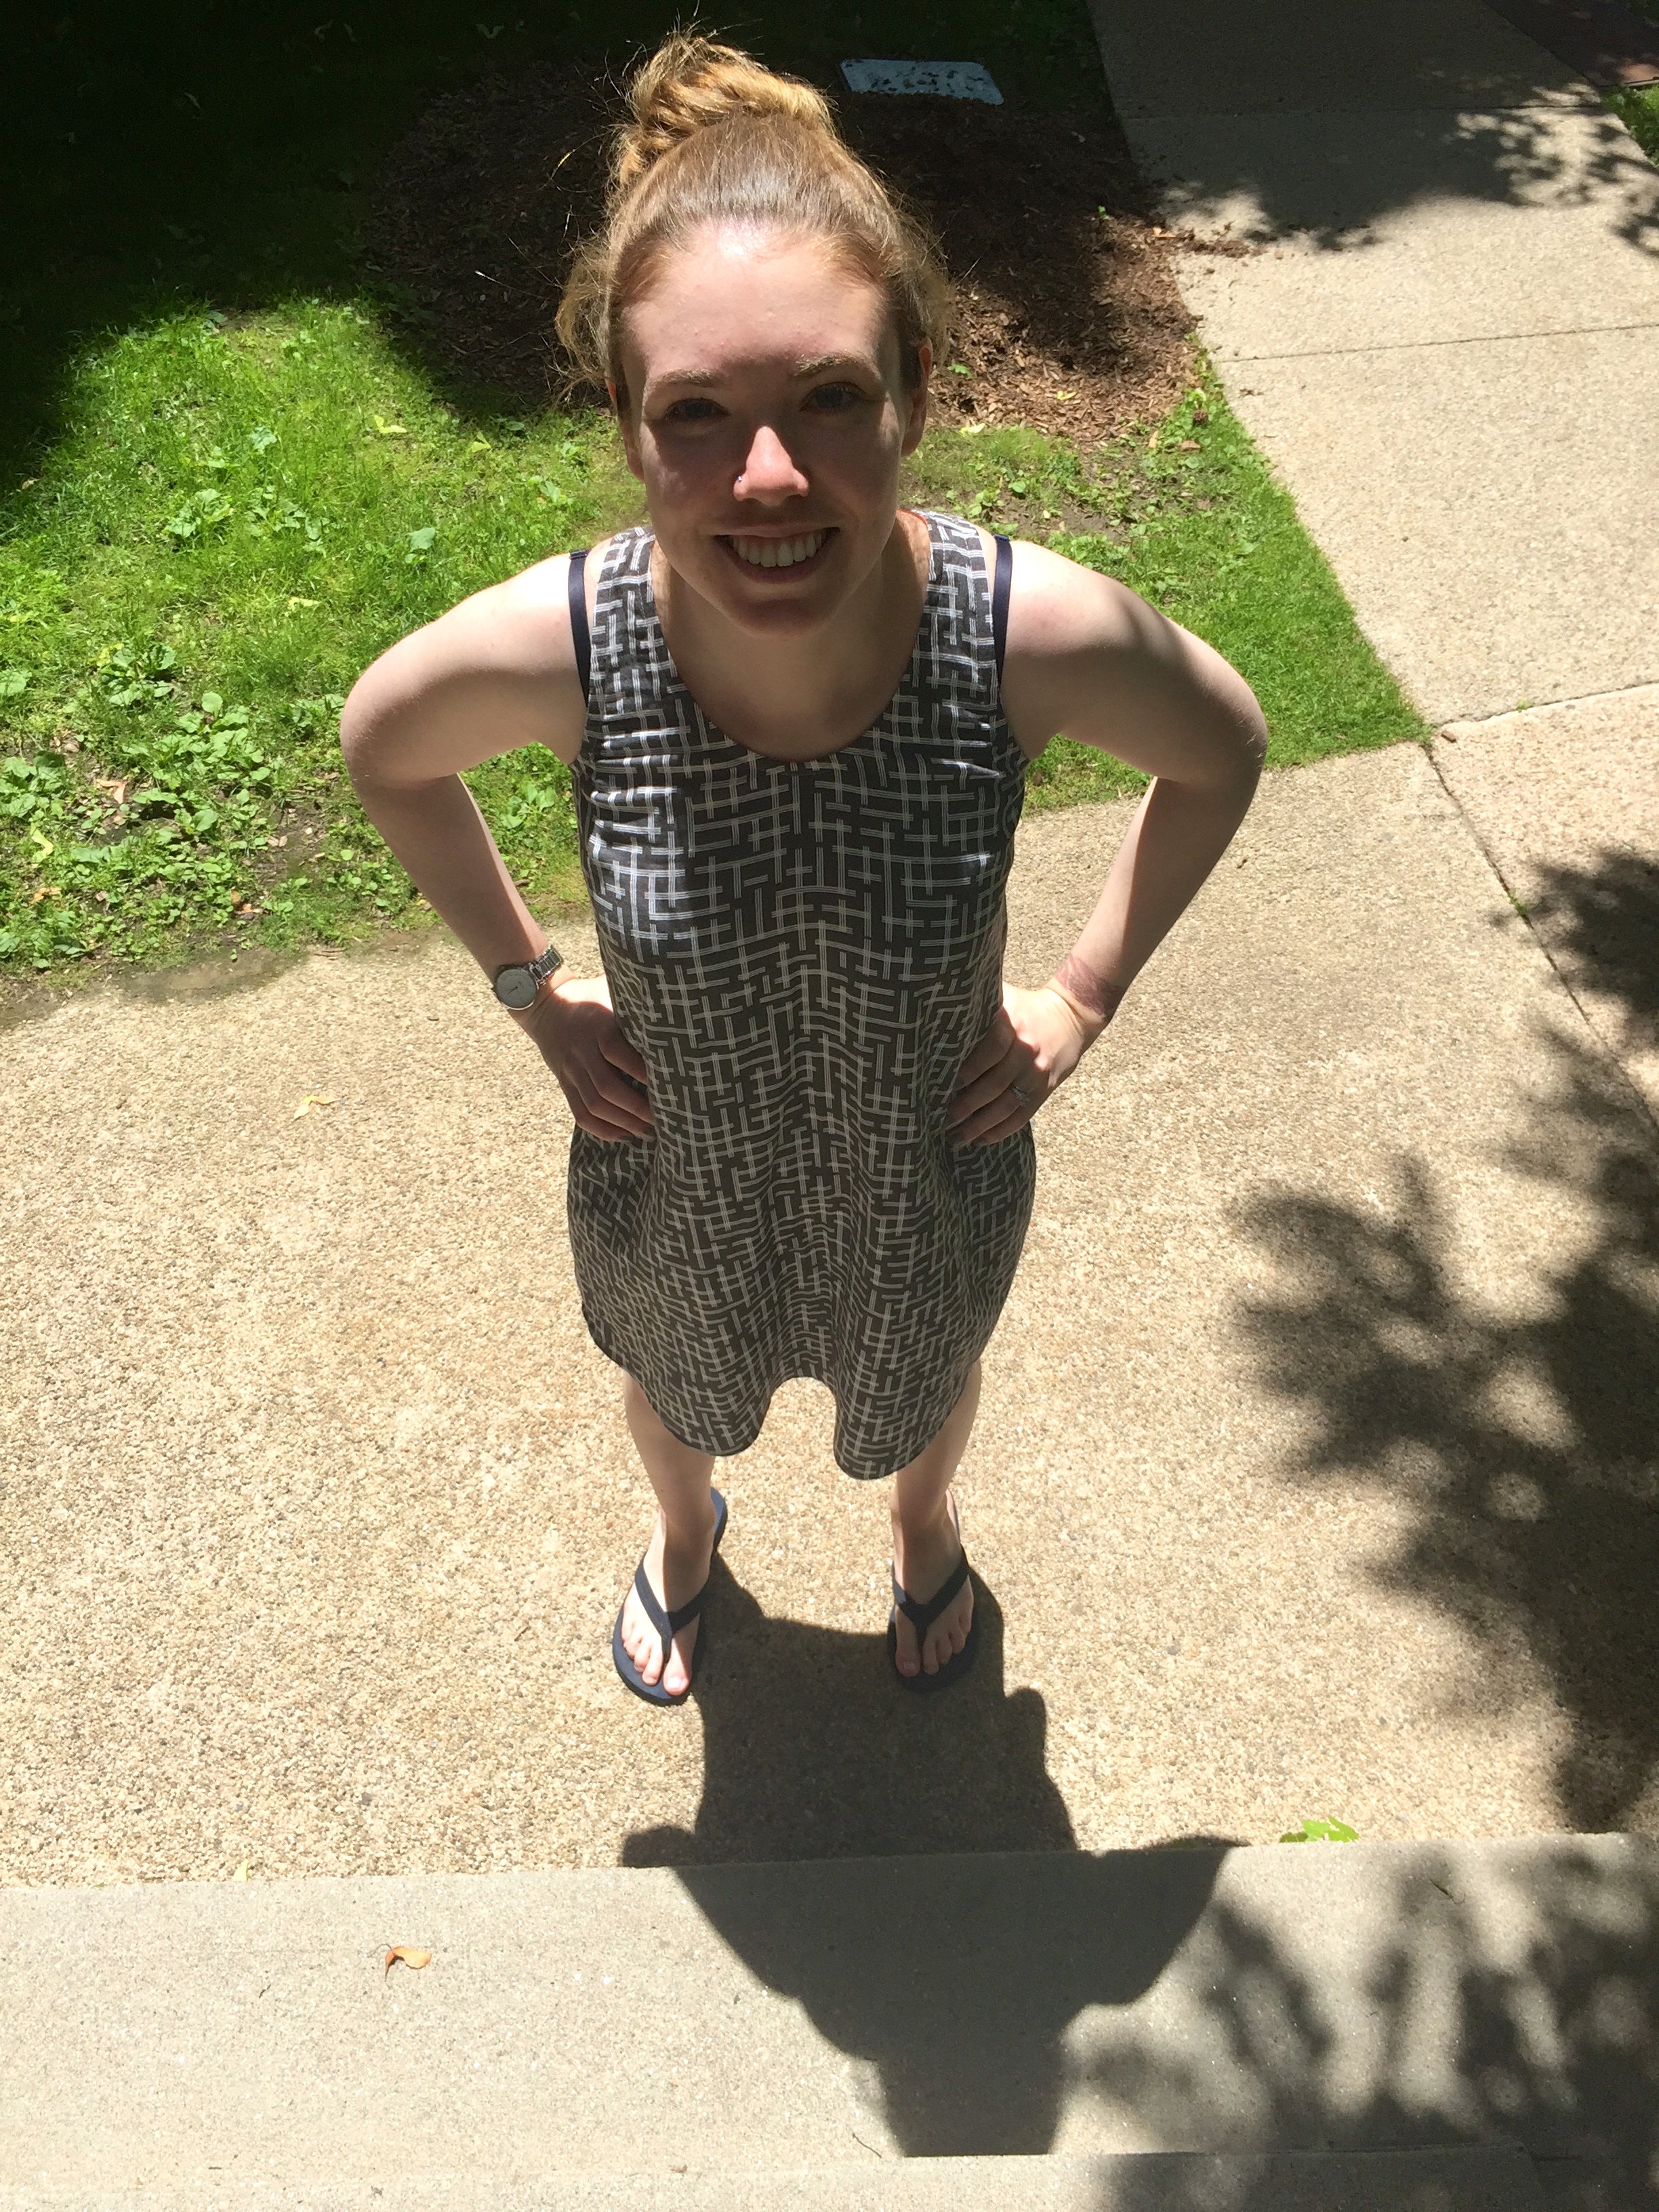
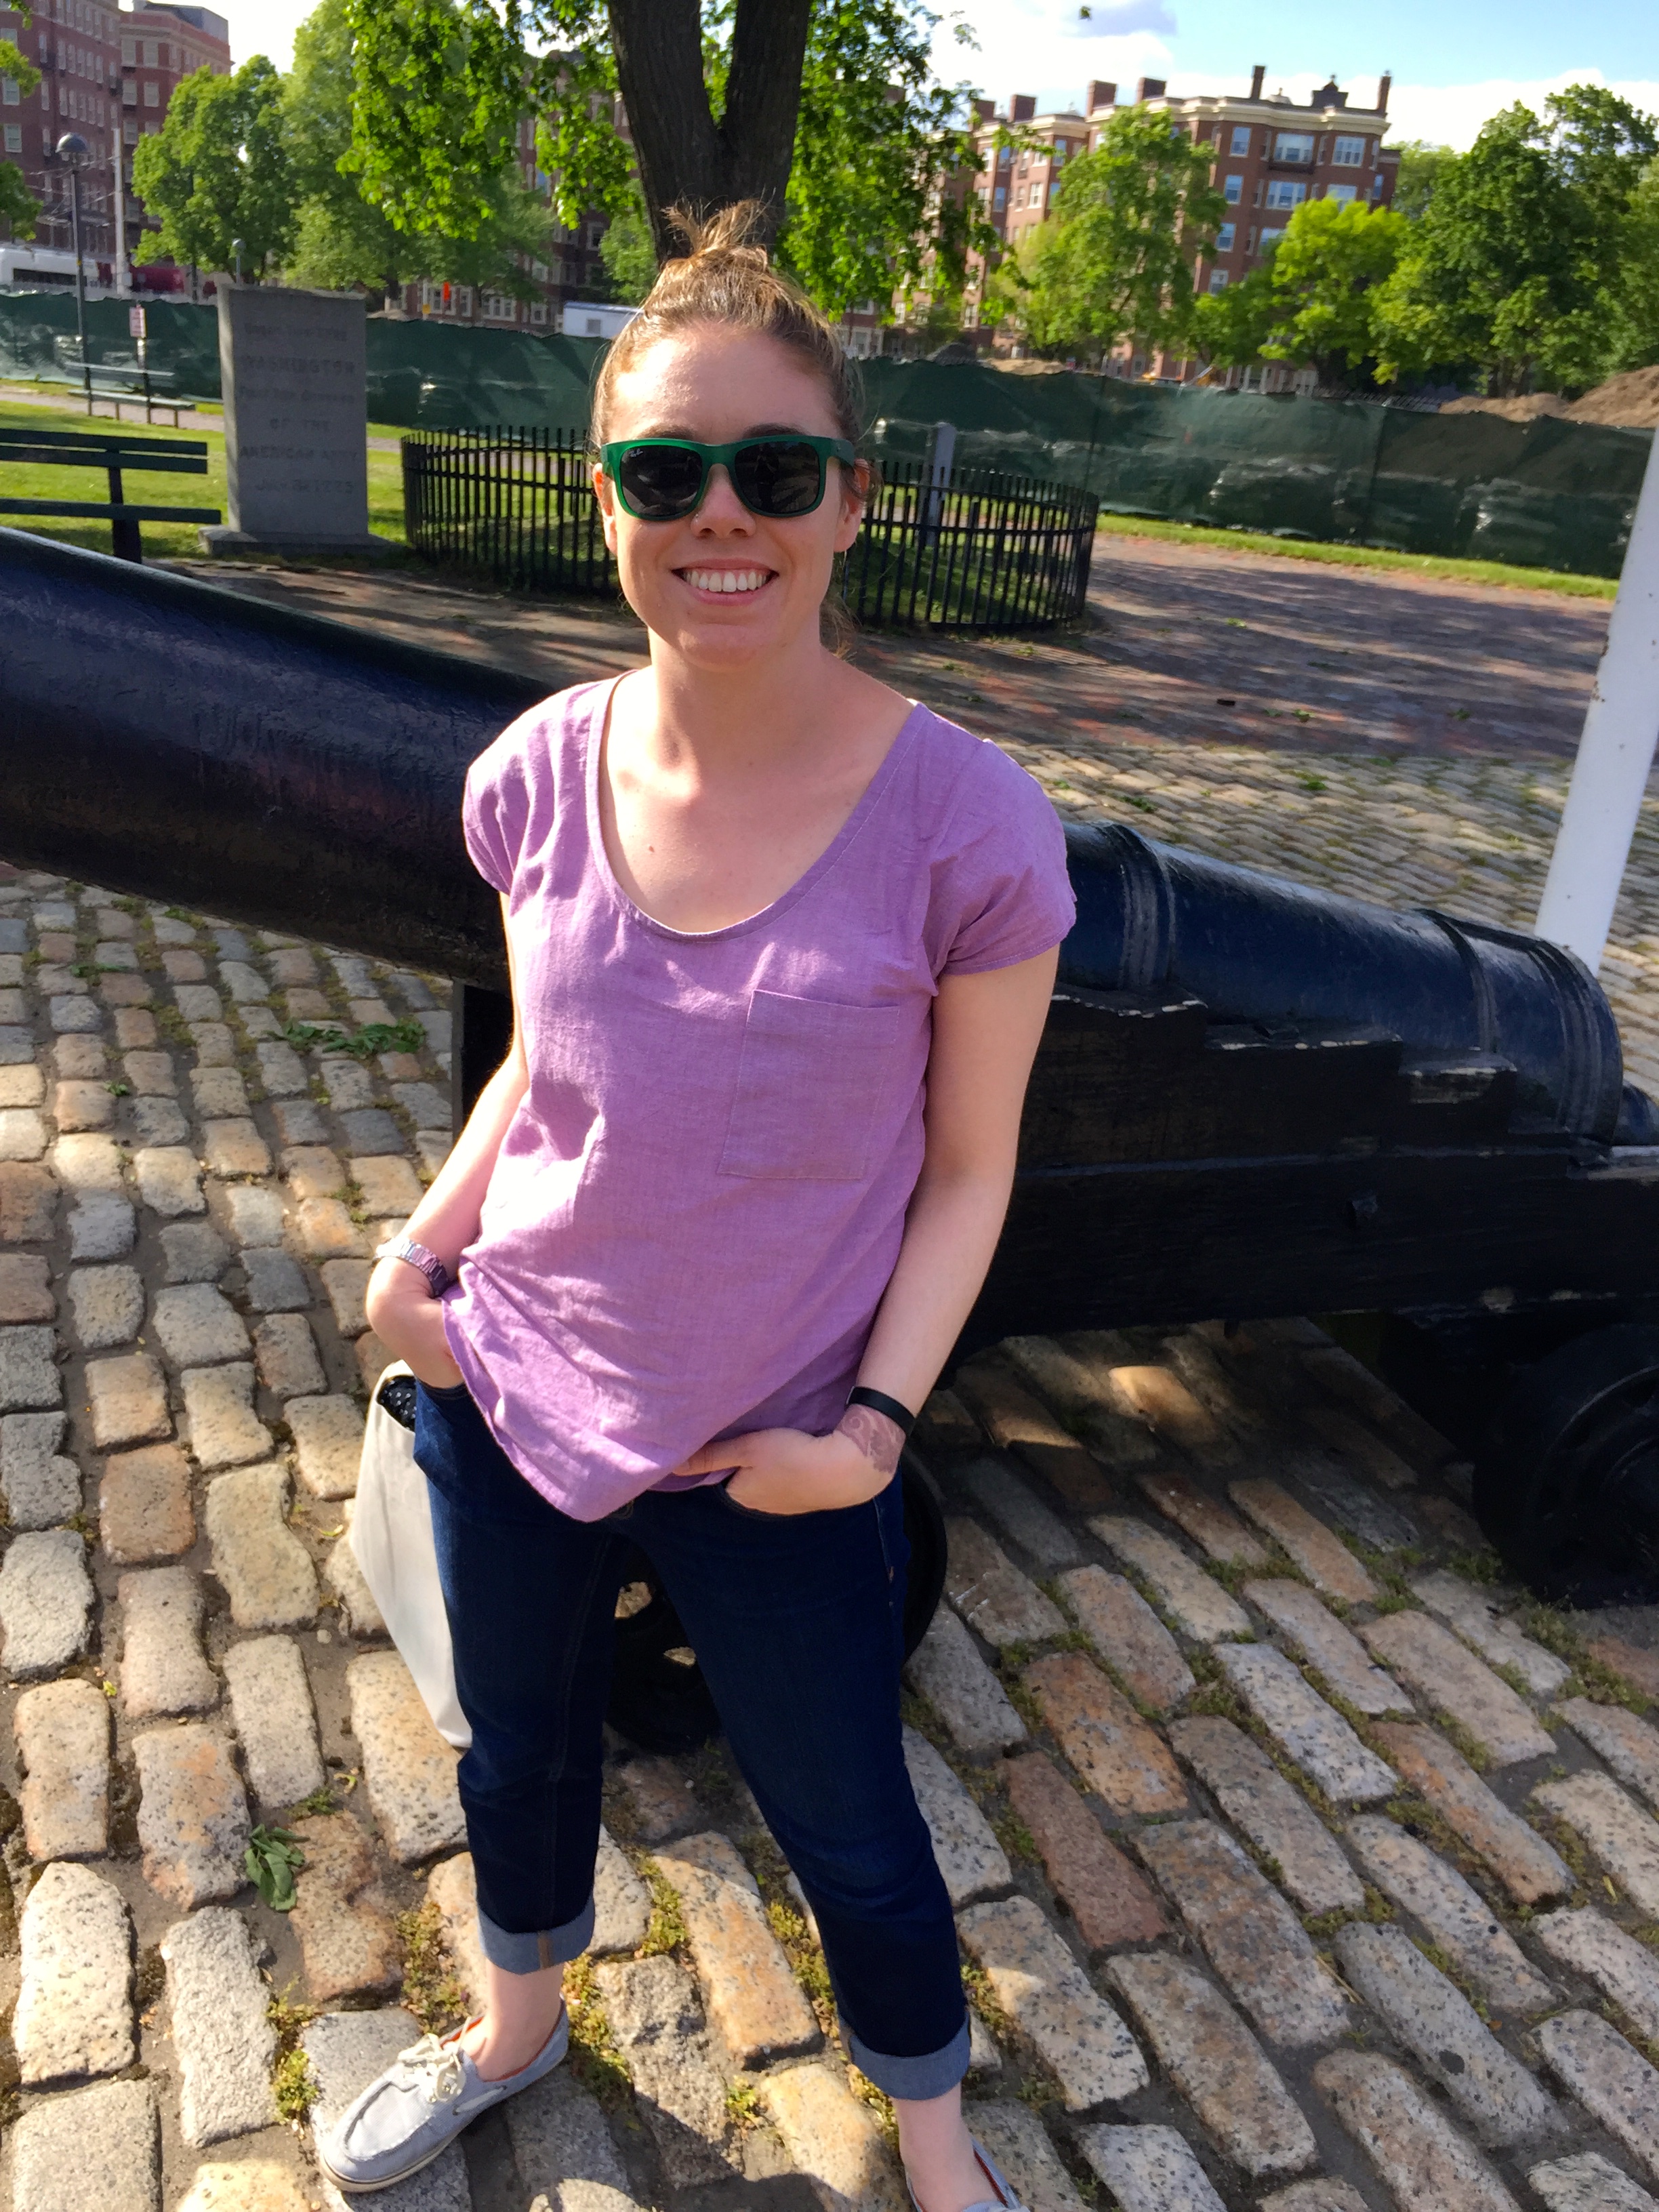
I made view A which is a hip-length blazer though it is a bit long on me. This is partly the weight of the fabric but also because I didn’t remove any length from the pattern pieces. I like that this sweater covers my bum, especially as we’re getting into colder temps here in New England, but I think I’d take two inches off the next time I make the shorter view.

IMG_8280

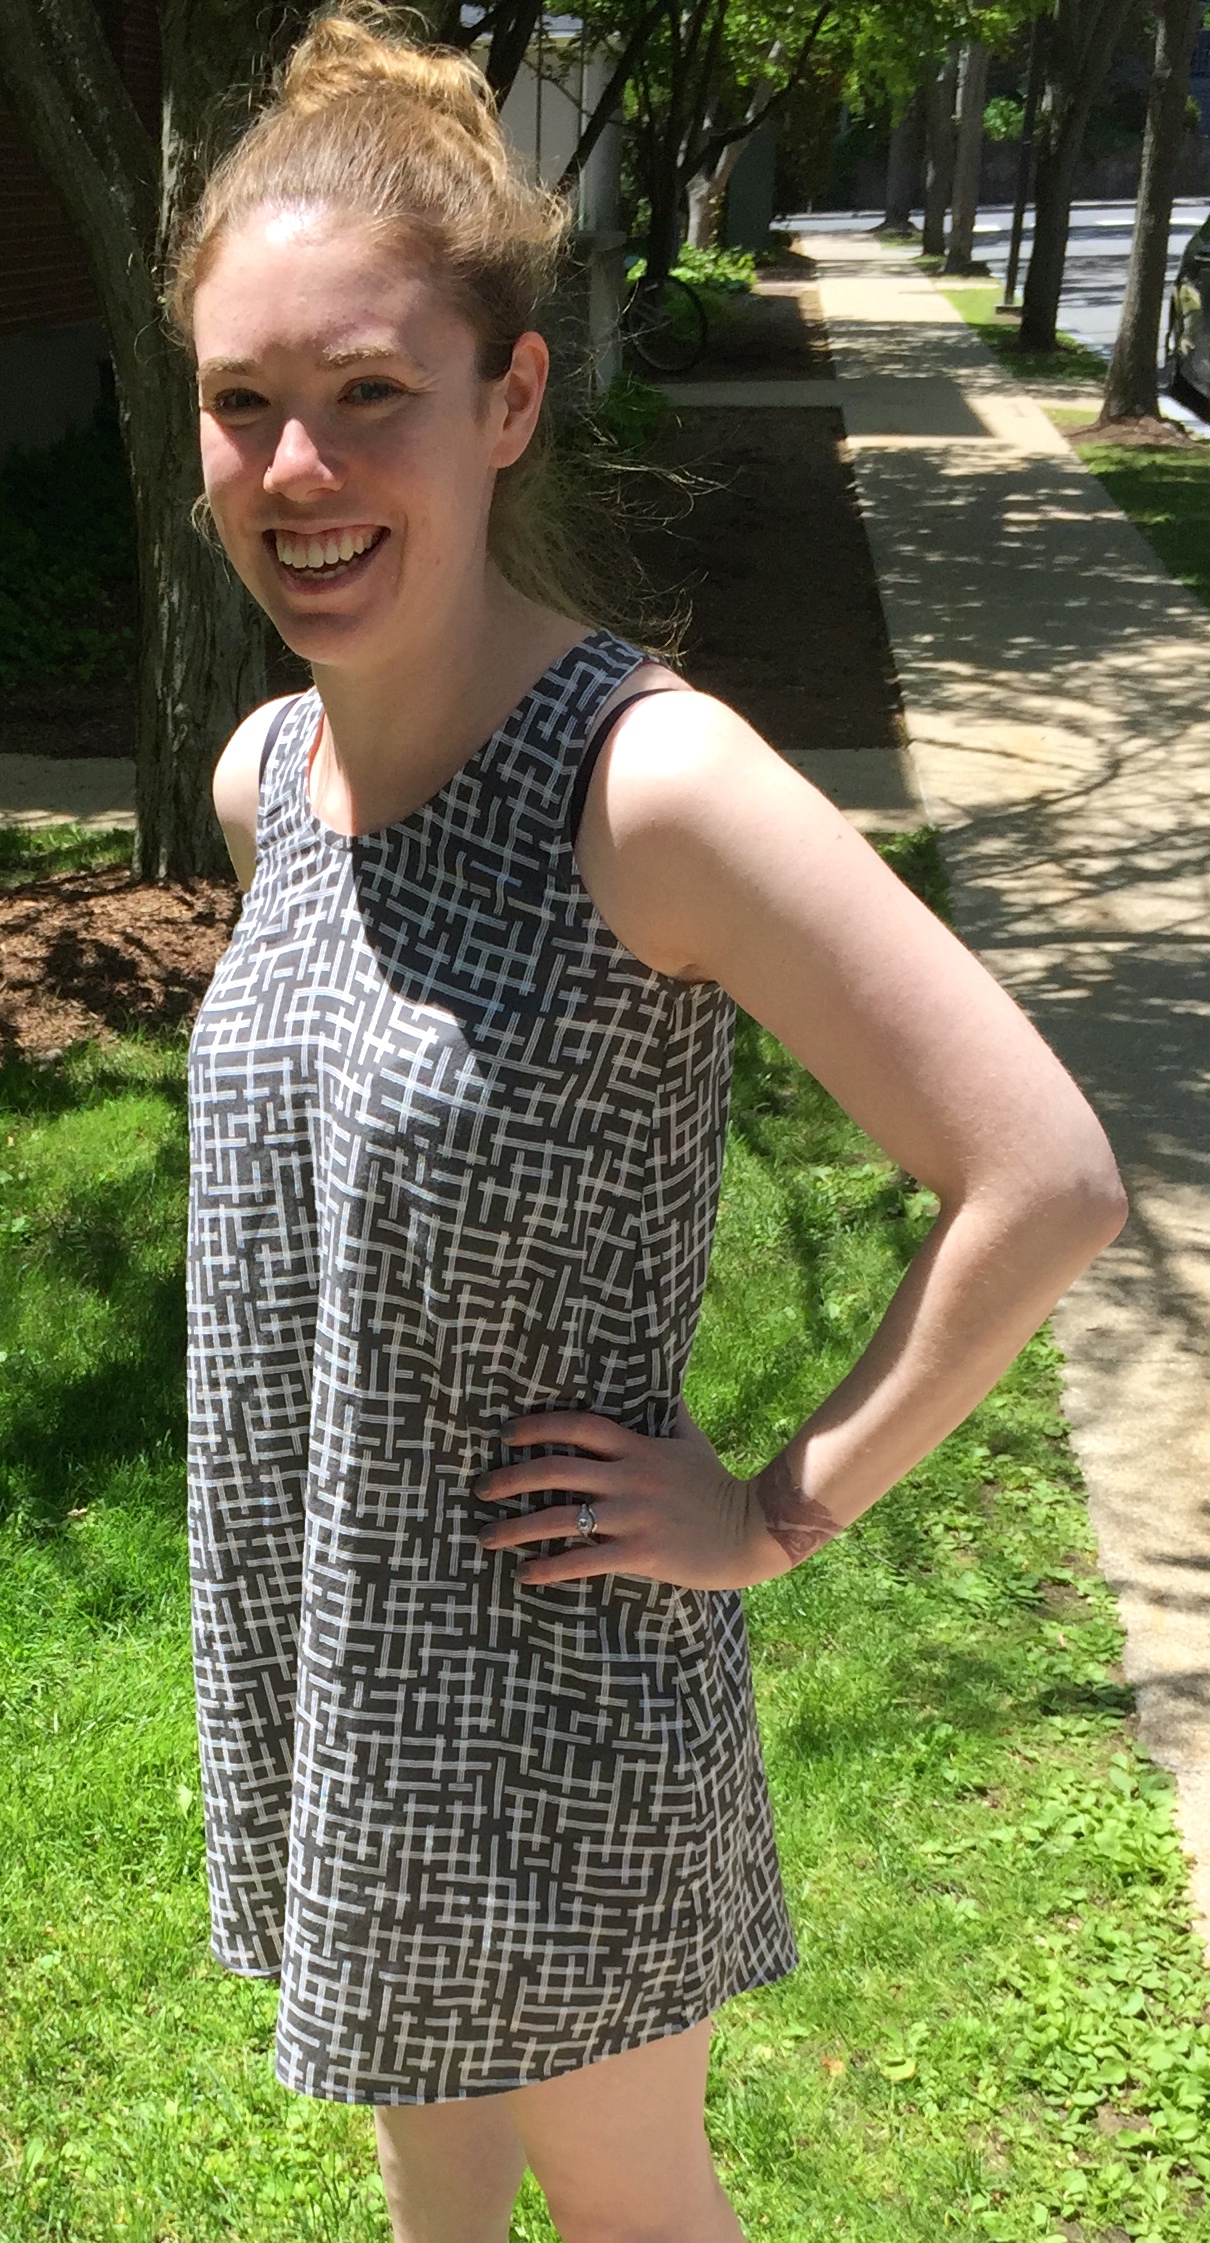
I decided to make the longer sleeves on this version, again because it’s getting cold here, but I would also take some length from the sleeves in the future. Again, this has nothing to do with Alina’s drafting; they’re predictable changes for me. I love the cuffed look and the contrasting facing is a fun detail for someone who tends to make pretty classic clothing.

IMG_8257

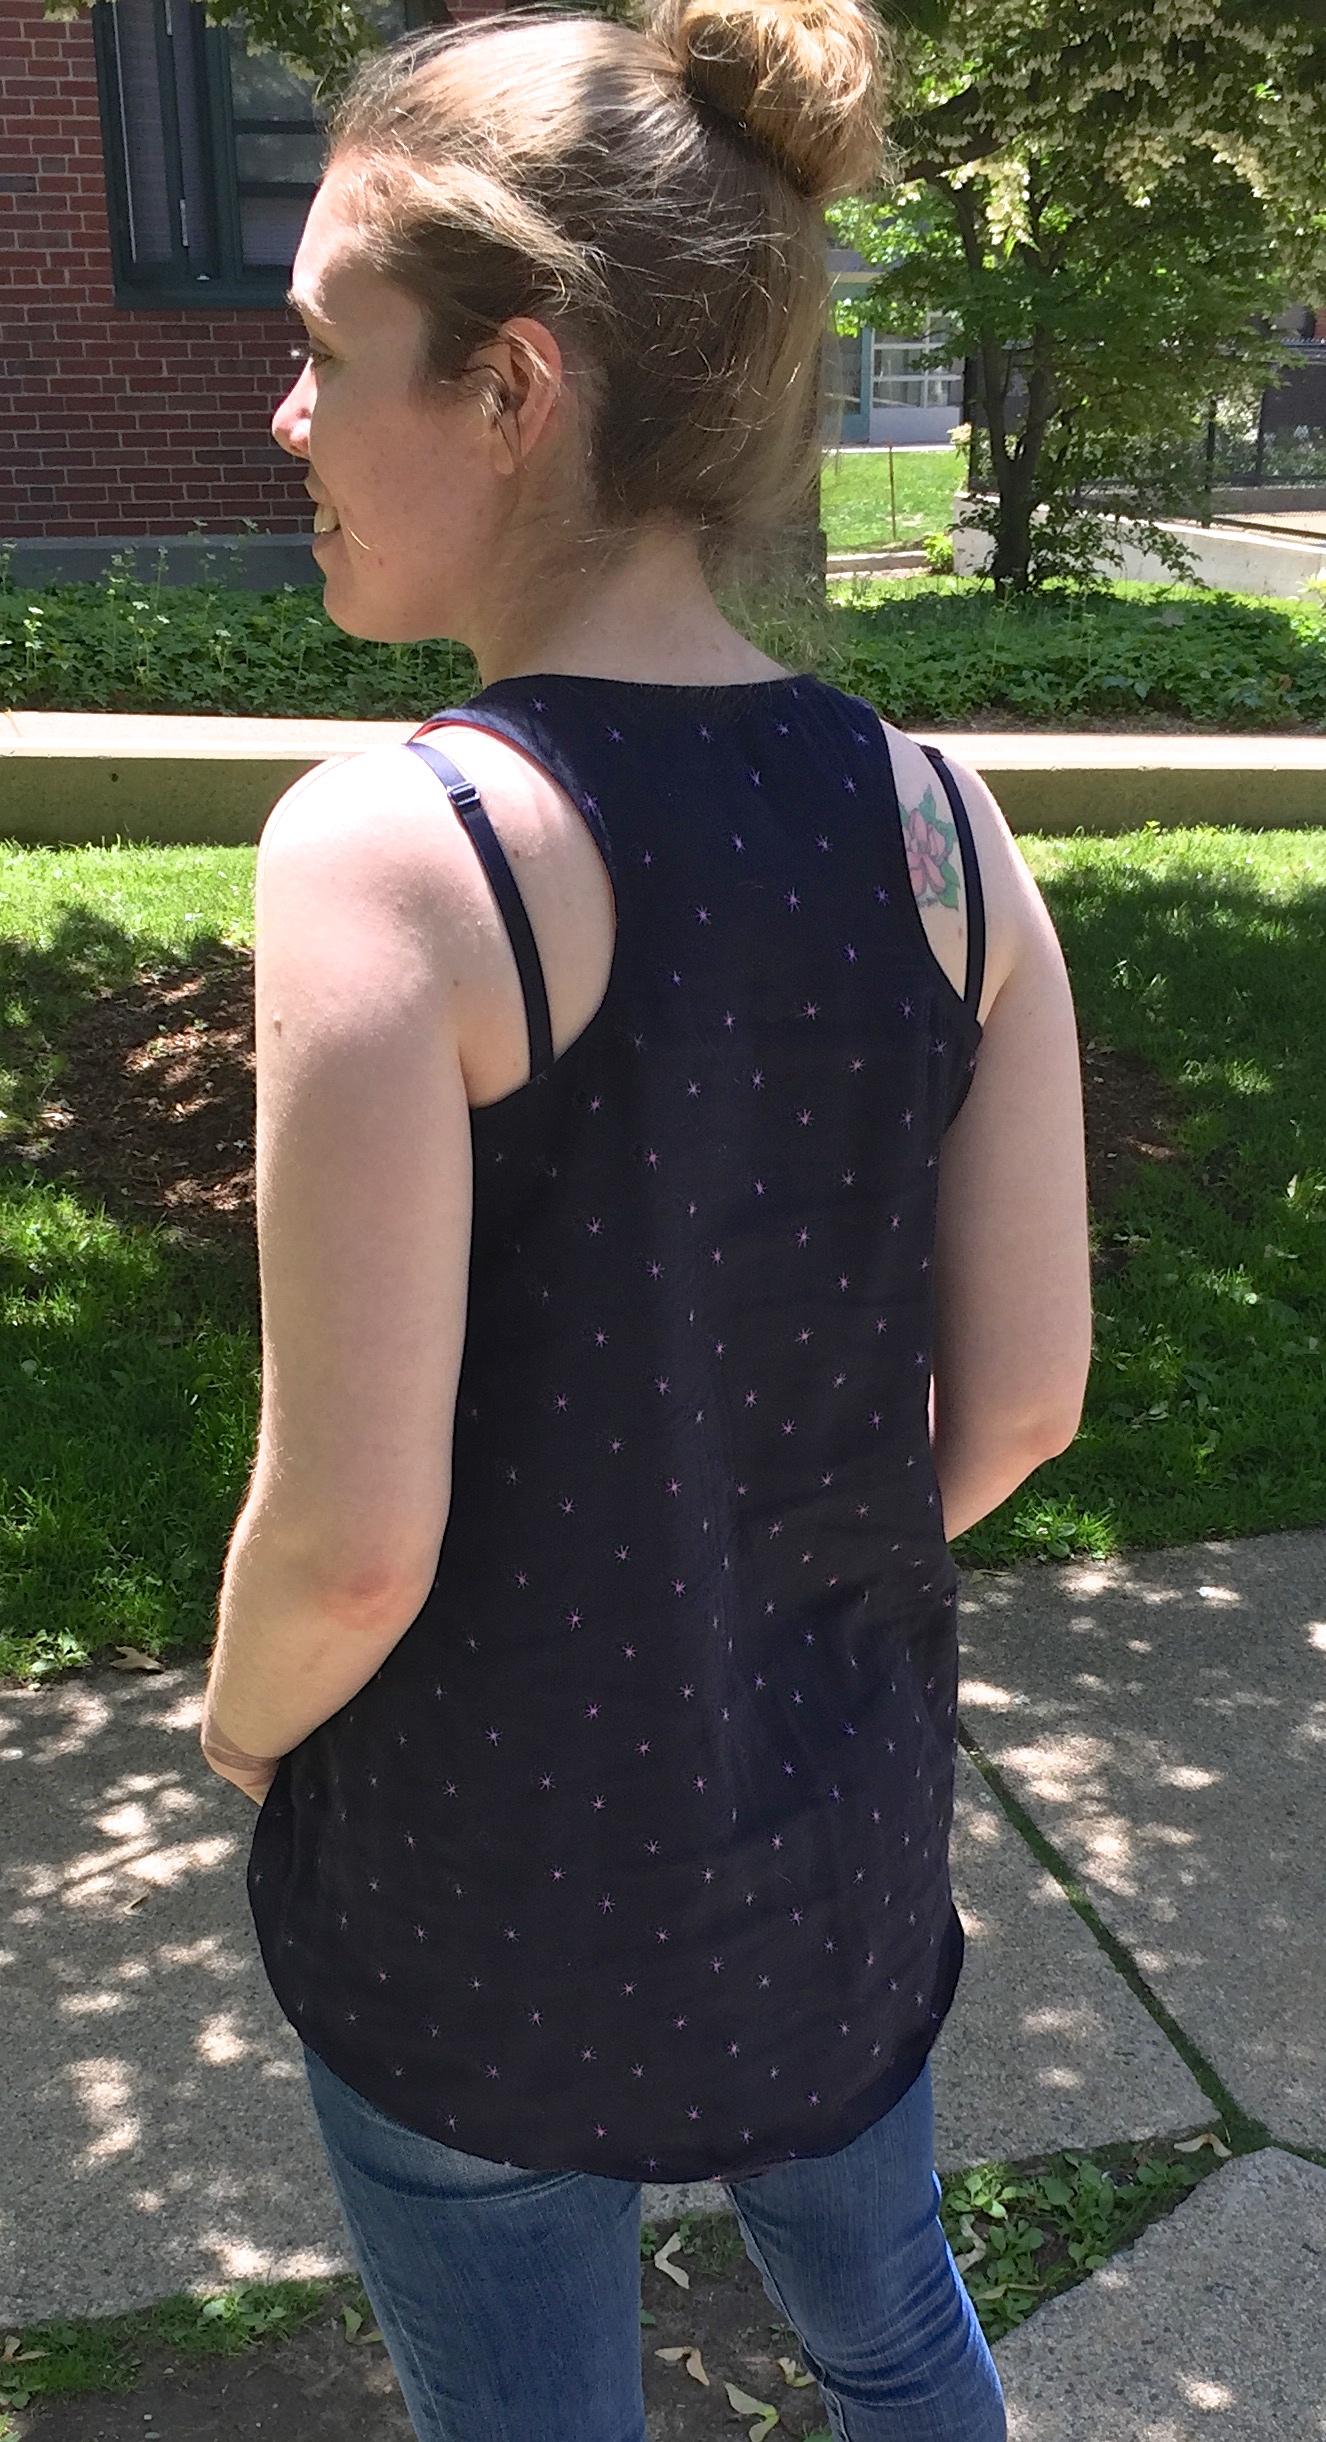
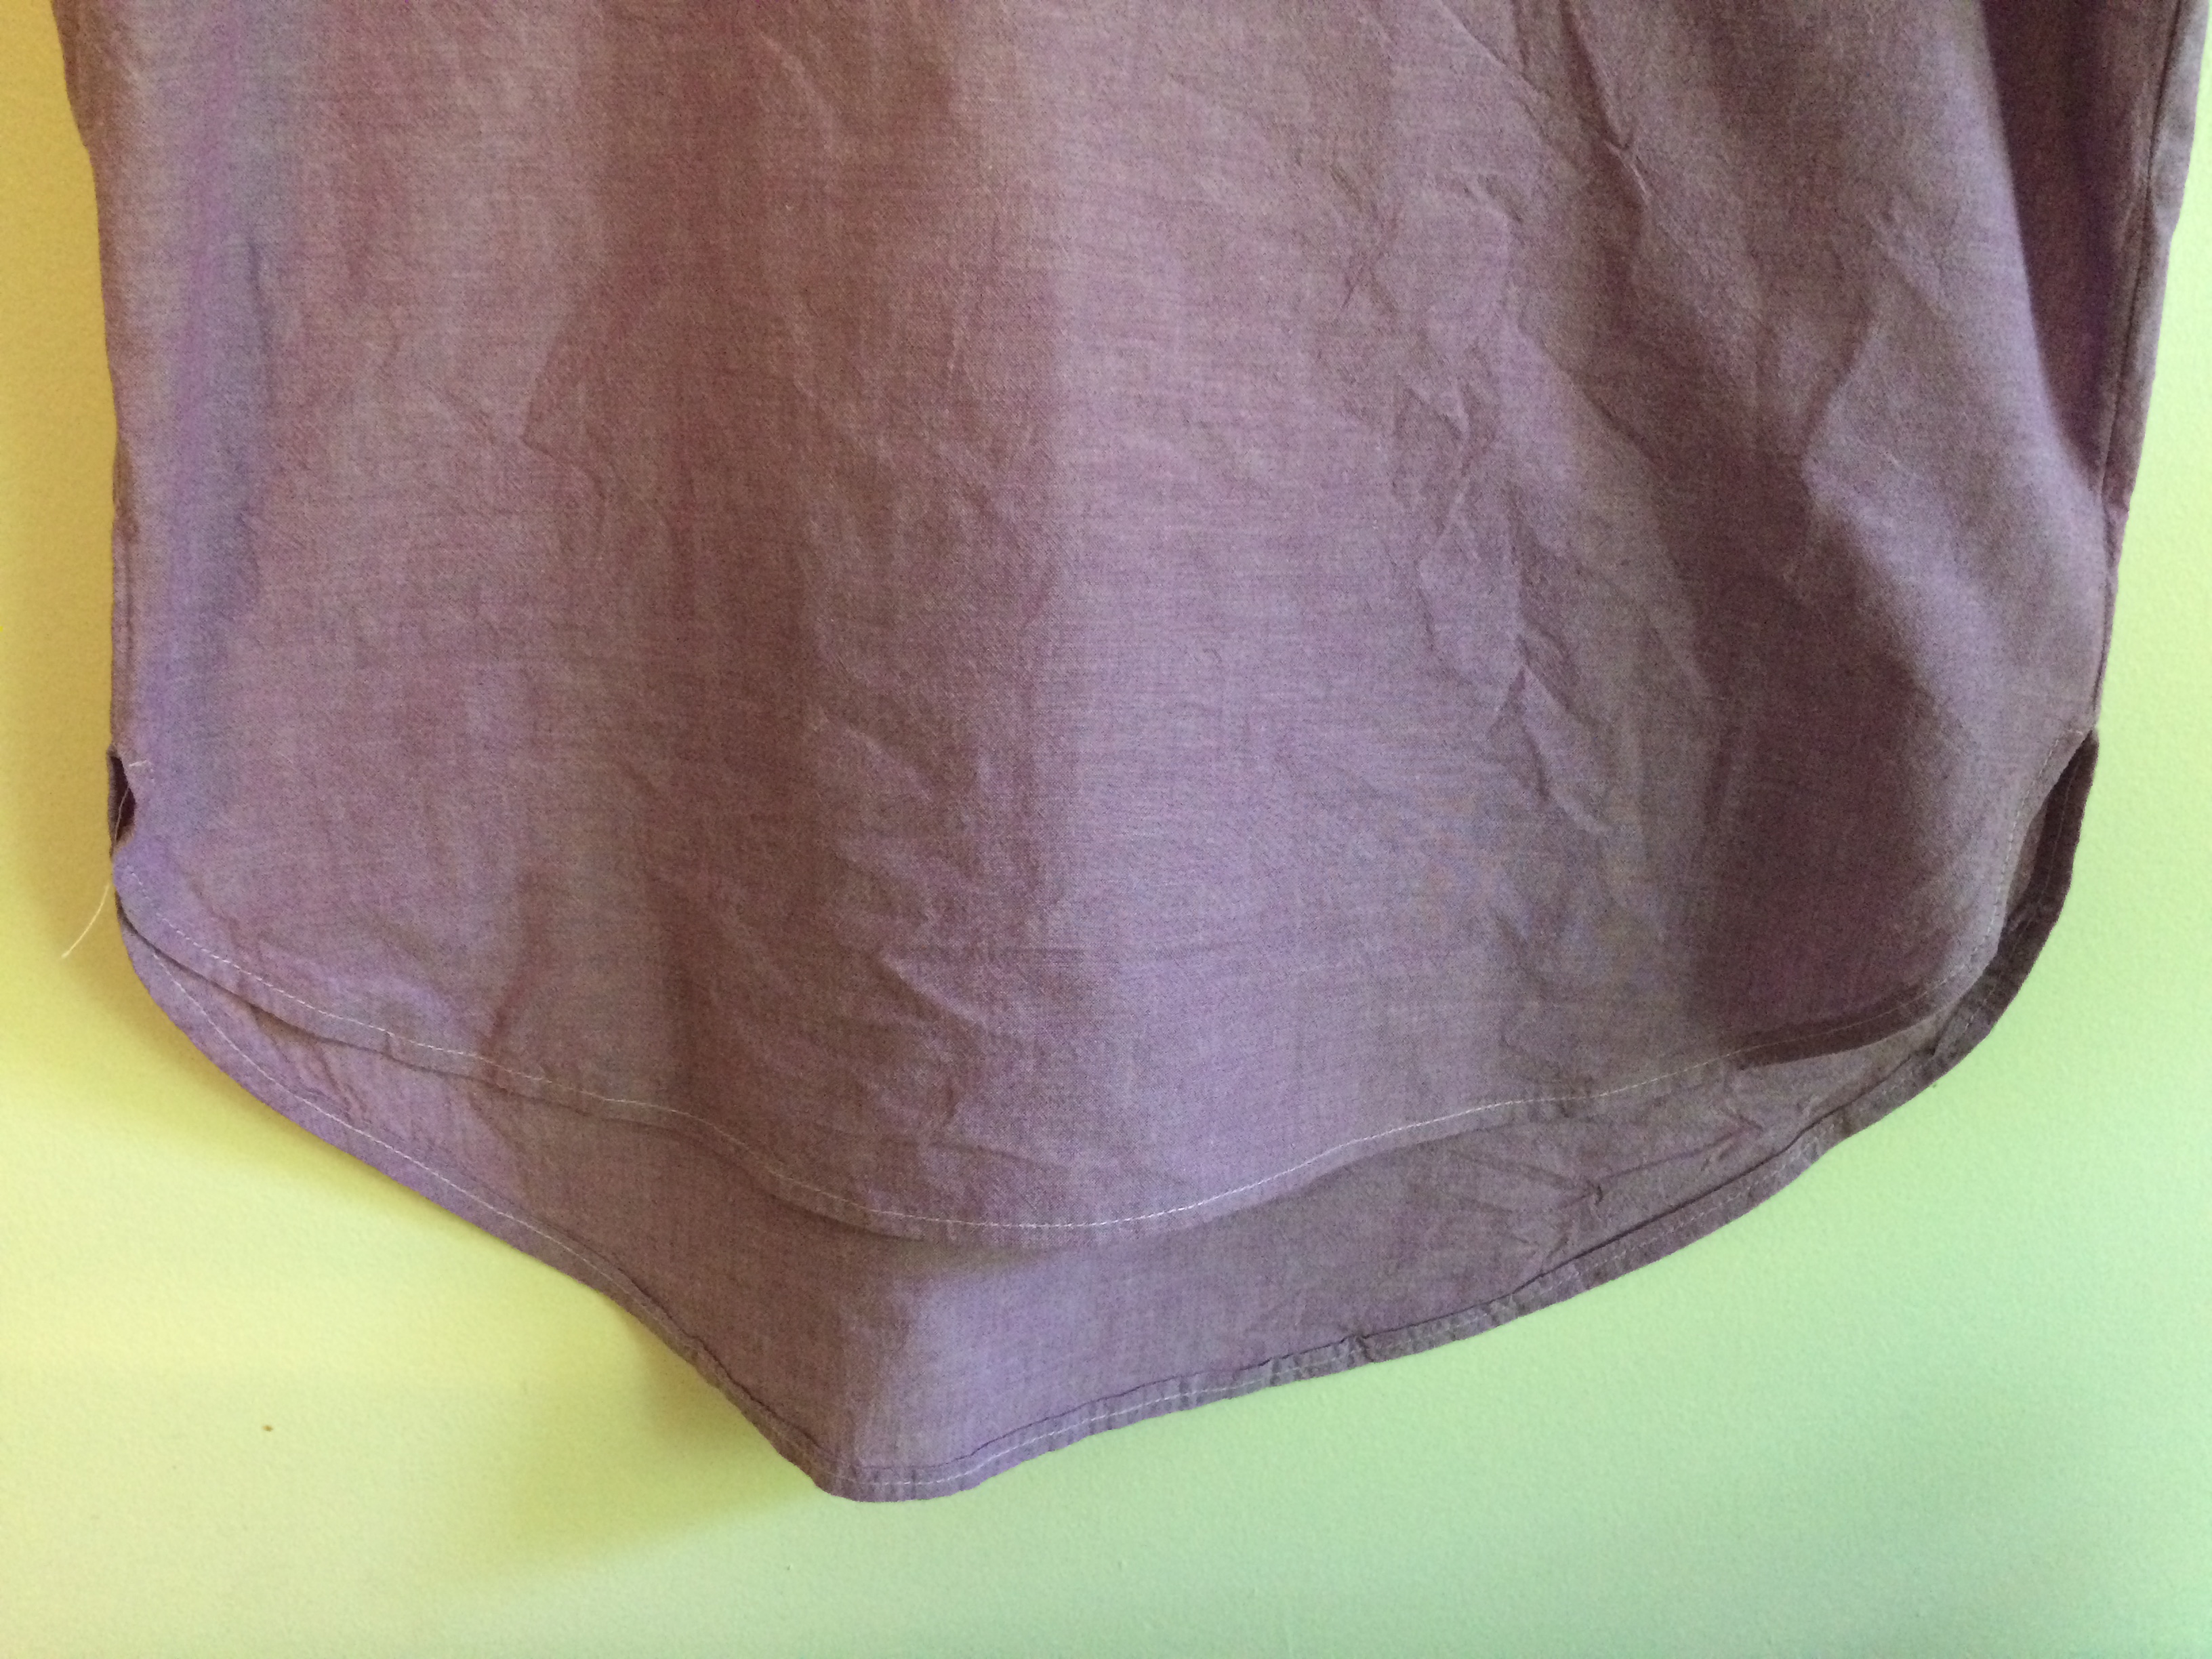
All in all, everything came together very easily for me on this test. The instructions are clear and the only challenging technique is the collar. Alina’s instructions are really helpful and it’s one of those times where you just need to take it slow, follow the steps, and be precise. She’s added even more detail to this part of the instructions since the pattern test and I think it makes this step possible for a confident beginner!

IMG_8270

IMG-2441

Since I made my version, Alina has removed two inches of ease from the hips on the pattern which makes for a slightly slimmer fit. I’m looking forward to this in my next version. Combined with a less heavy fabric I think it will give an even more polished look to this already fantastic pattern!

IMG_8261

I think the Fulton will be a great layering piece this fall and winter. It’s got the coziness of a cardigan but feels stylish and put together! I’m looking forward to adding another one to my wardrobe!

2018 Making Goals

Two blog posts in such a short time period! Don’t worry, I’ll go back to neglecting this blog again soon. But first I want to talk about my #2018makenine plans and general sewing goals for the year. I did very well with my #2017makenine goals and I think that had a lot to do with focusing my goals on staples that I knew I would grab for, or look forward to grabbing, in my everyday life. My job at Gather Here really encourages me to wear handmade because I’m around other makers. And fortunately my “uniform” of jeans, tees, button-ups, and cardigans are perfect for the store and have become some of my favorite things to make.

I have again focused my sewing goals for the year on items that I know will get a lot of wear, and that I will enjoy making. There are repeats from last year because I am much more interested in making things that I will wear than in trying new patterns just to say that I did.

The nine patterns below may or may not be the exact patterns that I use. I’m using them more as guidelines for the types of garments that I want to make and in some cases they represent the desire to make a number of that garment using a couple different patterns.

8D1550F7-99B7-49CE-8CA8-C91DA39C6BBD

First up are the Chi-town Chinos from Alina Design Co. These are the only item on my 2017 Make Nine that I didn’t get to. That was mostly a matter of running out of time so these are back on the list. I also hope to make the Sasha Trousers from Closet Case Patterns. I have four or five twills that will make great non-jean pants and I hope to work through those fabrics with these two patterns.

The Archer Button Up was on my 2017 list and was made twice, but that’s not nearly enough button up shirts for me! I have a whole pile of plaids that I’m itching to sew into Archers. I also want to experiment with lengthening the Archer into a dress, making a slightly more relaxed dress than the Alder.

Screen Shot 2018-01-04 at 2.50.32 PM

Next on the list is a tailored coat using some lovely wool/cashmere coating that I bought a few weeks ago. I really like the look of the Clare Coat from Closet Case Patterns but I’m leaving the pattern choice open for now. I’m not expecting to finish this one in time to be used for this winter so I’ll have lots of time to finalize pattern choice.

Screen Shot 2018-01-04 at 2.55.53 PM

I made lots of tees and tanks last year but I’m hoping to add to that collection this year. I wear one either on it’s on or as a layer almost every day and I would love to replace the last of the RTW tees that I wear. The Grainline Lark Tee is on the list as is the Penny Raglan, the Closet Case Patterns Ebony Tee, and the Deer and Doe Plantain Tee. I’ve been stocking up on nice jerseys and I’m looking forward to batch-sewing tees and tanks a few times this year.

The Lodo Dress from True Bias has been in the back of my mind to make for quite a while but I’ve never gotten around to it. I’m hoping this will be the year! I’m looking to add a couple knit dresses out of slightly heavier weight knits as winter layering pieces and the Lodo should be perfect for that!

Screen Shot 2018-01-04 at 3.11.47 PM.png

I made three versions of the Kalle Shirt and Dress last year and I can’t wait to own so many more of them!! The black linen one that I made for my birthday party is one of my favorite garments ever and I’m looking forward to several more linen shirtdresses next summer. I’m also thinking about a flannel one for this winter! And more shirt versions! And I’m planning to try out the sleeve expansion pack soon. (Can you tell this might be my favorite pattern?) I also want to finally make a Grainline Alder Shirtdress this year and possibly an Alder shortened to be shirt length.

I’m really hoping that I can add another piece of outerwear to my closet soon. I find it so frustrating to get dressed in all of these lovely handmades just to toss a RTW jacket on top. Though I added two jackets to my closet in 2017 neither is particularly warm so once the temps fell below 40 degrees they got packed up for the year. I’ve made the Grainline Tamarack Jacket before but I’m hoping to make a warmer version in time to get some use this winter. I have some waxed canvas, Thinsulate for interlining, and a thick flannel. This may end up being a somewhat tricky project because of the layers but I think it will extend my handmade outerwear season! I’m hoping to lengthen it a few inches and I will add a collar like I did the first time I made this jacket.

Screen Shot 2018-01-04 at 3.27.00 PM.png

I made three Blackwood Cardigans from Helen’s Closet last year but I hope to add a few more this year. They work very well with button-ups and jeans for work or with leggings and tees for lounging. The Grainline Driftless Cardigan will also get made again in 2018. Cardigans are nearly an everyday item for me during the winter and I’m looking forward to having a few more to choose from this year!

And last but most certainly not least is more jeans!! I hope the Closet Case Patterns Ginger Jeans and Morgan Jeans will both reappear a number of times this year. I have quite a bit of denim in my stash and I hope to batch sew jeans a couple times so that I can stop switching between just two pairs all winter! I’ve been pretty happy with the high-waist Gingers so I will make those but also plan to make some of the lower-rise Gingers in addition to Morgan Jeans.

It’s going to be a busy sewing year but I hope it will continue to feel fulfilling to sew my own clothing. I’m hoping to do some purging of the remaining RTW clothing that is lurking, mostly unworn, in my closet and bureau. It has felt so great to be able to wear handmade almost exclusively and I look forward to continuing with that trend in 2018!

2017 Sewing Wrap-Up

One of my goals for 2018 is to blog more, which shouldn’t be too hard since I only blogged once last year…oops. I don’t think I’m going to be a weekly blogger, or that I will even write a post for every project that I finish but I’m aiming for a post every month.

I’m going to start with a wrap-up of the projects I worked on last year.

By a quick count I made 55 garments last year. I think I’m probably missing a few but even with 55 that means I’m averaging about a garment a week!! I love the graphs that lots of makers have been posting so here’s the breakdown:Screen Shot 2018-01-04 at 12.51.48 PM

Lots of pants and shorts, lots of woven tops, and at least 17 knit tees and tanks! I’m very excited about the amount of clothing that I made last year and the fact that it’s allowed me to be wearing almost exclusively handmade most days. That’s a goal that I’m continuing to work toward this year.

2017makenine

My #2017makenine goals included a Grainline Archer, Closet Case Patterns Ginger Jeans, Style Arc Blaire Shirt, Sew House Seven Toaster Sweater, CCP Kelly Anorak, Grainline Lark Tee, Alina Design Co. Chi-town Chinos, Grainline Hemlock, and CCP Sophie Swimsuit. I made 8 of those 9 patterns, some more than once! The Chi-town Chinos are the only pattern on that list that I did not make and that was simply because they didn’t make it to the top of the list until November when I was feeling the crunch with work and school. They will hopefully be made, at least once, in 2018.

The Ginger Jeans, my Kelly Anorak, and the purple plaid Archer are among my very favorite makes of 2017. Also on the list of favorite makes are my linen Kalle Shirtdress from CCP, my Allie Olson Highlands Wrap-dress, and my Alina Design Co. Hampton Jean Jacket.

2017 felt like an evolution of my sewing focus from frosting to cake. I made a number of fun, event-focused items but I focused primarily on sewing well-fitting basics that get worn all the time. I hope to continue that focus in 2018, building a larger and more diverse collection of basics so that wearing handmade daily stays possible and fun!

Hampton Jean Jacket

Oh hey blog, it’s been a long while! Glad you’re still here!

IMG_0337

I’m so thrilled that Alina from Alina Design Co. asked me to be a part of this blog tour because it really gave me the push to sew up this jacket. I’d been meaning to work on this for a while but having a deadline got me working on it! I definitely should have said no when she asked given all the sewing, school, and work commitments going on this month but I managed to get through this jacket and it’s already become a go-to wardrobe piece.

IMG_0259

I purchased the Hampton Jean Jacket pattern as soon as it came out and then jumped on the fabric and hardware kits that Threadbare Fabric was offering to go with the pattern. The denim in the kits was a non-stretch mid-weight in a fairly dark indigo. I knew that I wanted a pretty classic jean jacket–I didn’t currently have one in my closet and felt like starting with a classic one would be most useful. But I also knew that I wanted to get a bit of a jump start on aging and wearing in my jacket.

IMG_0255

I followed Alina’s directions for bleaching denim and made a day of it bleaching both the denim for this jacket and some natural denim that I wanted white for some Morgan Jeans. Bleaching went well and I was able to achieve the color I was going for based on my test swatches.

IMG_E8063

I did decide against further distressing partly because I didn’t want to rush the process of distressing and ruin my jacket and also because I’ve never distressed denim and it makes me anxious to think of taking sandpaper to a handmade garment! (That said, I think some of the distressed Hamptons that I’ve seen are absolutely perfect and if I make another one I might give it a try.)

IMG_0230

I’m hoping to throw my Hampton in the wash regularly until it starts to wear in a bit. As I’ve washed and worn my handmade jeans I do really love the way that they break in  and I hope this jacket can achieve a similar look.

I made no fit adjustments to my Hampton, choosing to make a straight size 12. I was daring (read: irresponsible) and did not make a muslin for this jacket. This was mostly a matter of feeling crunched for time, but I’ve found that I’m generally safe going with my measurements in indie patterns, especially when they are a looser fit. The size I choose feels roomy enough for layering underneath but not too big that I can’t wear it with just a t-shirt underneath. (Obviously I would recommend to anyone not confident about their sizing to make a muslin because it’s a real bummer when finished garments don’t fit!)

IMG_0313

I sewed up my jacket following Alina’s fantastic instructions, deviating only slightly to sew as much with regular thread before switching to topstitching thread. I’ve discovered while sewing numerous pairs of jeans that changing up the construction order to do as many steps as possible with each thread before switching really helps the process go faster.

IMG_0266

The only design change I made was to line the back yoke. I didn’t really want the stitching to show on the back from adding my label so a lined yoke was an easy way to hide that. I sandwiched the back bottom panels between the inner and outer yokes and pressed both up and topstitched through all three.

IMG_0335

I did not use flat-felled seams for my jacket, again partly because of the time crunch but also because I like the look of serged and topstitched seams on the inside.

IMG_0339

Overall, this jacket came together so much faster than I was expecting. I had no problem with things coming together; the pattern is drafted perfectly. It probably took me about 20 hours over the course of five days which was a lot less time than I had anticipated. It’s a very approachable pattern, even though there’s a lot of pieces and a lot of seaming it goes together quite quickly!

IMG_0274

My jacket is pictured here with a few different outfits–one thing that I’ve loved about this jacket so far is that it seems to go with everything! Also, I had a lot of fun deciding which enamel pins to add to my jacket. These two, from Colette Patterns and Quilt Kween were top choices for now but I think I’ll probably switch them out once in a while.

IMG_0333

If you are looking for a great layering piece to add to your wardrobe I highly recommend the Hampton Jean Jacket! Alina is offering a discount to readers this week so go pick up the pattern and use “HAMPTONSFORALL” to get 15% off!

IMG_0231

There are six other fabulous ladies sewing up and sharing their Hampton Jean Jackets this week! Go check out their fantastic versions!

HamptonBlogTourBlogs

Hampton Jean Jacket Fall 2017 Blog Tour
October 9: Helen’s Closet
October 13: Well Fibre
(Other garments pictured in this post include the Morgan Jeans, a Lark Tee, the Emerson Pants, and the Ogden Cami.)


Marianne Take Two

On the search for another fast project a couple weeks ago, I happened across a cotton spandex jersey that I got from Girl Charlee without having any real plans for it. It was hot here the week I made this and skirts and dresses were the best way to stay cool.

IMG_3988

I thought about trying out a new pattern but I was getting started later in the day and really wanted to finish whatever I decided to make in time to wear it for Me Made May the next day. My previous Marianne Dress (blogged here) only took a few hours so I knew this pattern was what I was looking for. I think from cutting out to clipping threads this whole thing took me three to four hours. Not bad!

IMG_3978

I made Version A of the Marianne Dress by Christine Haynes. My only modifications were to skip the collar and to add slim bands to the cap sleeves instead of folding over the sleeves and hemming them. I figured out how long to make the sleeve bands by calculating what percentage of the neckline length the neck band piece was and then making the sleeve band length the same percentage of the armhole edge.

IMG_3996

I added the sleeve bands in exactly the same way as the neckband is added in the pattern. Easy peasy!

I decided to stitch down the hem of the dress without my double needle because I still don’t feel like I get the results I’d like from it. I know this means I just need to play with it a bit more but who wants to do that when there are so many other things to be sewing and I could just wish for a coverstitch machine instead.

IMG_3992

I was intending to just stitch the hem down once but when I was almost finished I noticed that I’d missed an inch or so of the hem in one spot. Rather than take out what I’d done (we were going for fast, lazy sewing project here!) I decided to just sew another line underneath. So it looks like I used a coverstitch machine or a twin needle but this was just two lines of stitching with my walking foot.

IMG_3976

Not much else to say. This is still a great pattern. I basically feel like I’m wearing pajamas all day when I wear it, and it only takes a few hours to sew. Doesn’t get much better than that!

IMG_3986

The other great thing about making this dress is that I now know how fantastic this basic cotton spandex jersey is. At $6.50 a yard this medium weight, 95% cotton 5% spandex blend seems very high quality for the money. It sews up very nicely and is about as easy to work with as knits can get. I’ll certainly be adding more to my sewing stash soon!

IMG_3991

Details:

Pattern: Marianne Dress by Christine Haynes

Fabric: Cotton/Spandex Jersey from Girl Charlee

-Hannah

Foxglove Tank and Dress

IMG_4027

I’ve had my eye on the Foxglove Tank by Selvage Designs for a pretty long time. I remember first seeing on Indie Sew as that site was coming on the scene. I didn’t buy it for a while because it was more expensive than other woven tank patterns and I was still leaning about all that goes into putting a sewing pattern together. Not that I’m an expert by any means but after a year of really regularly following a bunch of indie pattern designers I feel like I have enough of a sense of the workload that I definitely don’t feel like I’m overpaying for a $12 pattern as long as it’s a good one.

IMG_4038

And this one is! The pattern goes together easily, there are only two pattern pieces, the instructions are thorough, and the construction is straight forward.

IMG_4023

Continuing in my tradition of making two versions of easy patterns (which totally defeats what I’m usually going for, a quick sew) I dove in with a bunch of double gauze and made a tank and a tank dress.

IMG_4045

I was inspired to make this pattern when I finally gave in and bought some Cotton & Steel Bespoke double gauze last weekend. After I got home I decided that I wanted to try turning the pattern into a tank dress but of course I hadn’t bought enough fabric for that. So I dug up this Kokka broken plaid double gauze that I bought last year and never cut into.

IMG_4042

I made two modifications in order to turn this pattern into a dress. The first was to lengthen both the front and back pieces by 6″ at the lengthen/shorten lines. The second was to lower the front hemline. The original hemline is a high/low hemline. I wanted to maintain the low in the back and mirror the shape, though not quite as low, in the front. Basically I wanted to create a shirttail hem with the pattern pieces I had.

IMG_4049

After making the pattern modifications I cut out my fabric and got sewing. Nothing special about the construction for either of these. I used french seams on the shoulders and side seams which is one of several suggested finishing methods in the pattern. Bias binding around the necklines and armholes and narrow hems finished off these quick makes.

IMG_4063

The only thing I’d like to fix when I make this pattern again is to open up the neckline and the armholes a bit. I’m fine with the style of the higher neckline but it’s actually a bit challenging to get over my head! The armholes are also a bit higher than I’d like so the top feels a little tighter than it actually is. Opening both of those up will be easy and give me the perfect fit I’m looking for.

IMG_4078

I’m so happy to add two new double gauze items to my wardrobe. My double gauze Eucalypt tank got lots of wear during Me Made May and I’m glad I was able to make more pieces out of this fabulous fabric. These are both incredibly comfortable. The Foxglove pattern is also usable with knit fabric and I’d like to give a knit version a try soon!!

IMG_4056

Details:

Pattern: Foxglove Tank by Selvage Designs

Fabric: Kokka Broken Plaid double gauze from Gooba Designs on Etsy and Cotton & Steel Bespoke double gauze from JP Knit & Stitch

-Hannah


Mini Collection One–The Reunions

I mentioned in my Me Made May round-up that I was going to try a new method for planning out sewing projects. Instead of making a crazy long, exhaustive list of everything I want to make for a given season I’m going to try focusing my plans on mini collections for specific trips or events. So here’s my first one…

This mini collection is for two reunions that I’m headed to this month, my husband’s family reunion next weekend and my ten-year high school reunion the weekend after. Because my timeline is fairly short I’ve limited this collection to four garments, one of which I actually finished last night and another of which is in progress. Here’s what I’m planning:

My first project, now completed, is a tank dress that is a modified version of the Foxglove Tank pattern. I’ll post more details about how I modified the pattern very soon. **Update: Info on modifications for the turning the Foxglove into a dress are posted here. **

My in progress item is a maxi-length linen Southport Dress. I bought this pattern the day it came out and quickly matched it up with this gorgeous turquoise linen. I got started on this last month but it got pushed to the back burner for a while in favor of some faster projects. This really shouldn’t be a long project either. I think this is going to be an incredibly comfortable dress so I’m hoping to get it finished soon!

IMG_3971

My next two projects have not been started yet but will hopefully be fairly simple makes too. First off is the Cabernet Cardigan which I’m planning to make in this black sweater knit. I think this fabric is a little on the light side for the pattern but is a very similar weight to a store-bought cardigan in much the same style as the Cabernet. I’ve been wanting to add more cardigans like this to my wardrobe and I’m anxious to see if this pattern fits the bill.

IMG_3974

Last but certainly not least, I’m going to give the Greenwood Tank a try. This pattern looks like it’ll produce exactly the sort of tank I tend to wear most so I’m hopeful this will become a quick staple for my wardrobe. I’m planning to make it in this dark green jersey. This should be another easy make and I’m looking forward to using the pattern for some interesting variations later in the summer.

IMG_3973

What do you have for summer sewing plans? Any trips or events you’re planning to sew for?

-Hannah

Me Made May Round-Up Part Two

IMG_3946

I’m feeling very proud of how well I did with Me Made May. I had two goals when I signed up, the more measurable goal was to wear a minimum of three me-mades each week. I achieved this goal easily, and then some!

I wore handmade clothing 27 out of 31 days (I didn’t get photographs on two of those). At least two of those four days that I didn’t wear something handmade I also just didn’t get dressed. I’m a lazy Sunday sort of person! I guess this just means I need some me made pajamas!! There were six garments that were repeated at least once but even with those repeats I managed to wear 20 unique handmade garments in May!

Here are links for all of the garments that I’ve written posts about:

My other, less quantifiable, goal for Me Made May participation was to use the experience of trying to wear me-made for the month to clarify my sewing aspirations. I don’t have any enormous revelations here but I’ve certainly learned lots from the experience.

The first lesson is one I was expecting, and probably one that many of us have learned over and over again. DRESSES ARE FUN TO MAKE, BUT IF YOU’RE NOT GOING TO WEAR ONE TO WORK EVERY DAY IT’S TIME TO STOP MAKING THEM!!

What is it about dresses? Sure they’re less work than making pants and a blazer but they’re not an insubstantial amount of work. Why are they so captivating? I’m a nanny so technically I can wear whatever I want to work but of course the goal is that I’m comfortable, not worried that anything that happens to my clothing is going to permanently harm it, and most of all that I can run after a three and a half year old in it. This doesn’t rule out dresses for me entirely but generally I need to stick with things that are really washable, roomy, and long enough that I can bend over easily. I have some dresses that fit the bill but for the most part separates just work better. I don’t need to swear off making dresses but should focus more attention on separates that I can wear day to day. Those are the things that I wore the most during May.

The second lesson, and one that I’m still learning, is that it’s ok if I don’t want to sew certain things, it’s ok if I like my Gap tanks and tees. I’m still in the process of figuring out which basics and wardrobe staples I want to spend time sewing and which I don’t. I’m really excited about the pair of jeans I made and I’m looking forward to making more of them. But I don’t want to make long sleeve t-shirts or knit tanks in basic colors. Making super basic items in the same fabrics I can purchase RTW items, not my cup of tea! I know it is for some people and I’m not swearing off making these things. If it’s what I or someone else really wants to make there is absolutely nothing wrong with that. But sewing is an escape for me and deciding that I “should” be making basic tees when I could buy them (likely for less than the cost of the fabric I’d need to make them) takes away from sewing as a soothing activity for me.

My third lesson is really less of a lesson and more of a puzzle that I’m still trying to figure out. That puzzle is all about how I make my sewing plans, stick to them, and get through some of my massive stash of fabric. About six weeks ago I posted here about my summer sewing plans. It included eight garments in May, five garments and a bag in June and six garments in July. I actually sewed quite a bit in May. I made, from start to finish, six garments as well as working on but not yet completing three others. That’s a really productive month for me but unfortunately only one of my finished garments and one of in progress garments were on my list. I’m really happy with the garments I have made but there are also several things on my list for May that I was excited about and would still really like to make.

I think this means that I need to come up with a better system for planning. While I like the idea of having a long list of projects I’d like to get to at some point having three months of sewing all planned out has felt limiting. One thing that I can find a bit overwhelming about the online sewing community is that there are so many patterns coming out all the time and sometimes I just want to jump on the bandwagon and kiss my plans goodbye.

One idea that’s resurfaced several times as this topic has been percolating in my brain is to try to focus myself on really mini collections, the sort that would be perfect for a weekend getaway. I have several shorter trips planned in the next several months and focusing myself on three or four items to make for each of those instead of trying to have one massive plan for a whole season’s wardrobe seems easier. I’ll be back later this week to tell you about my first mini collection.

So there are my Me Made May thoughts. How did Me Made May go if you were participating? Do you plan out large numbers of projects or just sew whatever is on your mind?

-Hannah

Lou Box Tops

My schedule and energy level over the last few weeks have left me most interested in faster, instant gratification sewing projects. This probably has a lot to do with not knowing how much sewing time I’ll have from day to day or week to week. It’s felt too frustrating to start longer, more in depth projects not knowing when I’ll be able to finish them.

IMG_3827

Patterns like the Lou Box Top from Sew DIY, with just three pattern pieces (two without the pocket) and minimal bias binding are really hitting the spot right now. So much so that I made 2!

IMG_3828

One of the best parts of this pattern is the number of options it comes with. In addition to being able to use the pattern with knits or wovens, there are two different necklines (a scoop and a crewneck) and 3 different hemlines (straight, curved or a high-low with a dramatic dip in back).

IMG_3898

There are two front pattern pieces depending on whether you’re going with the scoop or crewneck and then the hemline pieces can be mixed and matched. You can either just print out the pieces you intend to use (she lists the page numbers in the instructions) or print out everything and have lots of options for a variety of closet staples.

IMG_3900

The first version I finished has a scoop neck, a curved hem, and a pocket. There’s not a whole lot else to say about this one. I made it entirely according to the pattern except that I used french seams for the whole thing. The only problem with this is that the tight curve under the arms didn’t take to the french seams quite as kindly as I’d like. Not very surprising but I guess it is a good reason to not question the pattern instructions.

IMG_3831

The second version I color blocked by cutting the pattern an inch or so below the armpit and adding seam allowances to each piece. It has a crewneck, no pocket, and I added a button placket in the back. The crewneck, when made in a woven fabric, requires some sort of opening in the back so that it can fit over your head. the pattern calls for cutting the back in two pieces, seaming it except for the top couple inches and adding a button and button loop at the back neck.

IMG_3897

For some reason I’m all about button plackets right now so instead I cut the top portions of the back in two pieces, adding 1.5 inches to one side for the button placket, and 2.25 inches to the other side for the buttonhole placket. I sewed the plackets down and then sewed the tops to the bottom back portion which I’d cut on the fold.

IMG_3895

The rest of the shirt was sewn just like the first, also with the, “not the best idea ever,” french seams. After I’d finished all the other steps I put four buttons and buttonholes on and called it a day.

IMG_3894

Next time I make this I will size up, while they definitely fit well and are super comfortable, they’re not quite as roomy as the pattern is intended to be and I’d like to give the roomier fit a try. I was short on fabric for the color blocked version, I squeezed it out of two half yard cuts, so I went with the smallest size because with the built in ease I knew it would fit. I’ll probably also go without french seams!

IMG_3890

All in all I’m incredibly happy with these shirts. They’re not a lot of work and are really comfortable, especially in the hot weather, though I know they’ll also layer well in the winter. I would certainly recommend this pattern for some easy basics.

Details:

Pattern: Lou Box Top by Sew DIY

Fabric: Shot cotton from Gather Here

-Hannah

Me Made May Round-Up Part One

Sorry for the radio silence around here recently, it’s been a crazy couple weeks finishing up the semester and supporting Mr Match with grad school milestones. Any available time I’ve had I’ve spent sewing and not updating the bloggity blog.

Here’s an update on how Me Made May is going. This is the first time I’ve participated and I’ve done better than I was planning wearing my me-mades. I’ve worn something handmade 15 out of 18 days though I’m missing one picture.

I’ve been learning very quickly, perhaps relearning because let’s be honest I knew all of this already, which items get the most use in my wardrobe. As much as I love making nice dresses, and as much as I enjoy wearing them, I don’t have as many occasions to wear them as I do dresses I want to make.

What I do go to every day is easy to wear shirts, jeans, and cardigans. My Ginger Jeans have been getting lots of wear, as have my tees and tanks. My more casual dresses have gotten some wear and I certainly want to make more Marianne dresses and Eucalypt dresses.

I think the even more important lesson I’m learning is about fabric choice and wardrobe planning. I’ve got a lot of great prints that had been part of my summer sewing plans but I’m realizing that I may want to rethink some of the those plans, simply based on what I am and am not pulling out of my closet and drawers.

I am hitting the point where I’m going to need to start repeating some things. I’ve still got a few items I haven’t worn though and a few items that I’m working on right now. I’d also been planning on making some Jamie Jeans during the sewalong over on Indie Sew. School work prevented me from participating in the sewalong but I’m looking forward to adding another pair of jeans to my wardrobe.

I’m also prioritizing sewing more tanks and tees. I’ve got a bunch of different patterns I want to try out which will hopefully help me pick out a couple patterns that will become TNTs. So far Me Made May has been a great learning experience and I’m loving getting to show off my handmade clothing a lot more frequently.

Here are links for all of the garments that I’ve written posts about:

I’ll be back in a couple days to show off some of the things I’ve been working on recently. Now that school’s over for the summer I’ve got a lot more time to work on sewing projects. Hopefully I’ll have some great wardrobe additions for the second half of Me Made May. If you’re participating in Me Made May, how’s it going?

-Hannah