Lane Raglan Hack

I’ve been totally consumed for the last two weeks writing a term paper and haven’t had a single minute for sewing. It’s been killing me! I’ve always known that sewing time was a huge mood boost but hadn’t ever experienced being this bummed out by not sewing. I still have another term paper and finals but I was able to take some time yesterday to whip up a great light sweatshirt Lane Raglan hack.

IMG_3648

I got the Lane Raglan as part of the Indiesew Fall Collection but hadn’t used the pattern yet. I know that ideally I should be making a pattern as is before hacking at it but I guess I’ve always been a bit of a rule breaker! This is also a very low key hack.

IMG_3647

I’ve been seeing lots of funnel neck sweatshirts recently, and then last week I saw one on someone and realized I could just make one. I think I’m still new enough to the idea of sewing my own wardrobe that i sometimes forget how simple some things are and that I’m totally capable of making them myself.

IMG_3645

As I was finishing my paper on Wednesday I was trying to figure out what sewing project to work on as a reward for my hard work. I knew I didn’t want to start one of my longer projects, I needed some instant gratification. But I wanted to work on something I was excited to wear. I remembered my desire for a funnel neck sweatshirt, and this french terry I got from Girl Charlee a couple weeks ago. BINGO!

IMG_3643

This was a very simple make. Pattern taped together and cut out to finished garment in four hours!!

IMG_3637

To add the funnel neck I started by lowering the neckline by an inch at the CF. I saw that tip on this tutorial when I did a quick search for funnel neck hacks. It helps to keep this from being a turtleneck. I measured down an inch and graded that out to nothing about an inch onto the sleeve, ending before the shoulder notch.

IMG_3644

I measured the new neckline removing the seam allowance from that number. For me that was a 29″ neckline – eight 1/4″ seam allowances for a total of a 27″ neckline. I measured up, somewhat arbitrarily, from where I though the new neckline would hit to where I wanted the funnel neck to end up. That was 7″. I doubled that because I wanted the funnel neck to be self-lined and added 1/2″ for two seam allowances for a total of 15.5″. I did not add a seam allowance tot he 27″ for the funnel neck width. I knew I wanted to make it need to stretch a bit when sewing it to the neckline of the shirt so it wouldn’t be ripply. I was expecting to make it narrower but it fit into the neckline perfectly.

IMG_3632

Before sewing the funnel neck to the neckline I added two buttonholes. Then I sewed it on just like it was the regular neckband from the pattern. After I’d put everything else together I sewed a line about 1.5″ down from the top of the funnel neck for a drawstring channel. Then I fed a drawstring though and I was done!

IMG_3635

I’m super happy with this one. I will definitely be making another at some point. I’ll probably slim the sleeves a little next time and have the funnel neck narrow a bit toward the top.

IMG_3633

What a fantastic start to Me Made May! I need to focus for a little longer on school work but I’ll be back later this weekend to take stock of my me-mades in preparation for the rest of the month.

-Hannah


Advertisement

Ginger Jeans!!

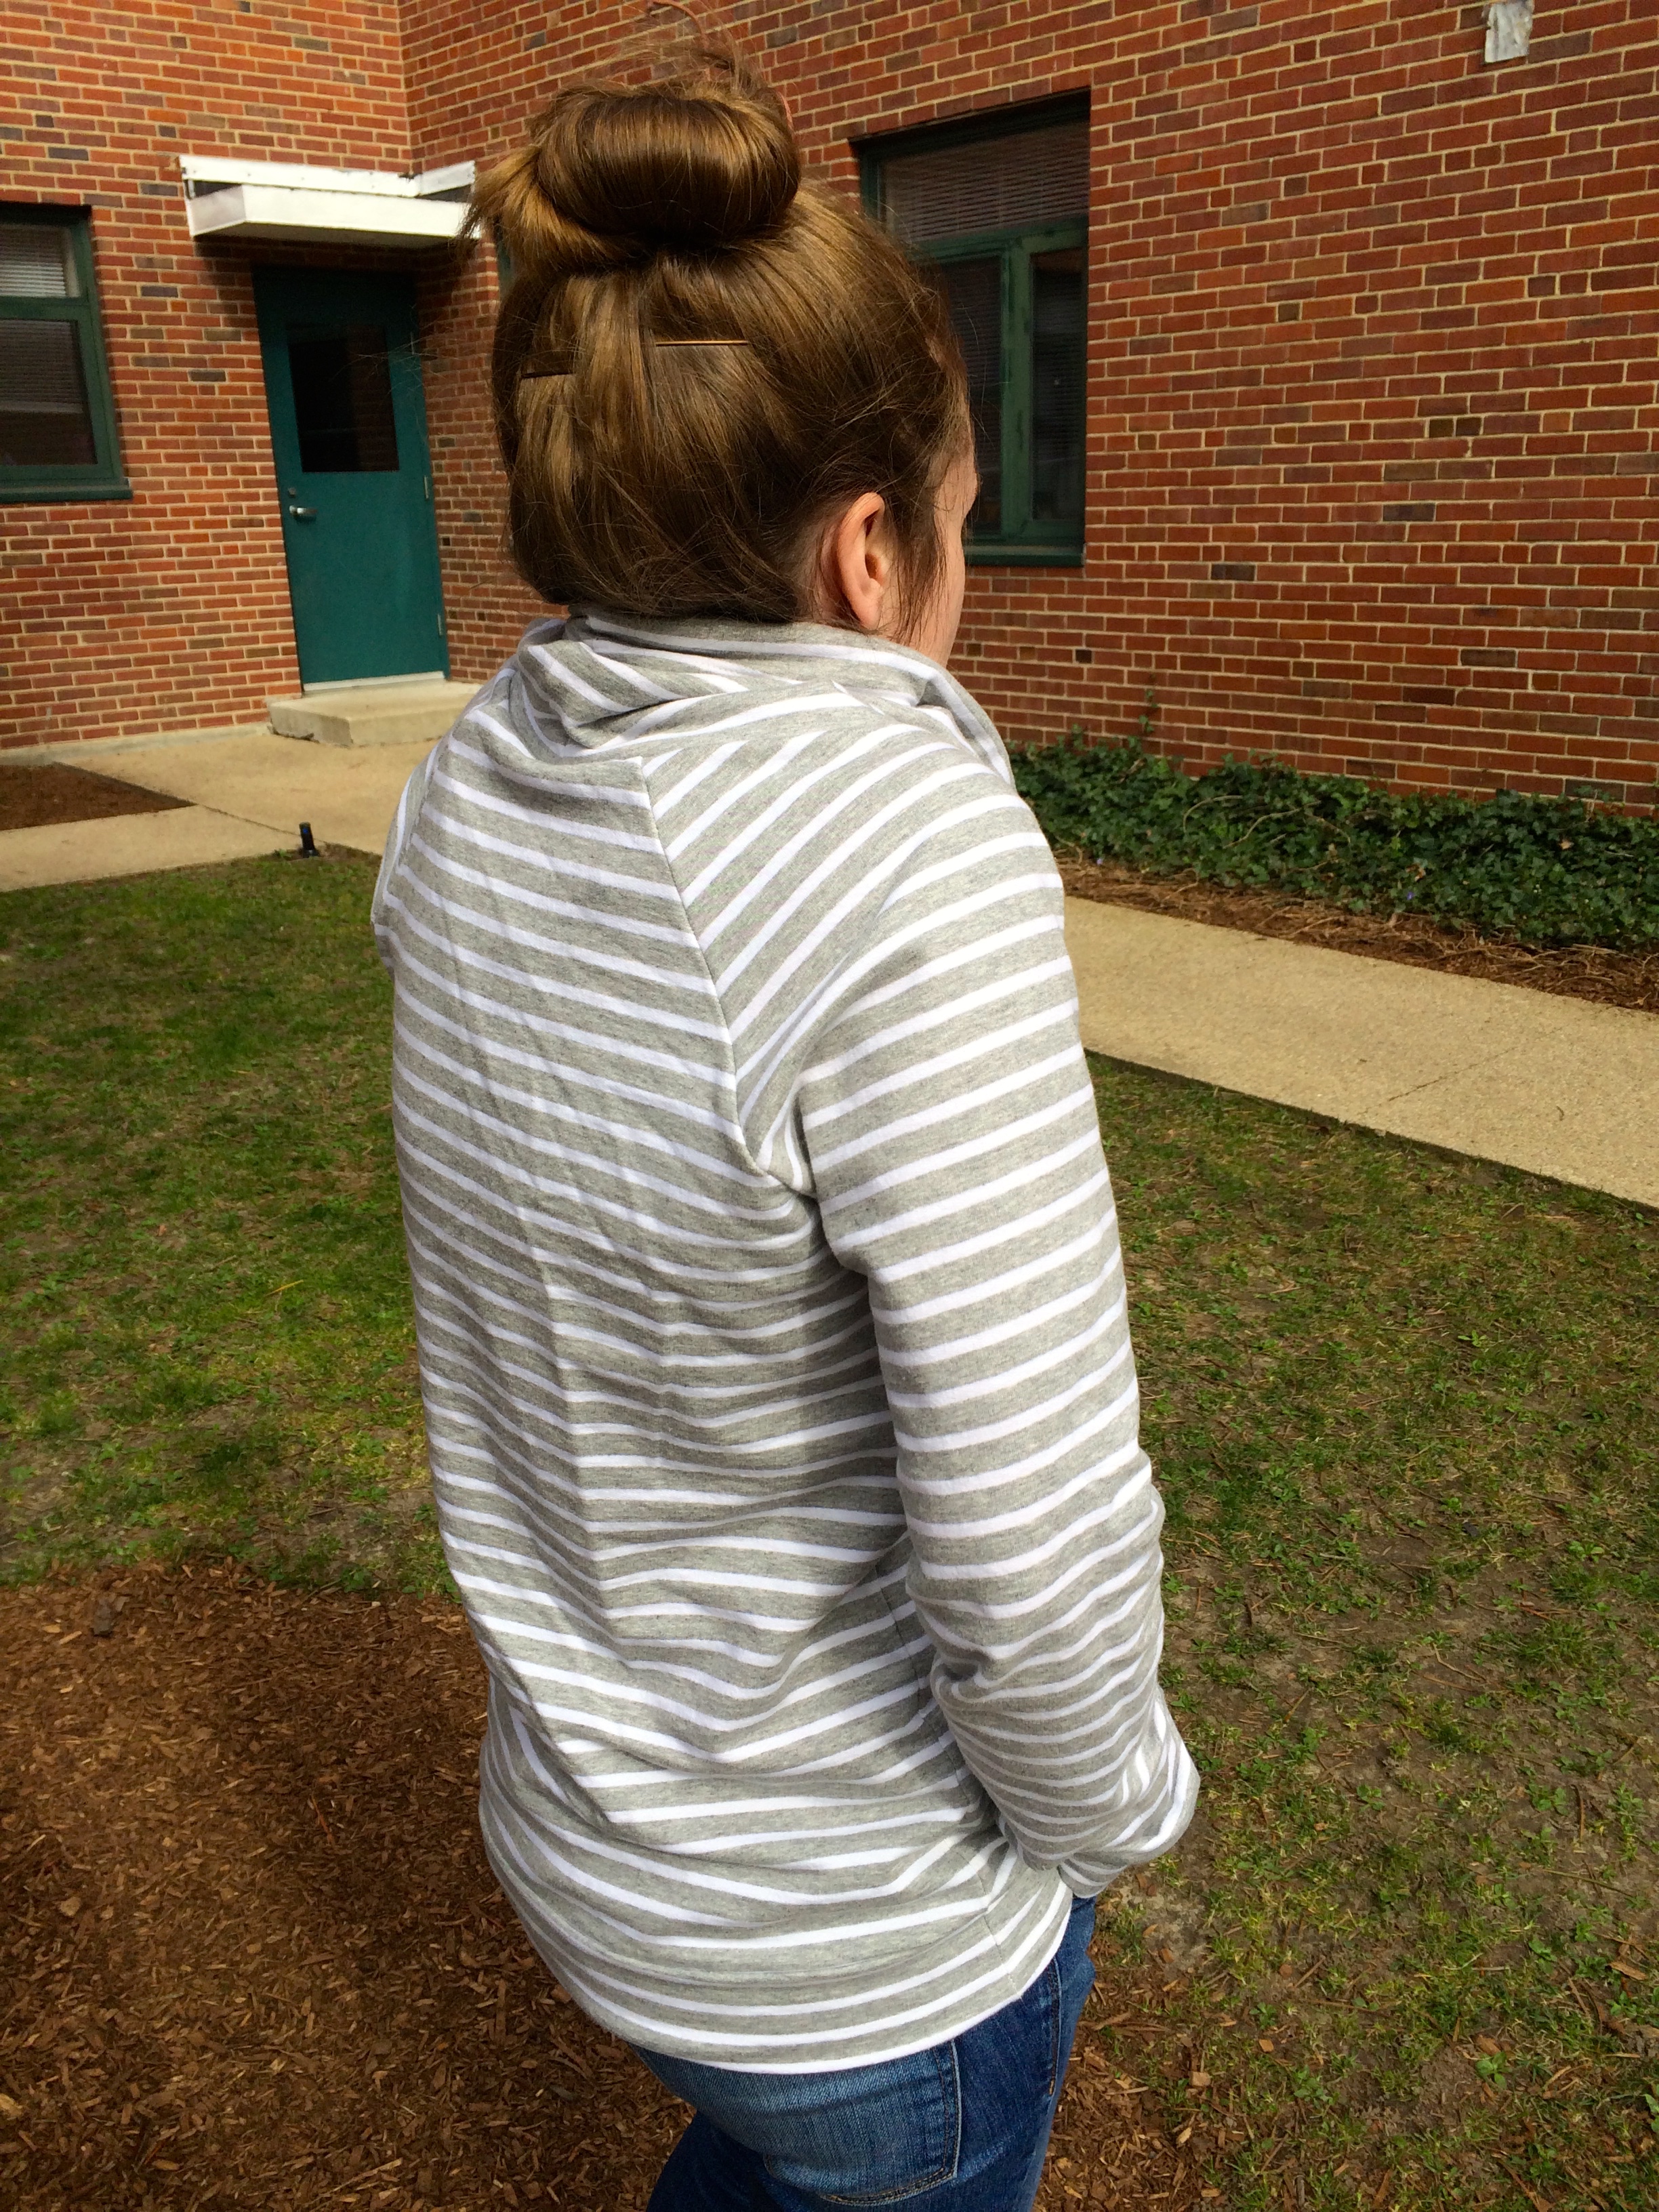
(Caution: What follows can only be described as full on gloating, unabashed pride, and a complete lack of modesty when it comes to any compliments. I apologize in advance but I am just so stinking proud. Have you seen these things? They’re badass.)

IMG_1990

Well hot diggity dog! Or as the beloved namer of the blog would say, “Hot dog, hot dog, hot dog, diggiyah dog!”

I made jeans!

IMG_1969

Not just that…I made wearable jeans!!

IMG_2001

I’d like to take some of the credit and say that perhaps I’m a better seamstress than I thought but I think mostly Heather just wrote a really amazing pattern because these turned out so well. It took me a long time to actually get started on my Ginger Jeans because I was so worried about how they were going to turn out. It’s been five weeks since I made my (successful) muslin and three weeks since I got everything cut out and prepped.

IMG_1952

Do you ever have that happen to you with a sewing project? You’ve read the pattern, cut out the fabric, you’re really excited about the idea of the finished product. But you’re just not sure your technical ability is up to the task? My biggest concern was how my topstitching and finishing skills would hold up on the denim. The places on my previous makes where I’ve been the least impressed with my skills have been topstitching and finishing in particularly bulky areas. I was also worried about fit, of course. Other than a couple pairs of Hudson Pants made around Christmas time last year, I’ve never made pants so I was anxious about how well they’d fit, even though I made a muslin.

IMG_1972

Heather nailed this pattern though, and that’s evident not just from how well I think my jeans  came out, but also from the enormous number of glowing reviews of this pattern and the number of fantastic Ginger-clad butt selfies running around on Instagram.

FullSizeRender

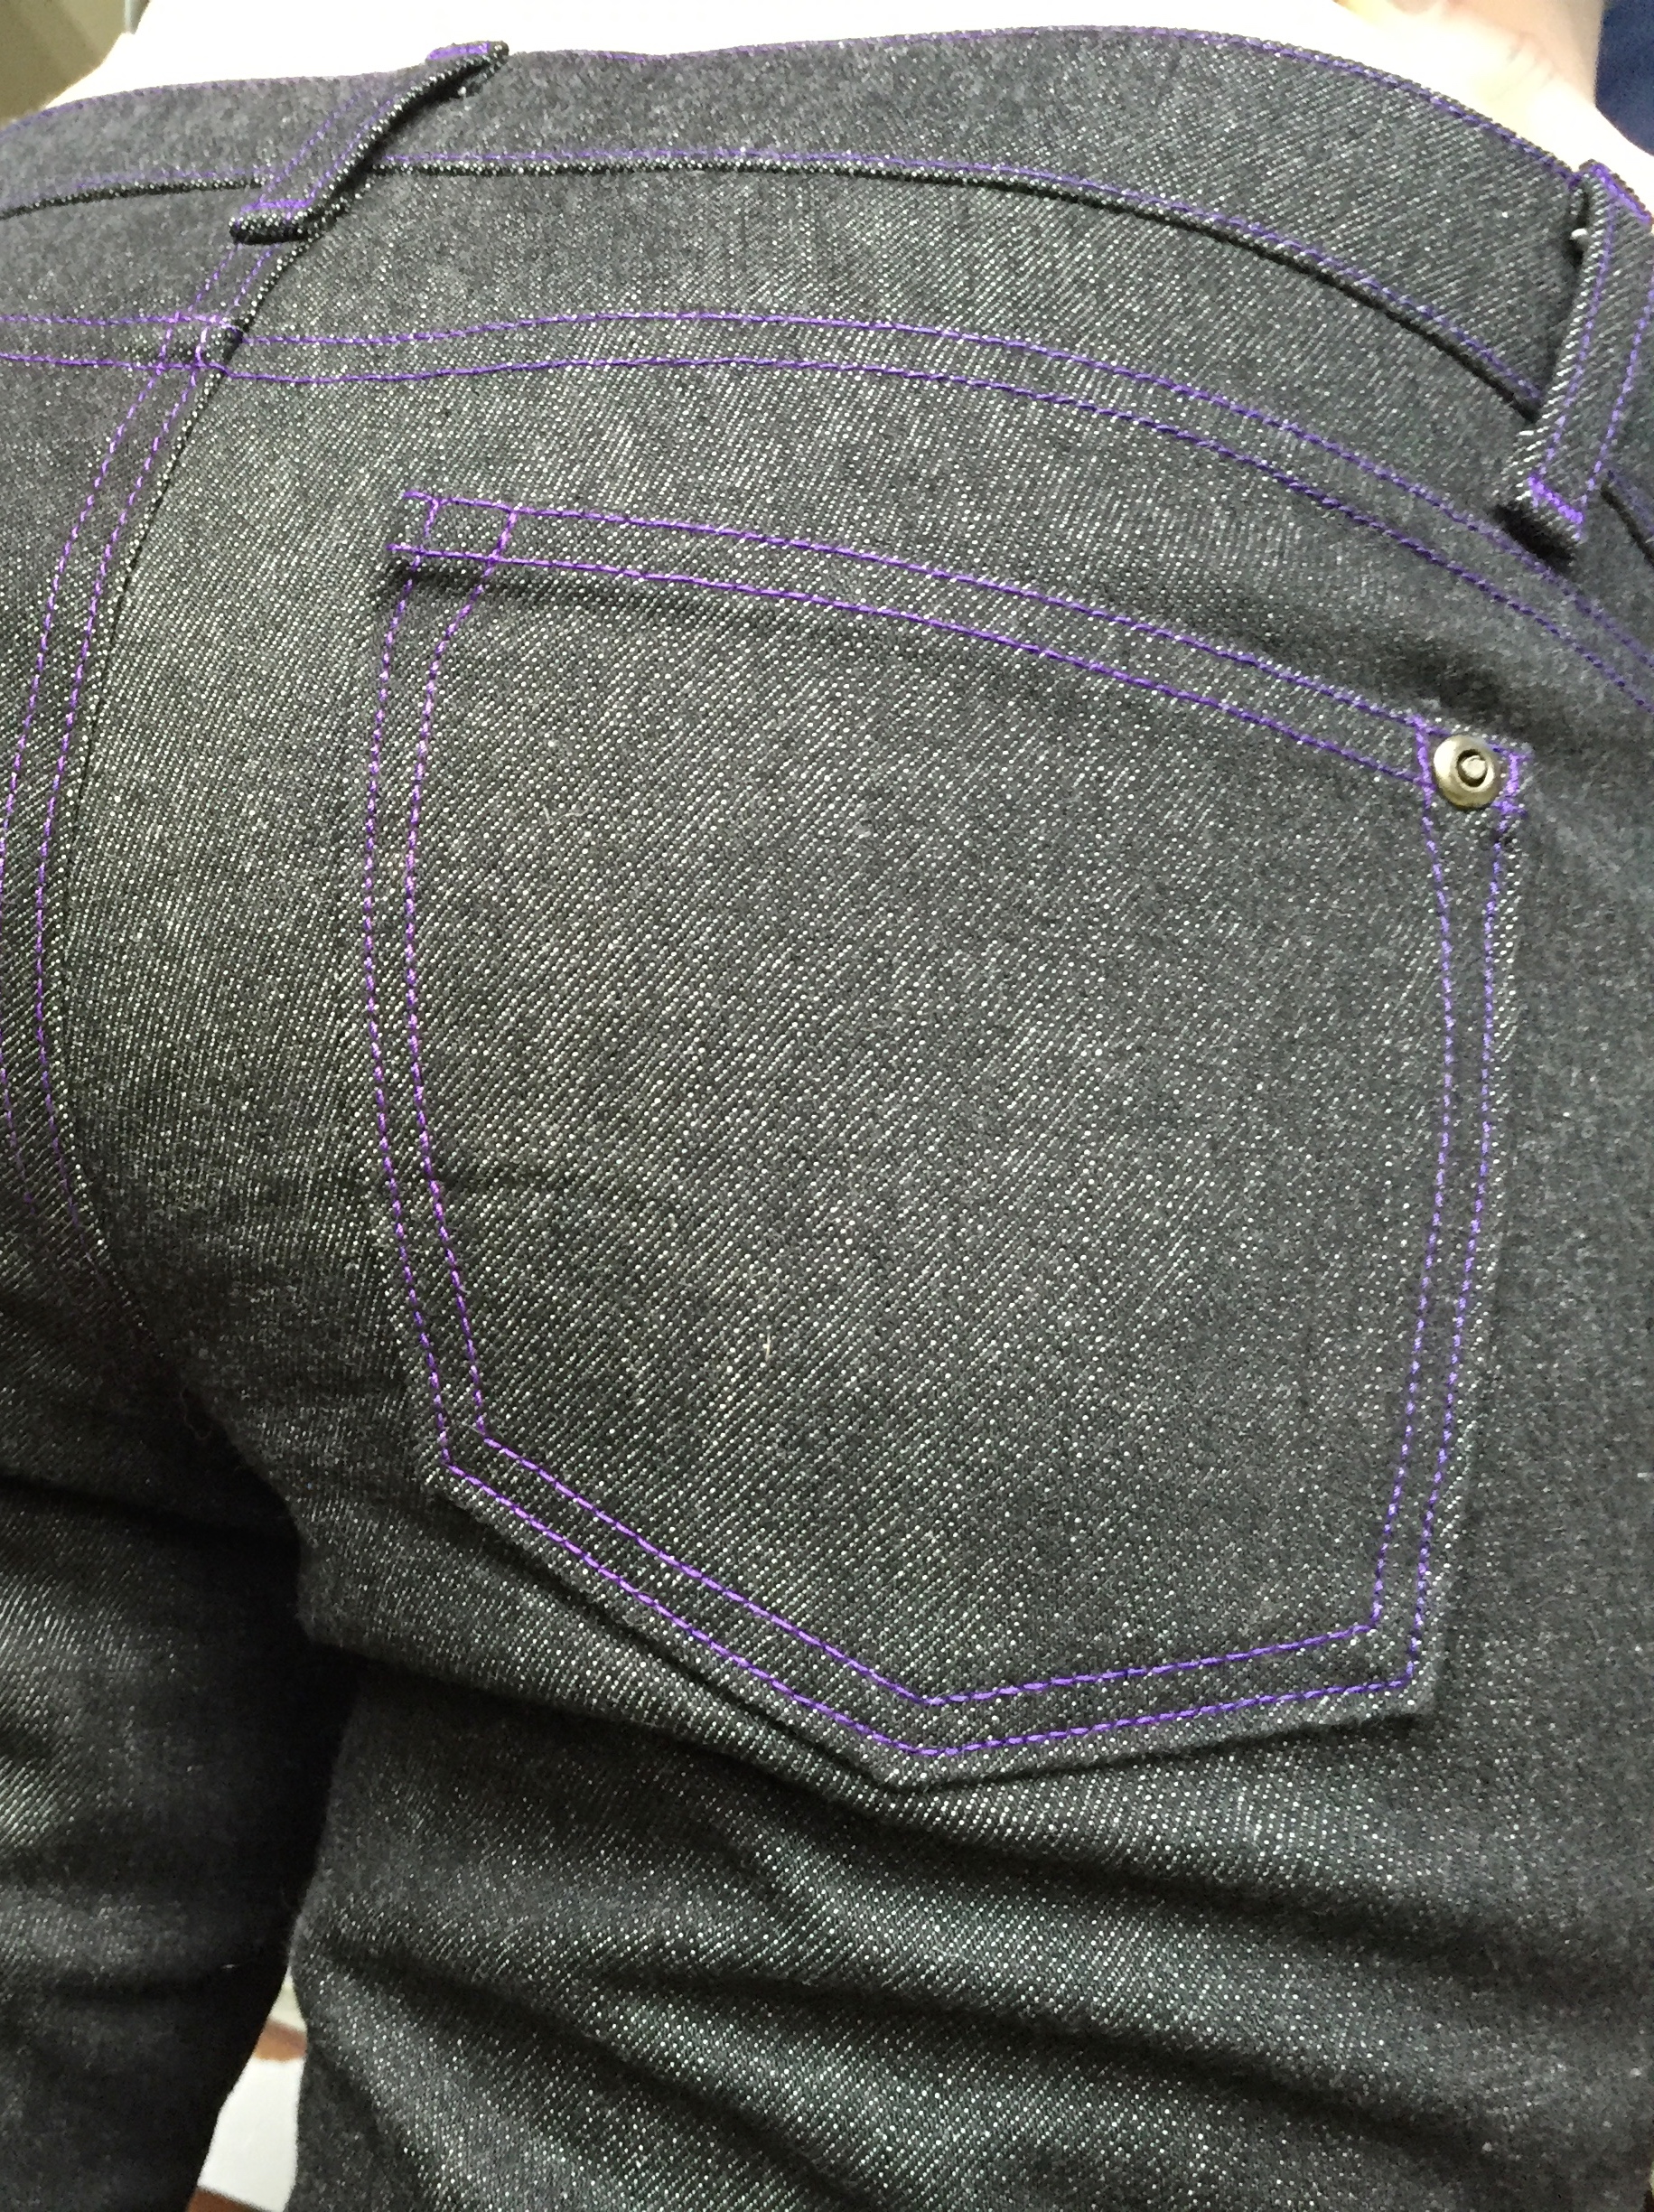
All in all, I was surprised by how easily these came together. I’d made a full muslin version several weeks ago, I’m pretty  sure the only things I skipped were some topstitching and the hem, so it was basically my second time putting them together. Still, I was pleasantly surprised by how quickly it went. Probably 15-20 hours over the course of 3 days. Maybe that’s a long time, but I’m trying to get myself to slow down and do everything well. And I think it shows. (See above caution about lack of modesty.)

IMG_3538

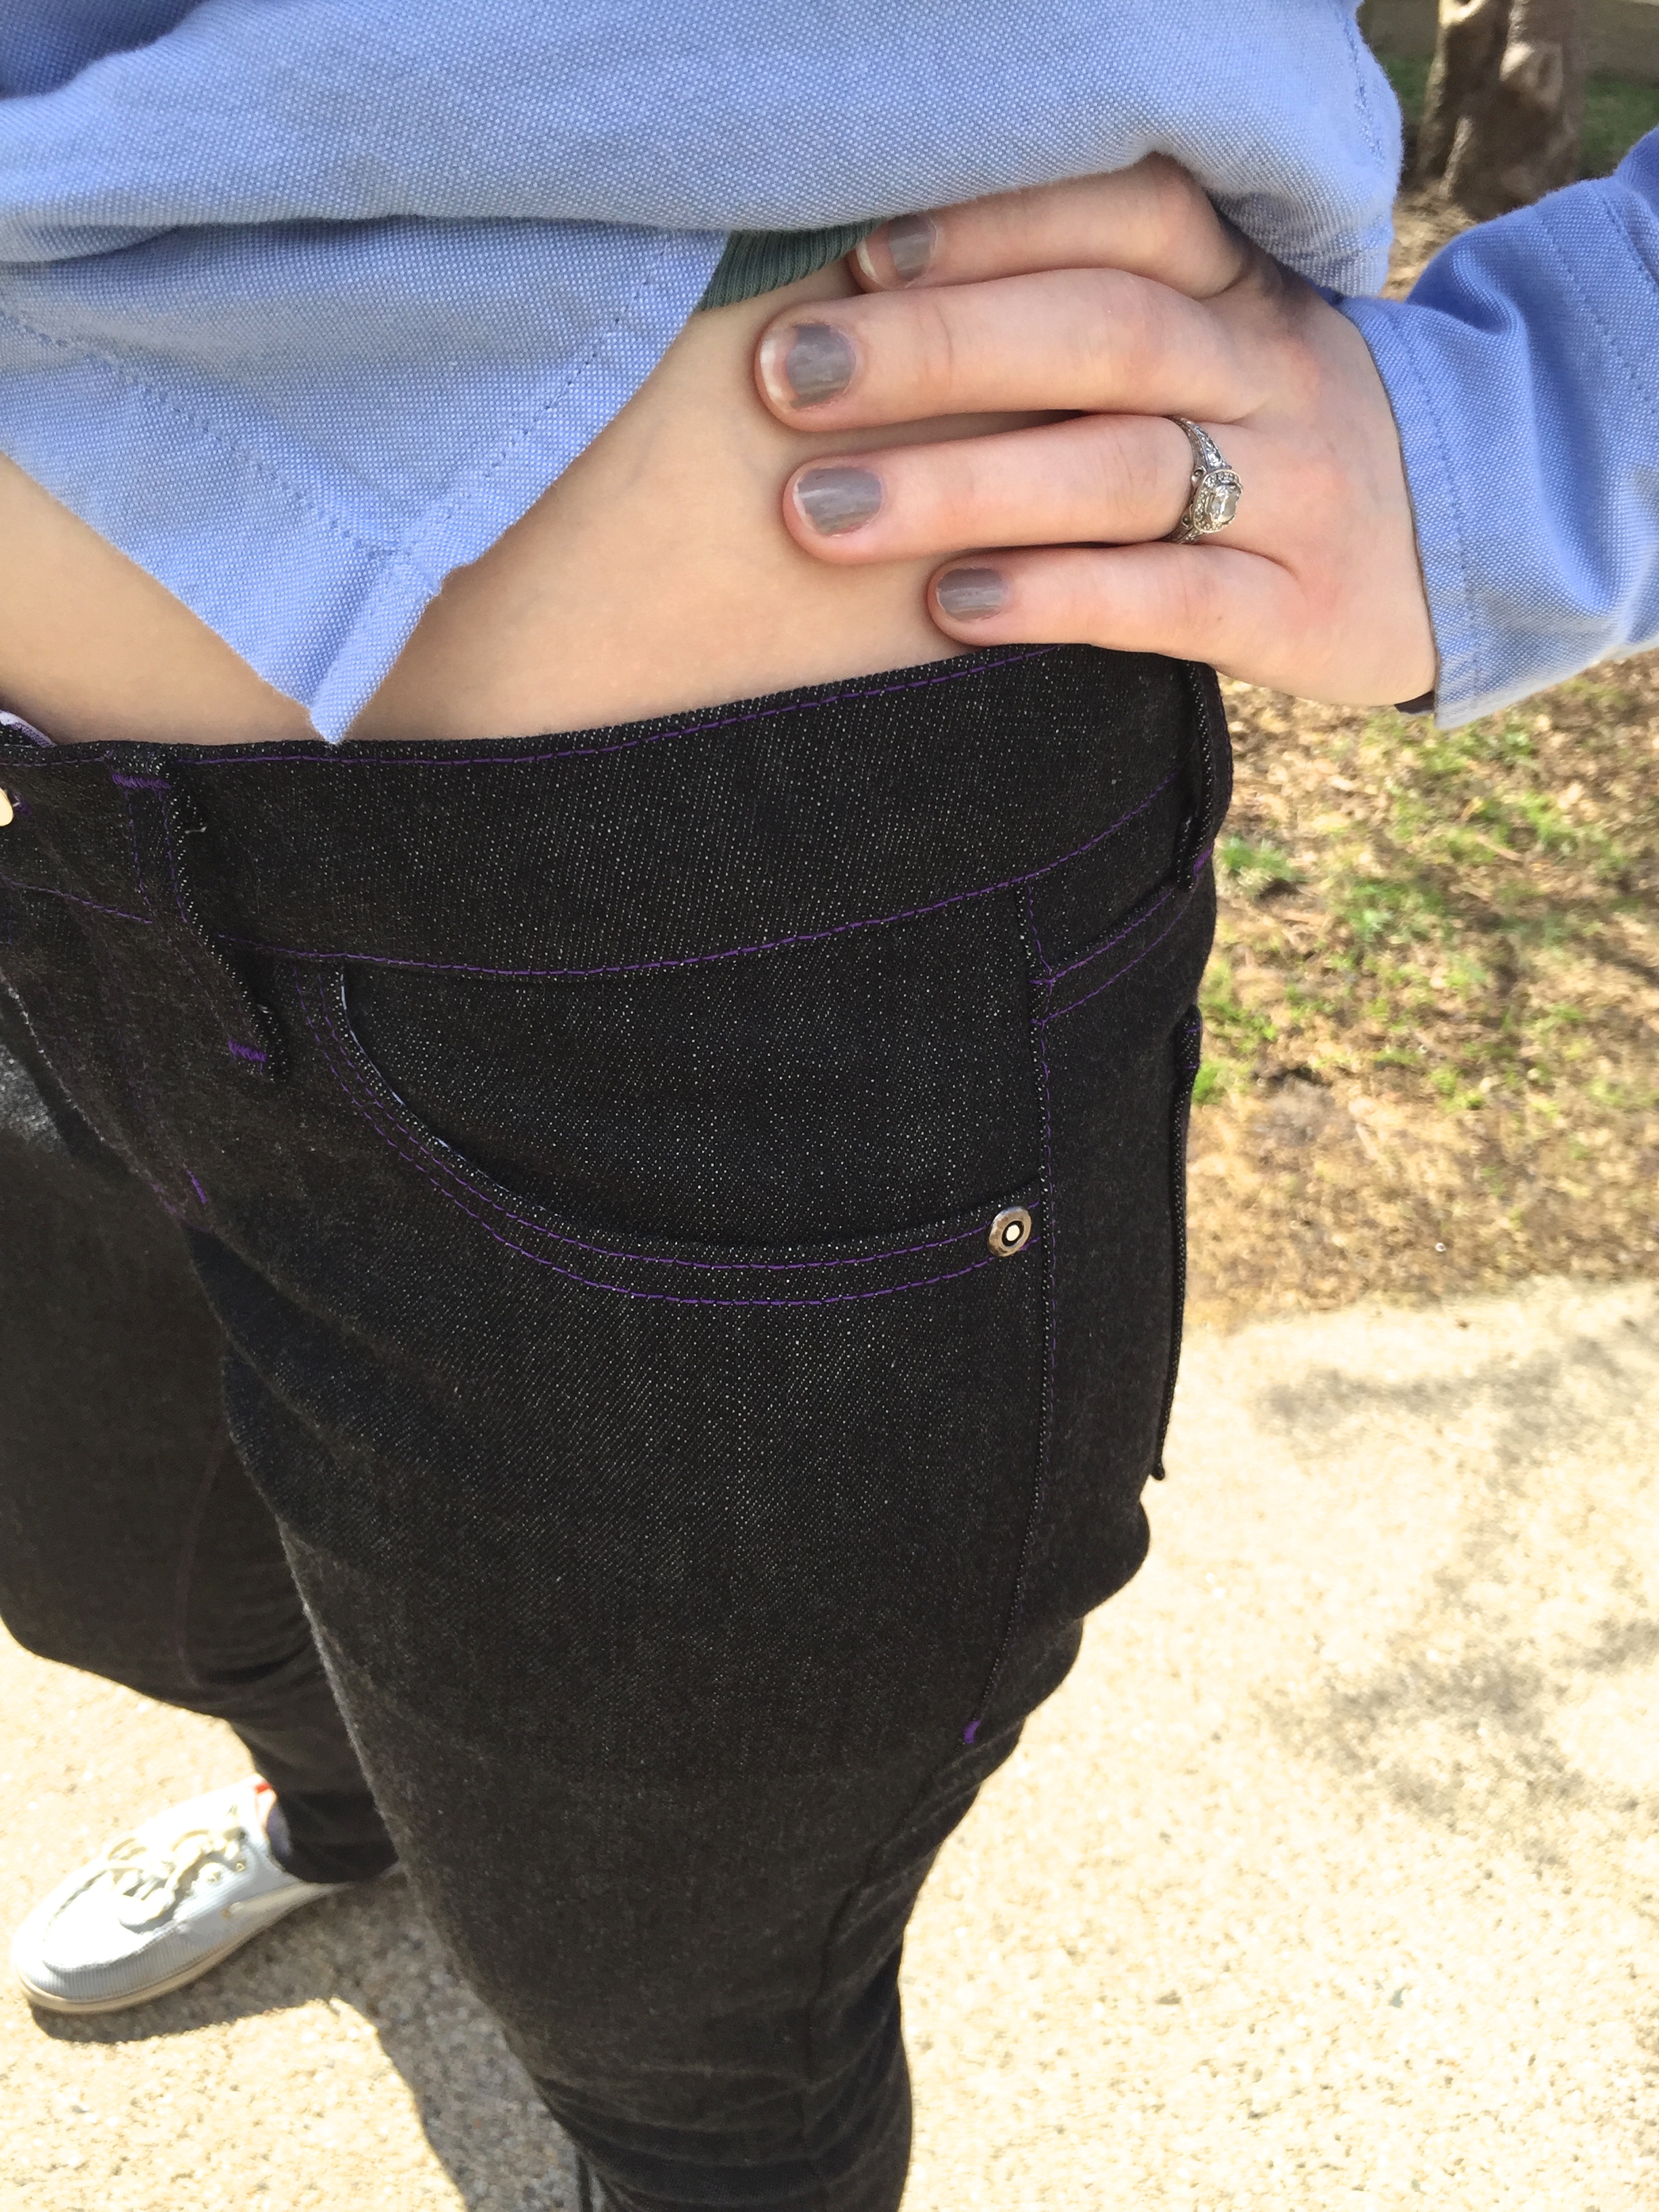
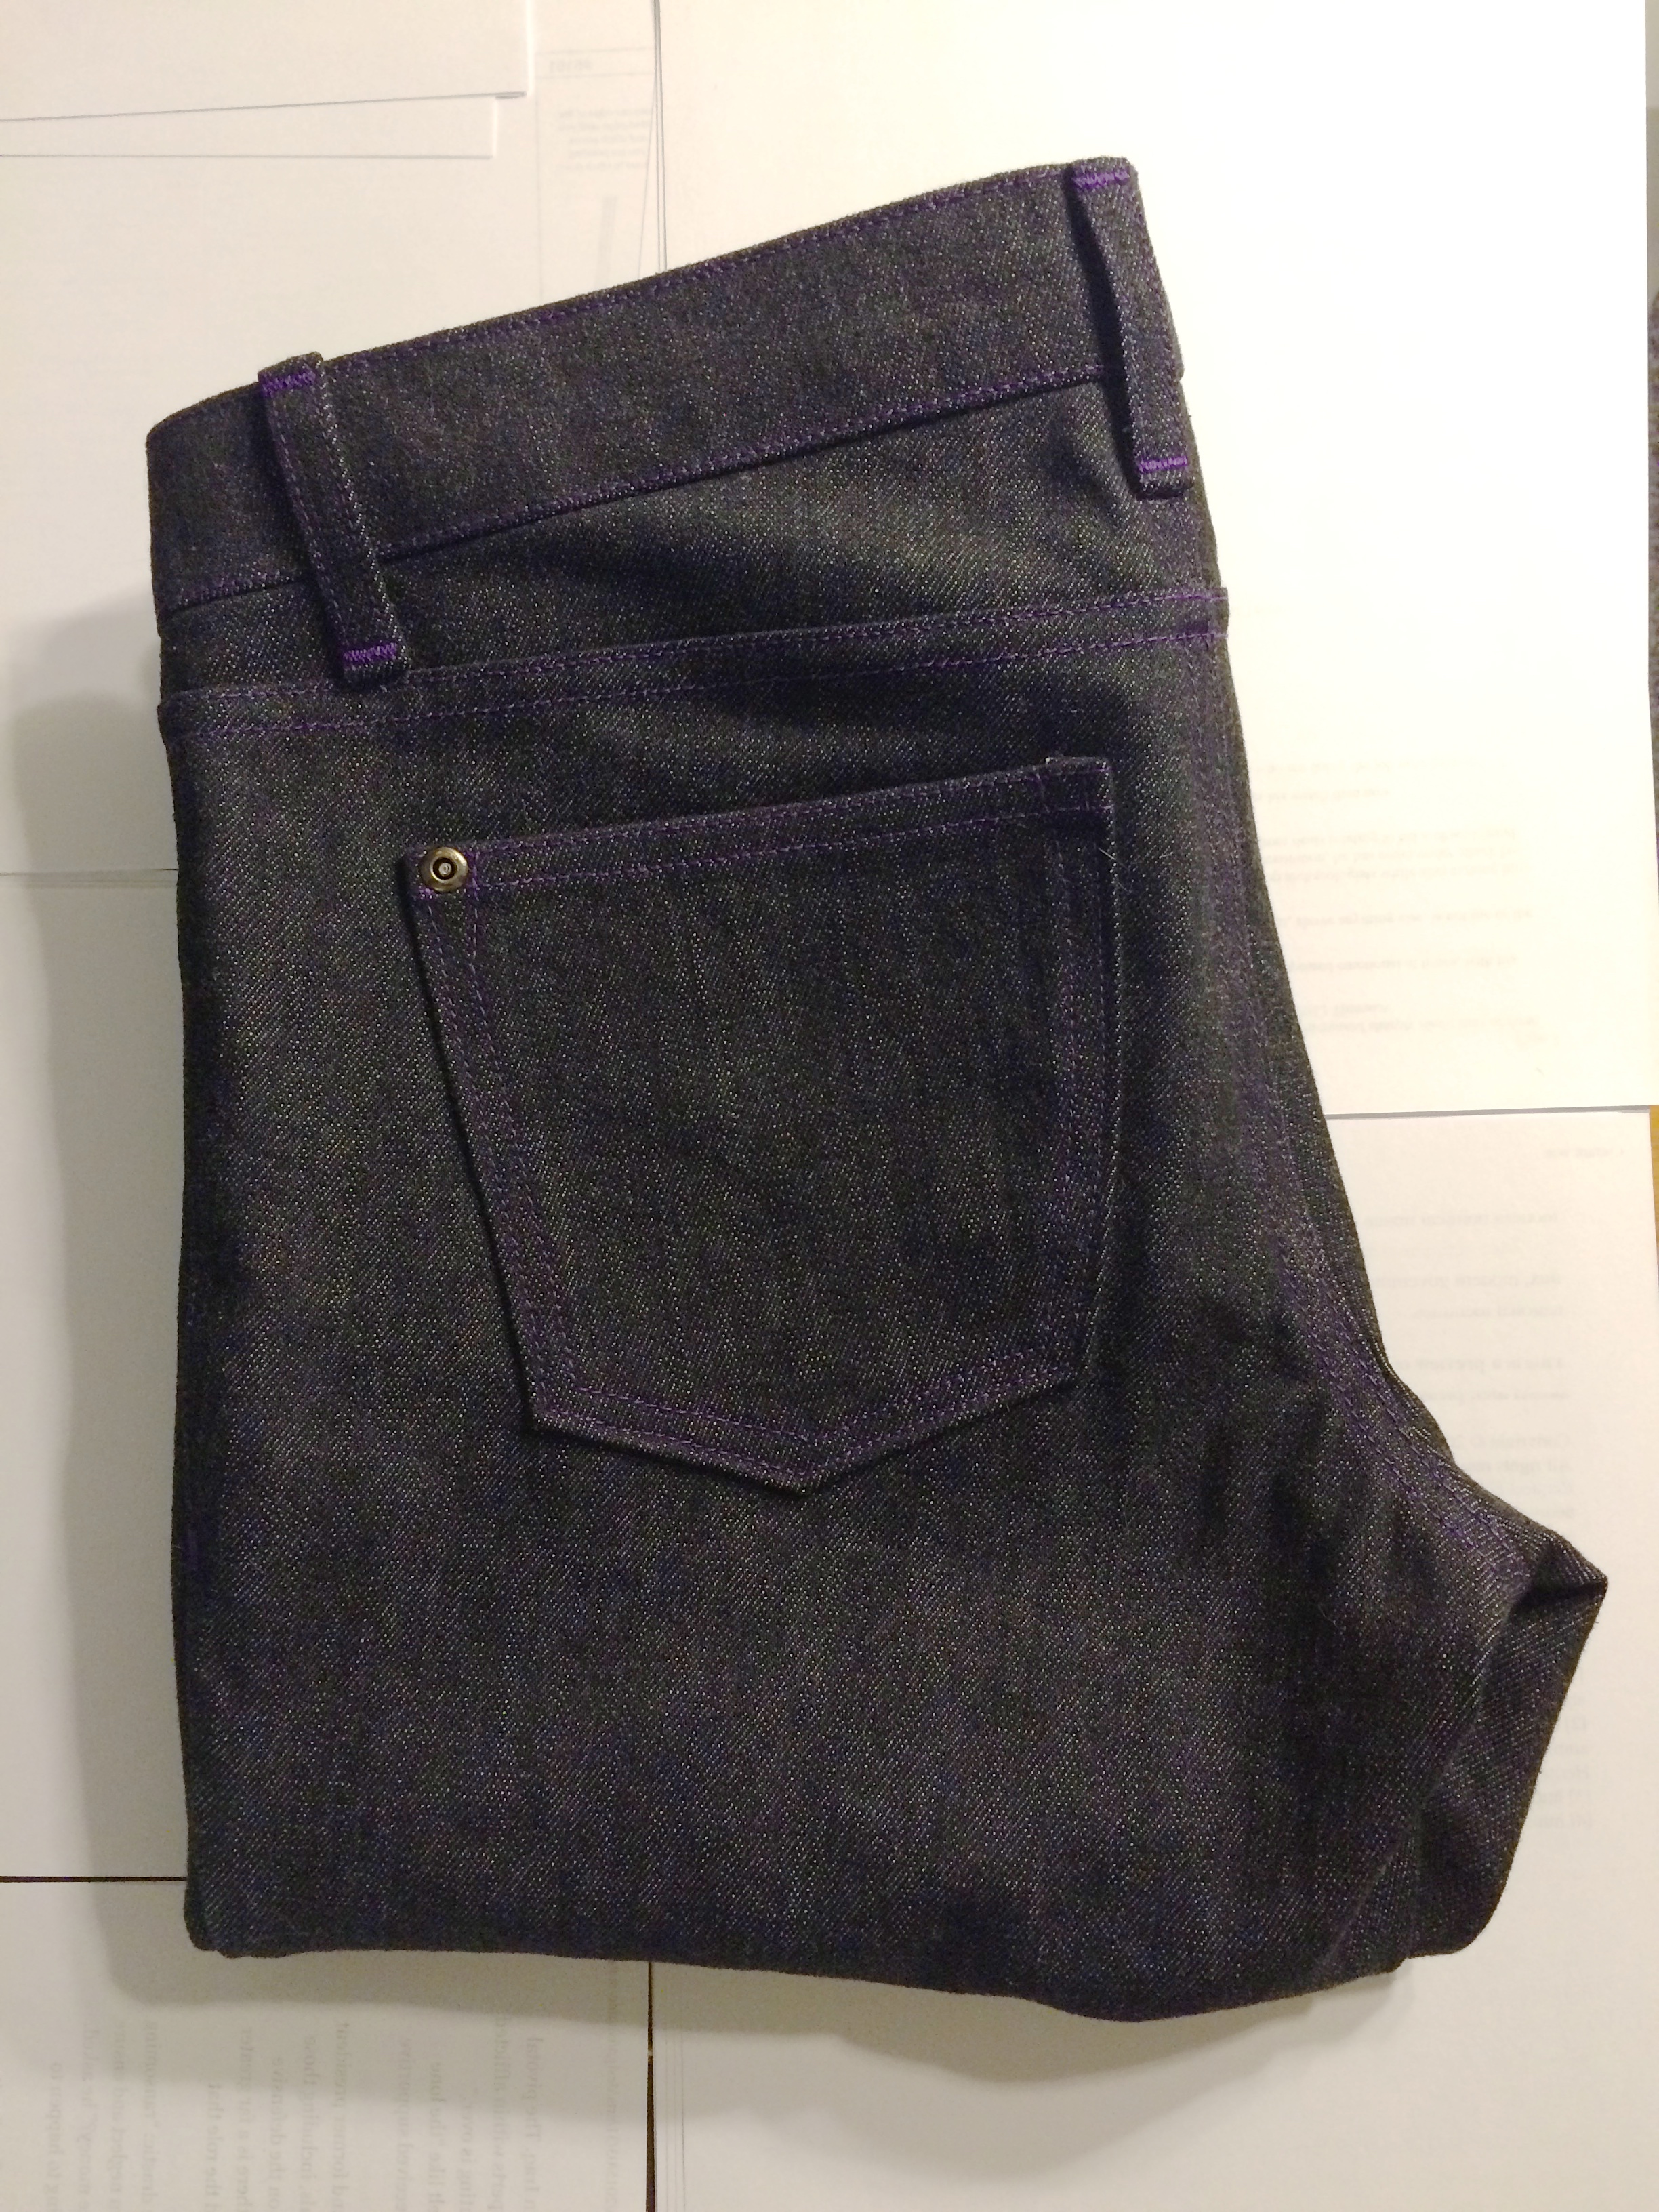
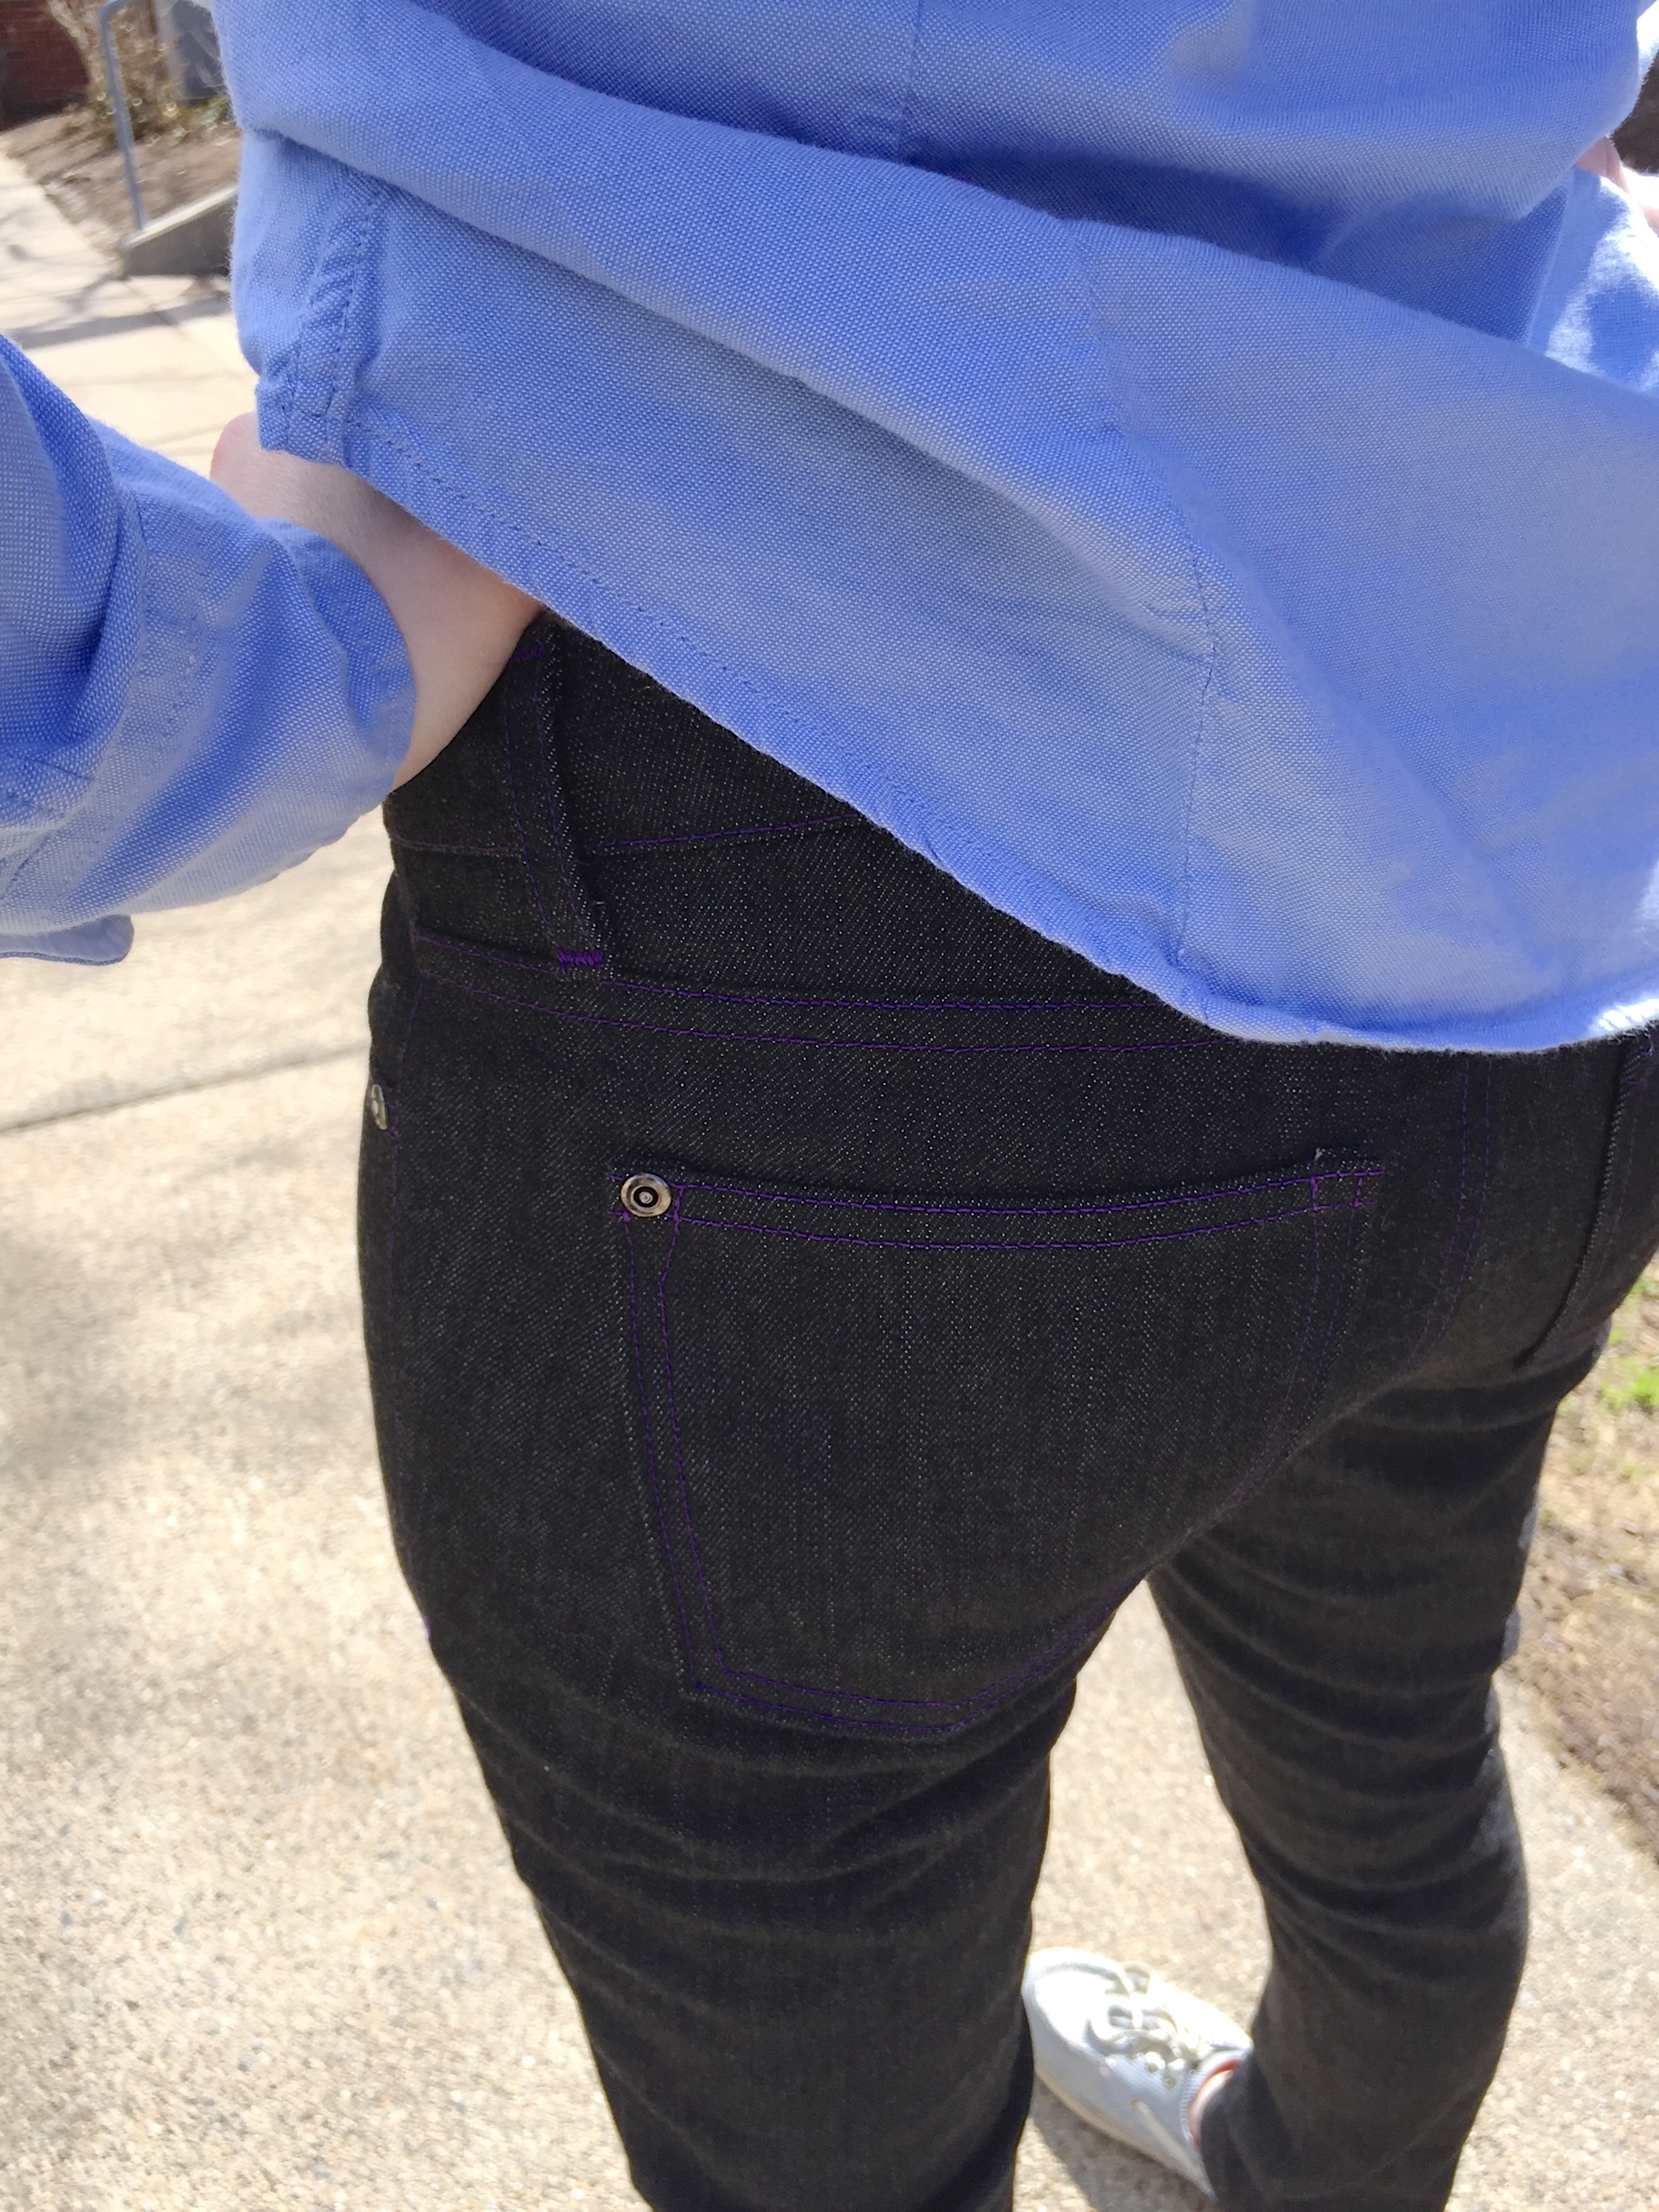
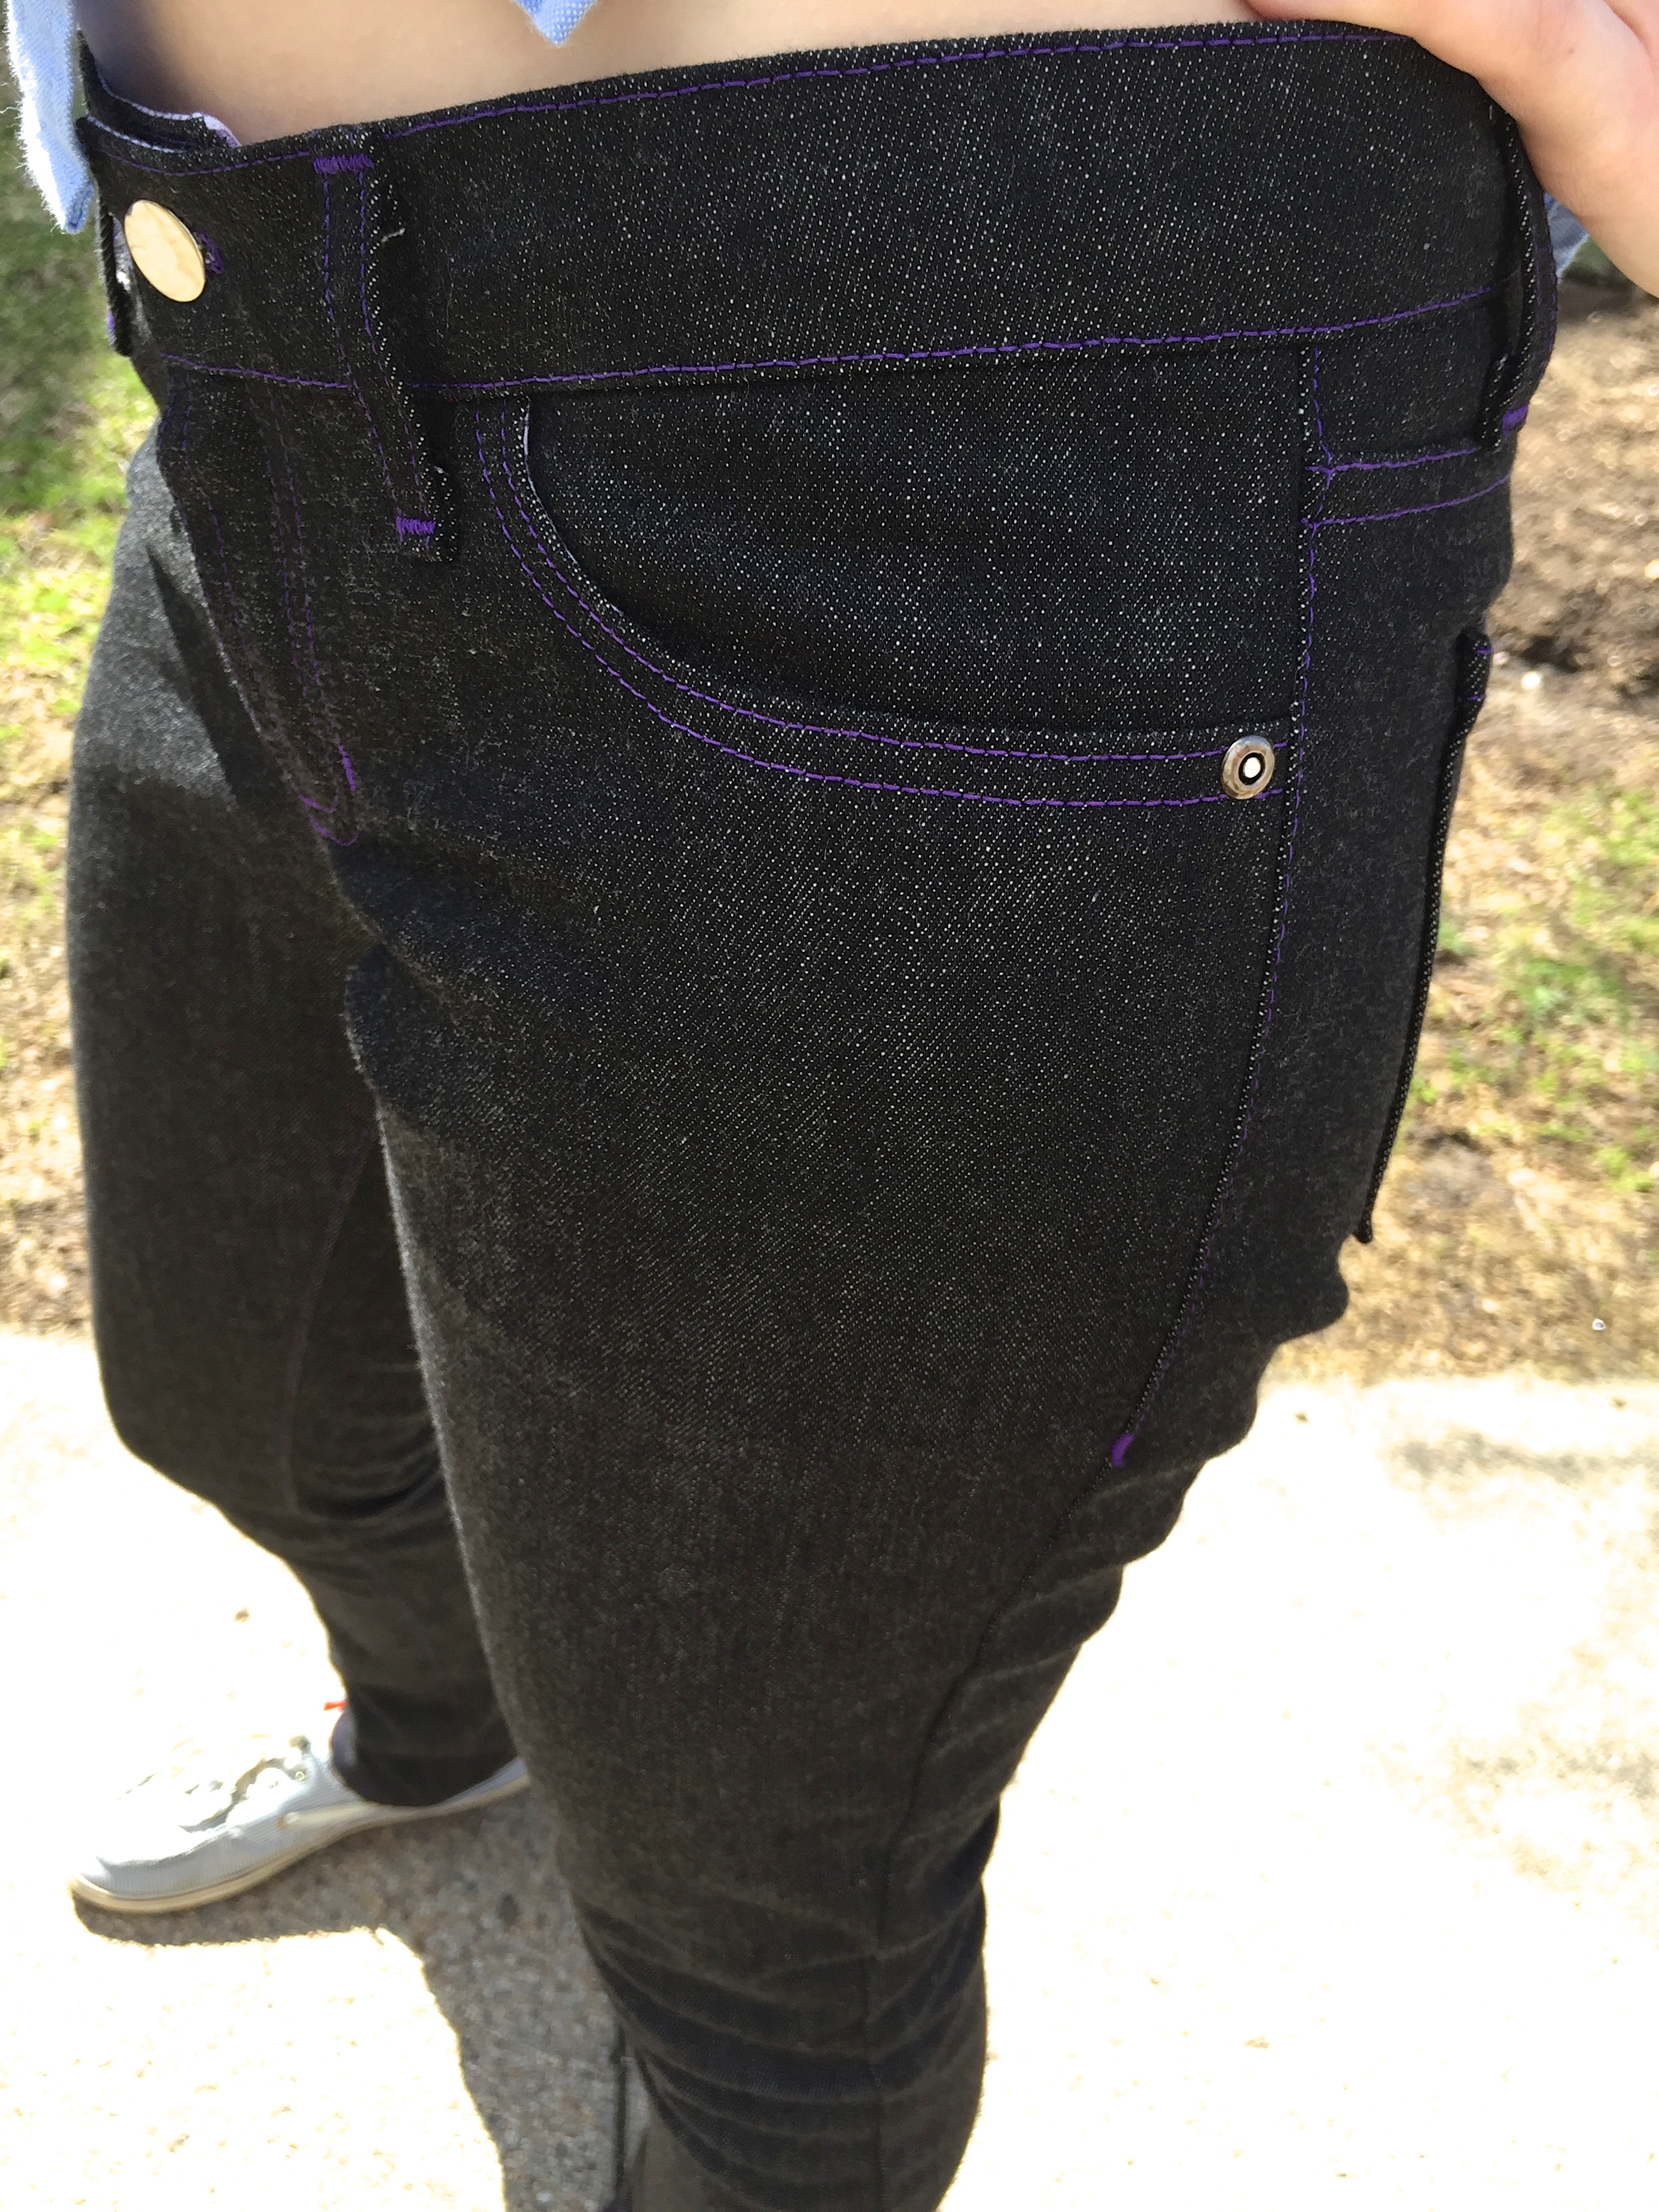
I think I have to give all of the credit for my good topstitching to my Jean-a-ma-jig which I used whenever I was stitching over other seams. You just place it under the back of your presser foot as you’re coming up to a particularly bulky area and it helps you maintain an even stitch length as you make your way across the bulk. I also used a little makeshift one that was just a folded over square of denim. I used that for the start of topstitched seams where I was just going to be sewing on a couple layers of denim. It helped me get a nice even start.

IMG_1950

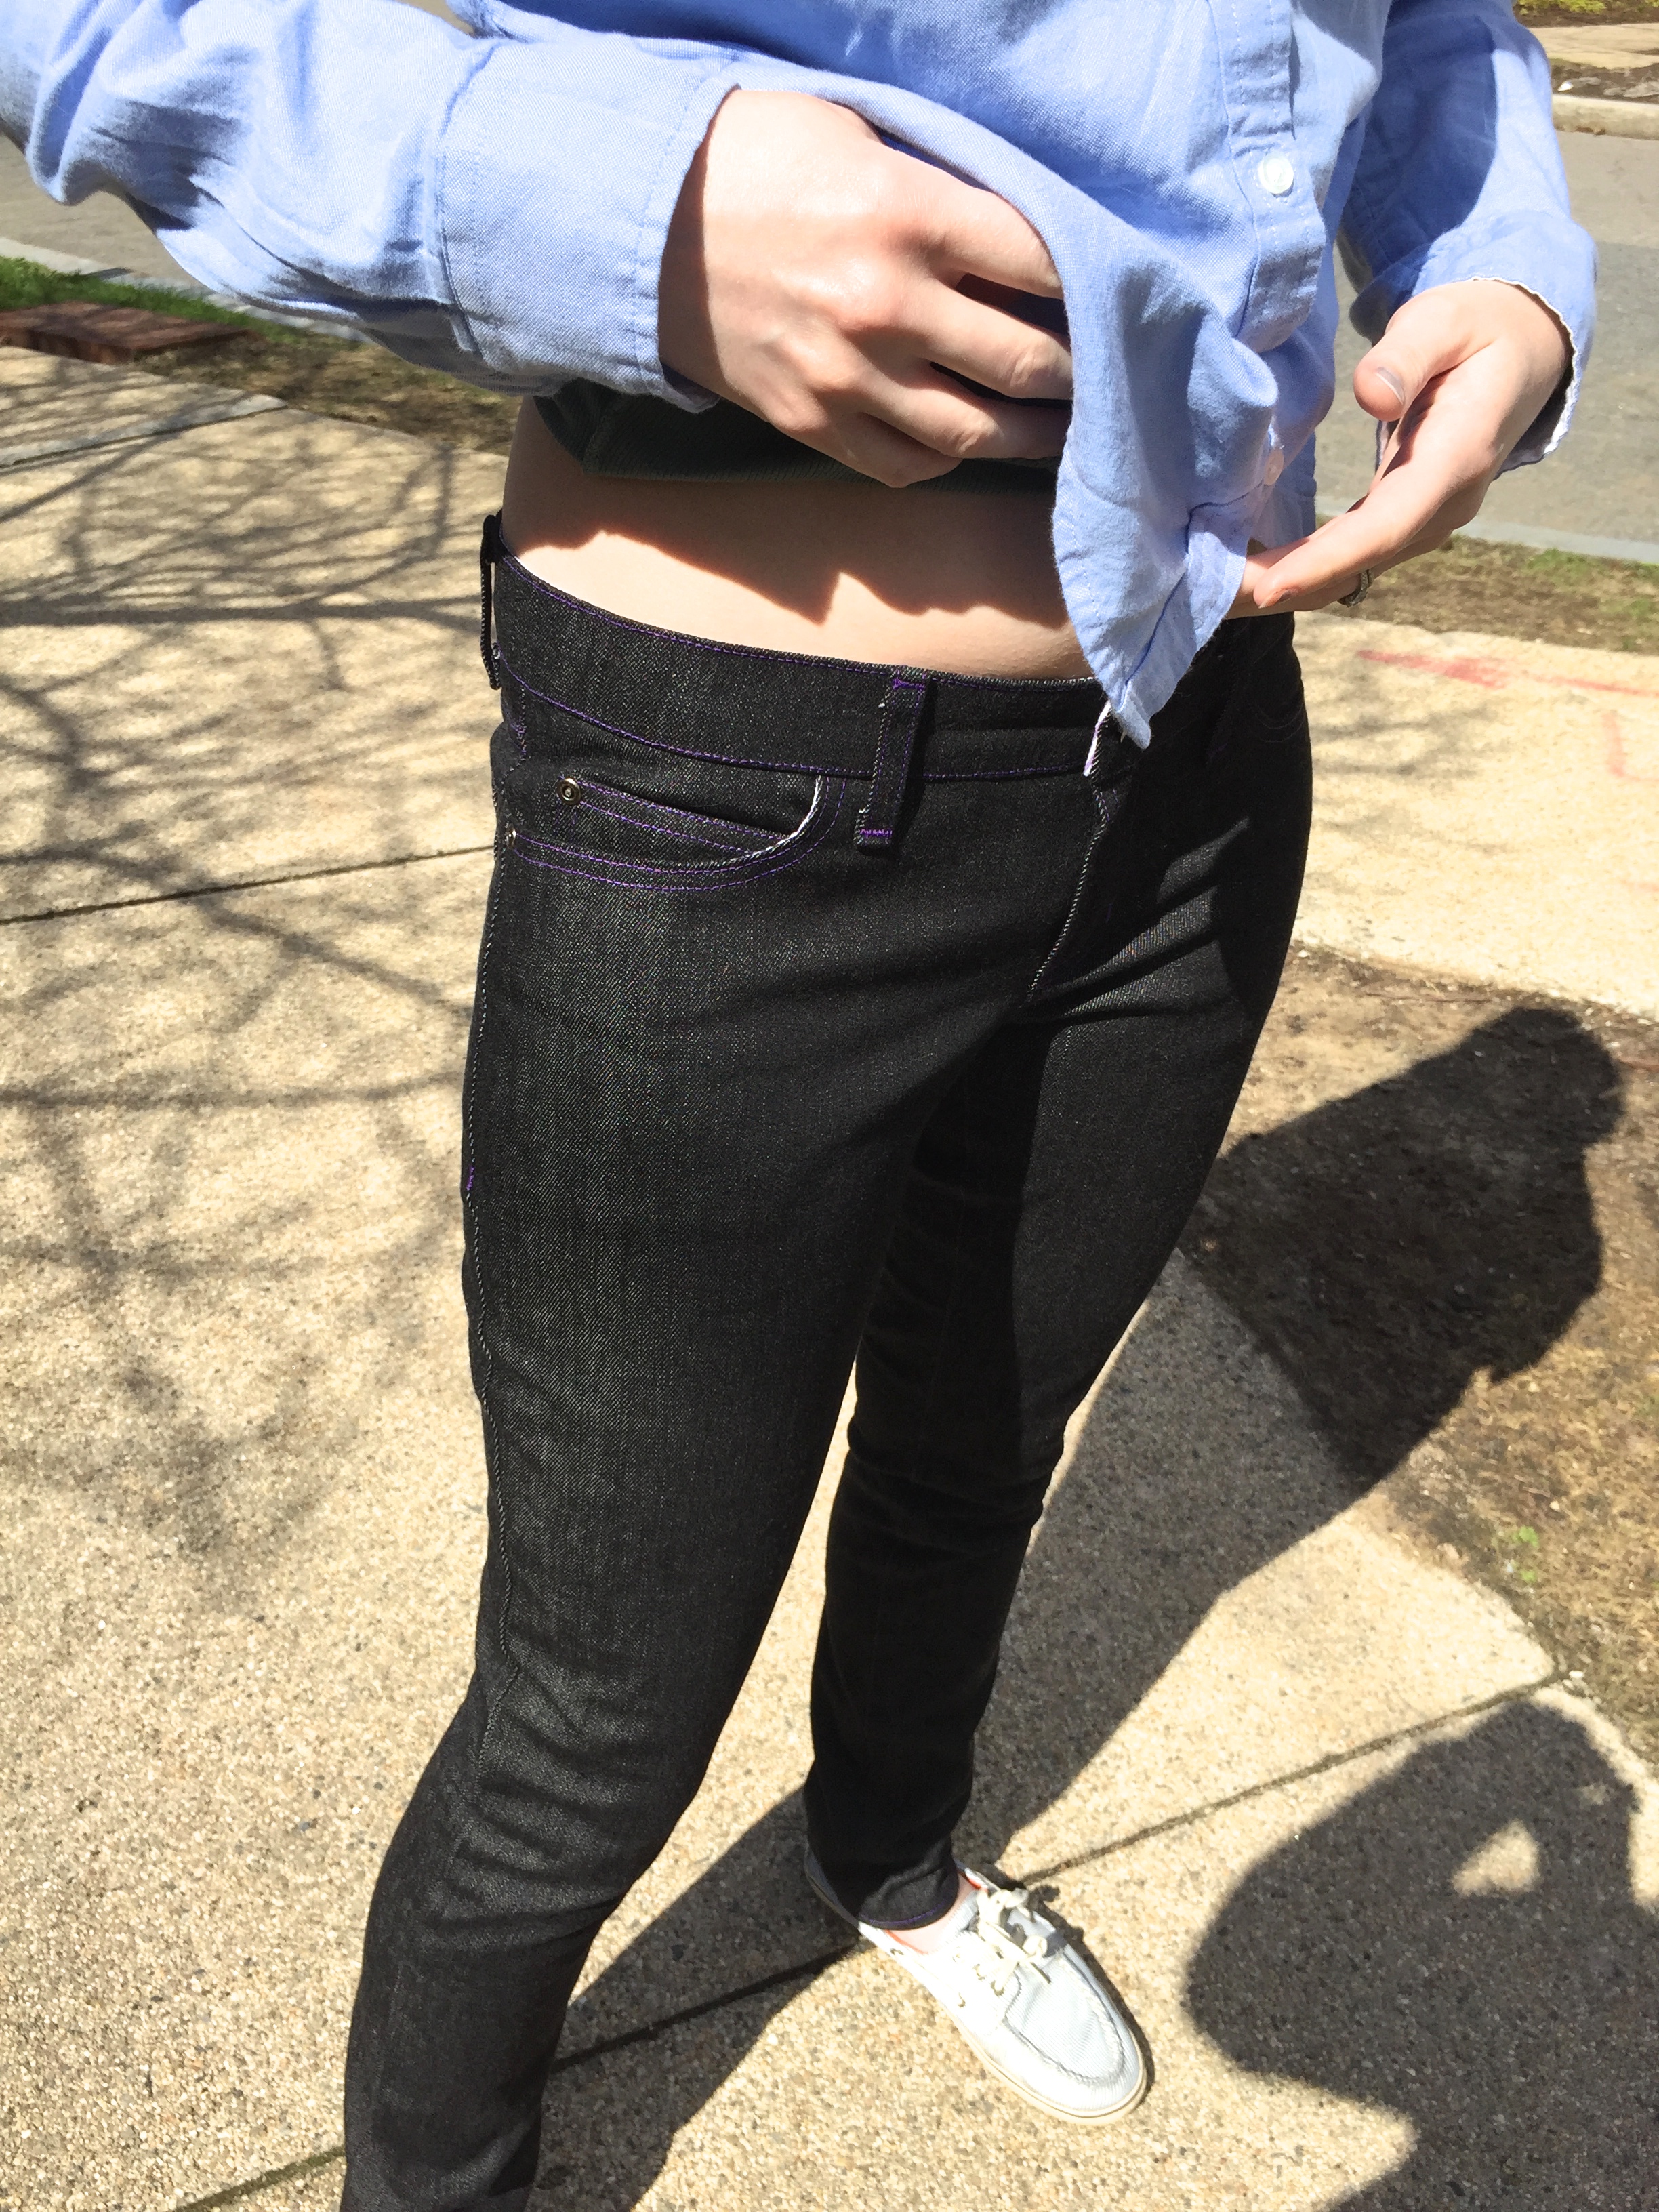
I don’t think there’s much to say about fit that I haven’t already mentioned here. When I decided to make these I knew that I wanted the lower waist of one version with the skinny legs of the other. I couldn’t begin to explain why I thought that it made sense to try to skinny out the legs of the lower waist version instead of just lowering the waist of the skinny version. But that’s what I’d decided to do. In my muslin I took out 3/4 of an inch on the side seam and inseam of each front and back leg. This result in having to cut my muslin at the knees because they were SO tight in the calves. When I cut out my denim, I added back 1/2 an inch to the side seams and inseam. Then I basted those seams to check fit.

IMG_1976

I could certainly have left them the way they were, but I really did want skinnier legs so I took out 1/8 of an inch on the side and inseams when I sewed those seams permanently. I could probably have gotten away with more, but I think they look good. Next time around, and believe me there will be a next time, I will try lowering the waist on the skinny version instead of messing with the leg width.

IMG_1959

There are a couple other places I will want to focus on next time. I think I could still take out a tiny bit more length. Probably just another 1/2 inch at the knees. They’re also feeling a bit big from the crotch up. I think they’ve stretched at bit, which makes sense, it’s stretch denim, and I might even be able to get away with a smaller size. If I stick with the same size next time I’ll need to take a chunk out at the center back seam and take out some extra fabric around the crotch too.

IMG_1954

Other than the tweaks I’ve mentioned I sewed these up just as the pattern calls for. I was expecting to find the switching back and forth between regular thread and topstitching thread to really drive me nuts but it wasn’t that bad. I did my best to break some of the construction sequence rules so that I was doing everything I could with whatever thread I had in the machine before switching. Other than that they were sewn up as prescribed.

IMG_1993

My one and only frustration with these was the rivets and button. I’d picked up the jeans notions kit from Thread Theory because Heather recommended it in her supply round up. I was happy with the zipper, and the rivets were okay, but the button in that kit and I are not friends. I think the problem is actually with the pin that you hammer into the button. I’ve done some research on this in the last few days and many of the other buttons I’ve found come with pins that have several ridges on them that catch inside the button to secure it. The pins that come with the kit only have one, very slight ridge on them. The result was trying both of the buttons from both of the kits I’d bought and neither of them working. The first one seemed to catch but then pulled off and bent when we tried to get it back on. The second one just never caught. I went ahead and bought new buttons from Pacific Trimming. They got here very quickly, and went on easily.

IMG_1979

Other than the button nonsense, these were such a fun and satisfying make. If you’d told me even six months ago that I would make jeans and there would be no crying involved I would’ve told you to cut the crap. I know that my sewing has improved a lot in the last year but there’s something about finishing these jeans that makes me feel able to try anything!

I can’t wait to wear these all over the place and start planning some new pairs too. I’m thinking they probably need to happen in corduroy this fall. What do you think?

Details:

Pattern: Ginger Jeans by Closet Case Files

Fabric: Theory Denim from Mood Fabrics

-Hannah

New Pursuits

I missed an internet highlights post last week because I’ve been off work, hanging out at home. And believe it or not, I’ve been spending more time getting some sewing done than I have been looking at sewing or making that I could be doing. Shocking? Yes. But bound to happen some day. I’ll be back in the next couple days with pictures and info about some of the other projects I’ve been working on. I think I’m just about done with my Natalie…finally. I still need to write up the Sutton blouse I finished weeks ago. I’ve almost finished a Julia cardigan and gotten started on a wearable muslin of a popover version of Archer. And I’ll have a whole post and review of the Felicity dress pattern. Whew!! That’s a lot of sewing progress!

But for now, here are the newer things I’m thinking about. I was poking around on instagram and came across Dropcloth Samplers and had to immediately snatch up one of the Original Samplers off of Etsy. Look at this thing, it’s beautiful!

The Original Sampler from Dropcloth Sampler

So that’s on it’s way. Hopefully I’ll have a chance to grab some embroidery thread and a hoop before it arrives because I really want to start on this. There are so many things about sewing that I absolutely love but one thing that has really bugged me about making the switch over from knitting to sewing is that I can’t bring my sewing machine everywhere. (I know I could just keep up some knitting projects so I have something portable. I can’t seem to keep both going at the same time though.) For some reason I’ve felt entirely disinterested in embroidery until very recently, even though it’s something I’ve done previously.

When I first learned to sew, back when I was a kid and spent a lot of time with my grandmother, embroidery was generally my sewing project of choice. My grandmother spent her time between high school and when she got married going to trade school and working in downtown Boston as a seamstress, working on wedding dresses. She continued after she got married making some of her own clothes, doing alterations for the family, quilting, embroidering, etc. She taught me, very early, with that crazy plastic grid canvas. At some point she moved me over from that lovely combo of acrylic yarn/plastic darning needle/plastic canvas to real embroidery. I’m not sure that I finished very many projects but I definitely started lots of things (and man did I love collecting ALL THE EMBROIDERY FLOSS!!)

This hobby fell by the wayside but I’m super excited to be giving it another try.

The other thing I’ve got floating around is an interest in pattern drafting. I know, I know. When I started this blog I said I wasn’t interested in making my own patterns. And now I’ve only been at this blog thingy for six weeks and I’ve already changed my mind. I’m not preparing to throw my patterns away and say I’m only making self-drafted things from now on. No way. But I came across this class over on Creativebug and I’ve started watching. I’m pretty excited about at least creating some basic forms and using them to help me alter the patterns I’ve already purchased, if only to work on really fitting them well. I’m not going to suggest that there’s no way I couldn’t come up with some new pattern shapes to offer the world but right now I’m feeling like indie sewing pattern world is serving me very well. I’m mostly interested in learning how patterns come together so that I can alter the patterns I’ve got in a more professional, and effective, way.

So those are my new ways to pass the time. I’ve got a couple more spring projects to finish up. Maybe spring is refusing to arrive in Boston because I haven’t finished my Ginger jeans. Guess I should get on that. I’ve already started planning my summer sewing list, I’ll let you know those details soon!!

-Hannah

Helpful Links for Upcoming Projects

I’ve been totally lacking in free time at home recently so I haven’t made as much progress as I’d like on the projects I’ve outlined. But I have been spending some time (at work and commuting to and from work) looking out for tips and tricks that will help me customize projects. Things like different pockets for my Archer, in whatever form it may take and petite adjustments for my Ginger jeans.

I’m also swimming in ideas for customizing my Minoru jacket. Sewing this jacket will certainly be the most involved project I’ve taken on so far and perhaps I shouldn’t be using that as the reason to pull out all the bells and whistles. But instead I’m feeling like, if I’m going to tackle a big project and put so much time and energy into it, it might as well be a jacket that has all the details I’m looking for. I’ll be making a muslin to check fit, and the construction doesn’t really involve that many things I haven’t done before. So I’m going big. I still haven’t decided on inseam pockets vs patch pockets vs welt pockets. I’ve been contemplating replacing the neck gathering with pleats or darts, and I think I’m definitely going to be adding a fifth placket piece to lay under the zipper and keep the cold zipper from my skin and the top of it from rubbing uncomfortably against my chin.

I’ve also just generally been lurking on the sew-along pages for all of the projects I’ve got planned. The Minoru, Archer, and Ginger sew-alongs are all over so I’m really just using those as tips. But the Felicity Dress sew-along is just getting started and I’m hoping to actually participate in that. She’s planning a pretty long sew-along schedule so I may end up finishing early but I enjoy the detailed instructions that come with this sort of thing.