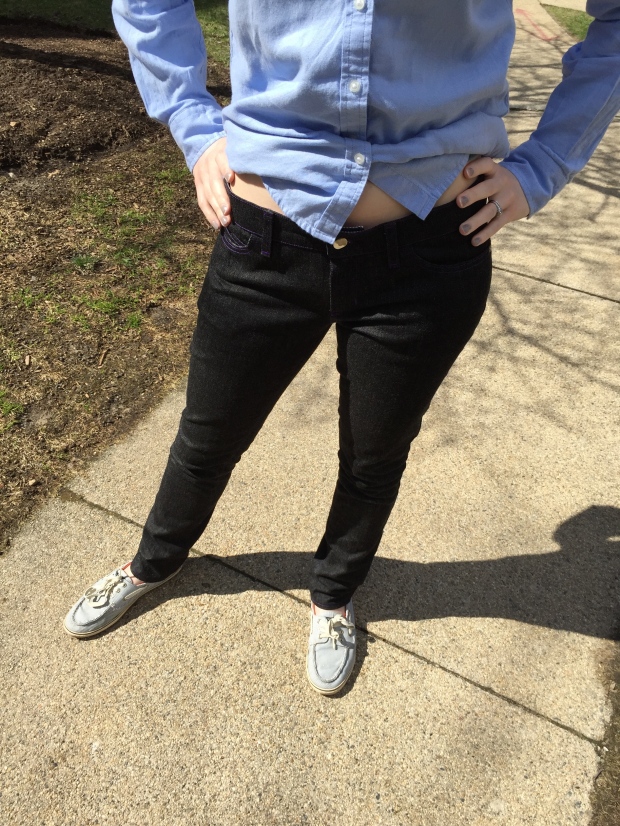
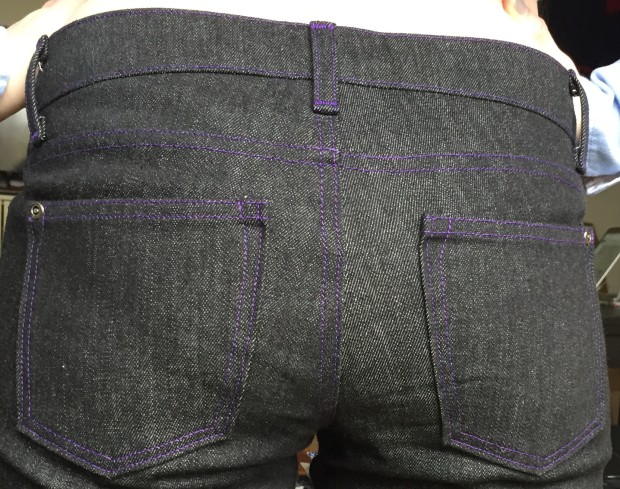
(Caution: What follows can only be described as full on gloating, unabashed pride, and a complete lack of modesty when it comes to any compliments. I apologize in advance but I am just so stinking proud. Have you seen these things? They’re badass.)
Well hot diggity dog! Or as the beloved namer of the blog would say, “Hot dog, hot dog, hot dog, diggiyah dog!”
I made jeans!
Not just that…I made wearable jeans!!
I’d like to take some of the credit and say that perhaps I’m a better seamstress than I thought but I think mostly Heather just wrote a really amazing pattern because these turned out so well. It took me a long time to actually get started on my Ginger Jeans because I was so worried about how they were going to turn out. It’s been five weeks since I made my (successful) muslin and three weeks since I got everything cut out and prepped.
Do you ever have that happen to you with a sewing project? You’ve read the pattern, cut out the fabric, you’re really excited about the idea of the finished product. But you’re just not sure your technical ability is up to the task? My biggest concern was how my topstitching and finishing skills would hold up on the denim. The places on my previous makes where I’ve been the least impressed with my skills have been topstitching and finishing in particularly bulky areas. I was also worried about fit, of course. Other than a couple pairs of Hudson Pants made around Christmas time last year, I’ve never made pants so I was anxious about how well they’d fit, even though I made a muslin.
Heather nailed this pattern though, and that’s evident not just from how well I think my jeans came out, but also from the enormous number of glowing reviews of this pattern and the number of fantastic Ginger-clad butt selfies running around on Instagram.
All in all, I was surprised by how easily these came together. I’d made a full muslin version several weeks ago, I’m pretty sure the only things I skipped were some topstitching and the hem, so it was basically my second time putting them together. Still, I was pleasantly surprised by how quickly it went. Probably 15-20 hours over the course of 3 days. Maybe that’s a long time, but I’m trying to get myself to slow down and do everything well. And I think it shows. (See above caution about lack of modesty.)
I think I have to give all of the credit for my good topstitching to my Jean-a-ma-jig which I used whenever I was stitching over other seams. You just place it under the back of your presser foot as you’re coming up to a particularly bulky area and it helps you maintain an even stitch length as you make your way across the bulk. I also used a little makeshift one that was just a folded over square of denim. I used that for the start of topstitched seams where I was just going to be sewing on a couple layers of denim. It helped me get a nice even start.
I don’t think there’s much to say about fit that I haven’t already mentioned here. When I decided to make these I knew that I wanted the lower waist of one version with the skinny legs of the other. I couldn’t begin to explain why I thought that it made sense to try to skinny out the legs of the lower waist version instead of just lowering the waist of the skinny version. But that’s what I’d decided to do. In my muslin I took out 3/4 of an inch on the side seam and inseam of each front and back leg. This result in having to cut my muslin at the knees because they were SO tight in the calves. When I cut out my denim, I added back 1/2 an inch to the side seams and inseam. Then I basted those seams to check fit.
I could certainly have left them the way they were, but I really did want skinnier legs so I took out 1/8 of an inch on the side and inseams when I sewed those seams permanently. I could probably have gotten away with more, but I think they look good. Next time around, and believe me there will be a next time, I will try lowering the waist on the skinny version instead of messing with the leg width.
There are a couple other places I will want to focus on next time. I think I could still take out a tiny bit more length. Probably just another 1/2 inch at the knees. They’re also feeling a bit big from the crotch up. I think they’ve stretched at bit, which makes sense, it’s stretch denim, and I might even be able to get away with a smaller size. If I stick with the same size next time I’ll need to take a chunk out at the center back seam and take out some extra fabric around the crotch too.
Other than the tweaks I’ve mentioned I sewed these up just as the pattern calls for. I was expecting to find the switching back and forth between regular thread and topstitching thread to really drive me nuts but it wasn’t that bad. I did my best to break some of the construction sequence rules so that I was doing everything I could with whatever thread I had in the machine before switching. Other than that they were sewn up as prescribed.
My one and only frustration with these was the rivets and button. I’d picked up the jeans notions kit from Thread Theory because Heather recommended it in her supply round up. I was happy with the zipper, and the rivets were okay, but the button in that kit and I are not friends. I think the problem is actually with the pin that you hammer into the button. I’ve done some research on this in the last few days and many of the other buttons I’ve found come with pins that have several ridges on them that catch inside the button to secure it. The pins that come with the kit only have one, very slight ridge on them. The result was trying both of the buttons from both of the kits I’d bought and neither of them working. The first one seemed to catch but then pulled off and bent when we tried to get it back on. The second one just never caught. I went ahead and bought new buttons from Pacific Trimming. They got here very quickly, and went on easily.
Other than the button nonsense, these were such a fun and satisfying make. If you’d told me even six months ago that I would make jeans and there would be no crying involved I would’ve told you to cut the crap. I know that my sewing has improved a lot in the last year but there’s something about finishing these jeans that makes me feel able to try anything!
I can’t wait to wear these all over the place and start planning some new pairs too. I’m thinking they probably need to happen in corduroy this fall. What do you think?
Details:
Pattern: Ginger Jeans by Closet Case Files
Fabric: Theory Denim from Mood Fabrics
-Hannah


Great jeans with a great fit!
LikeLike
Dude!! These look amazing! That topstitching is out of this world – and the fit looks amazing. You definitely need to make more pairs, and I think cords would be awesome too!
LikeLike
Thank you! The pairs you’re working on right now are amazing, I love those colors.
LikeLike